BSS Instagram Feed
Created on: Nov 16, 2026
PRE-REQUISITES
-
The plugin requires you to install the BSS Core plugin first.
INSTALLATION
-
Go to the Order Details Page and Download plugin package
-
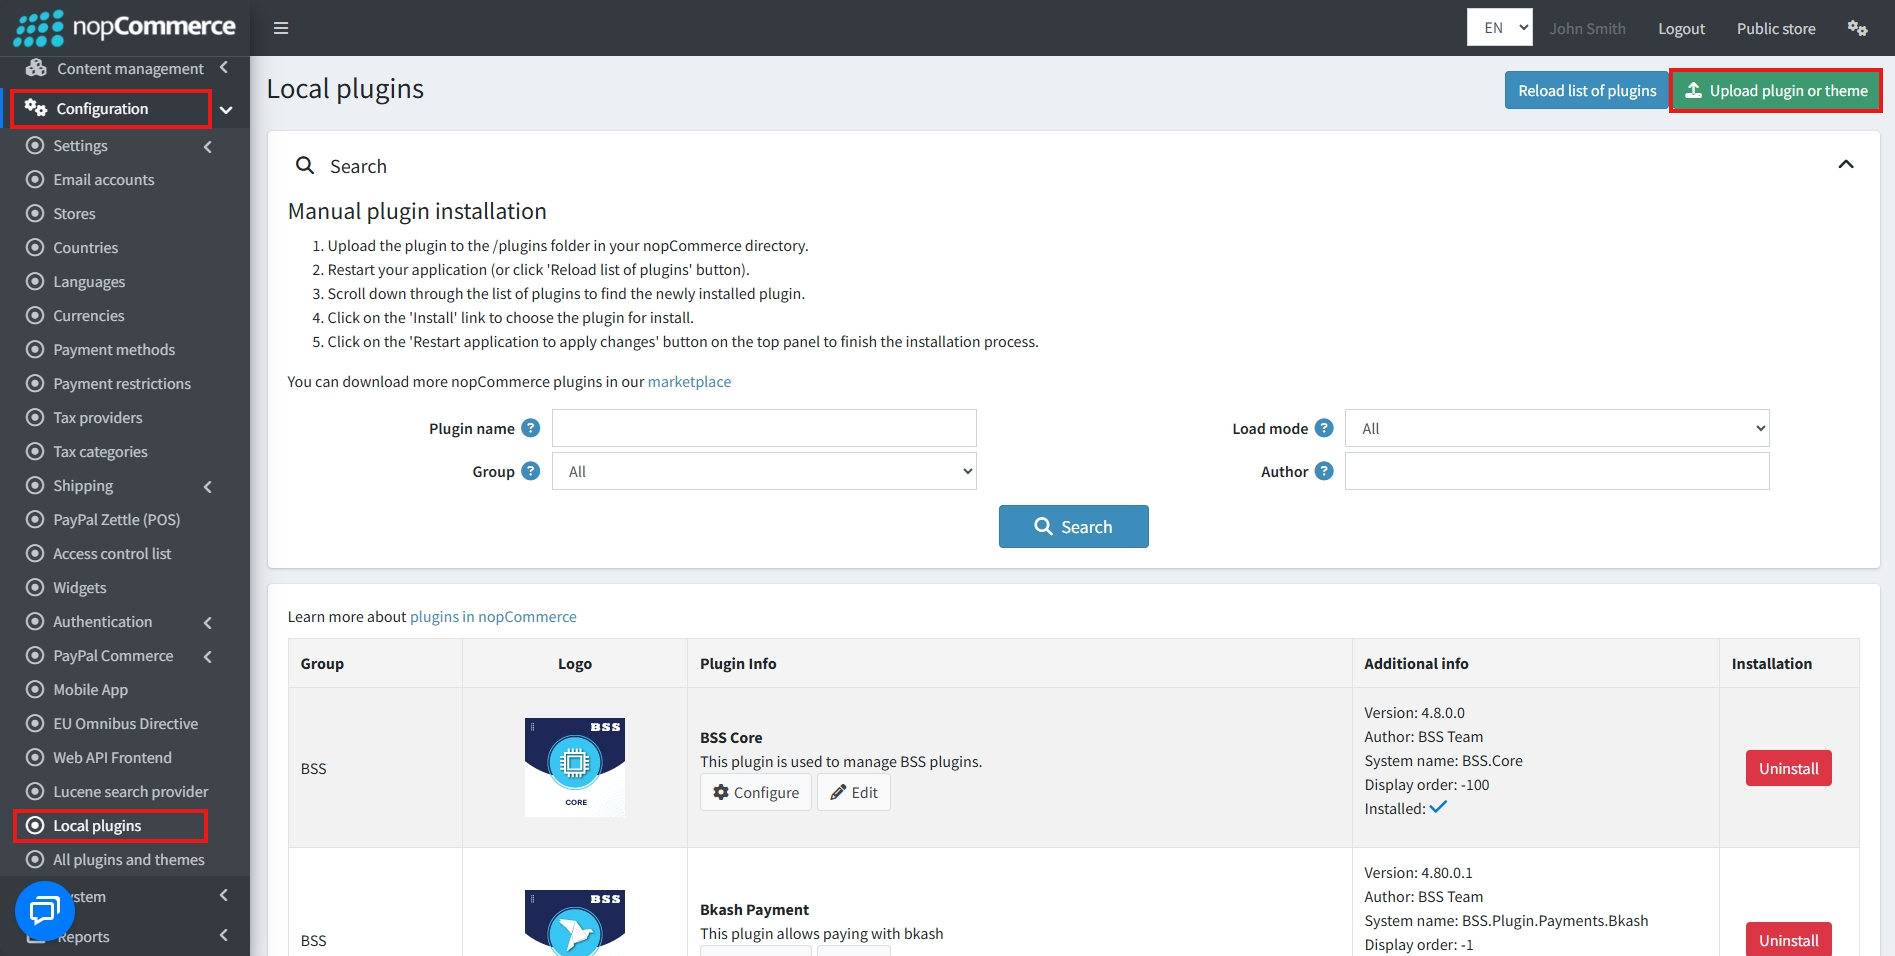
Go to Administration → Configuration → Local plugins
-
Within the bundle, you get all the required files, including BSS.Core
-
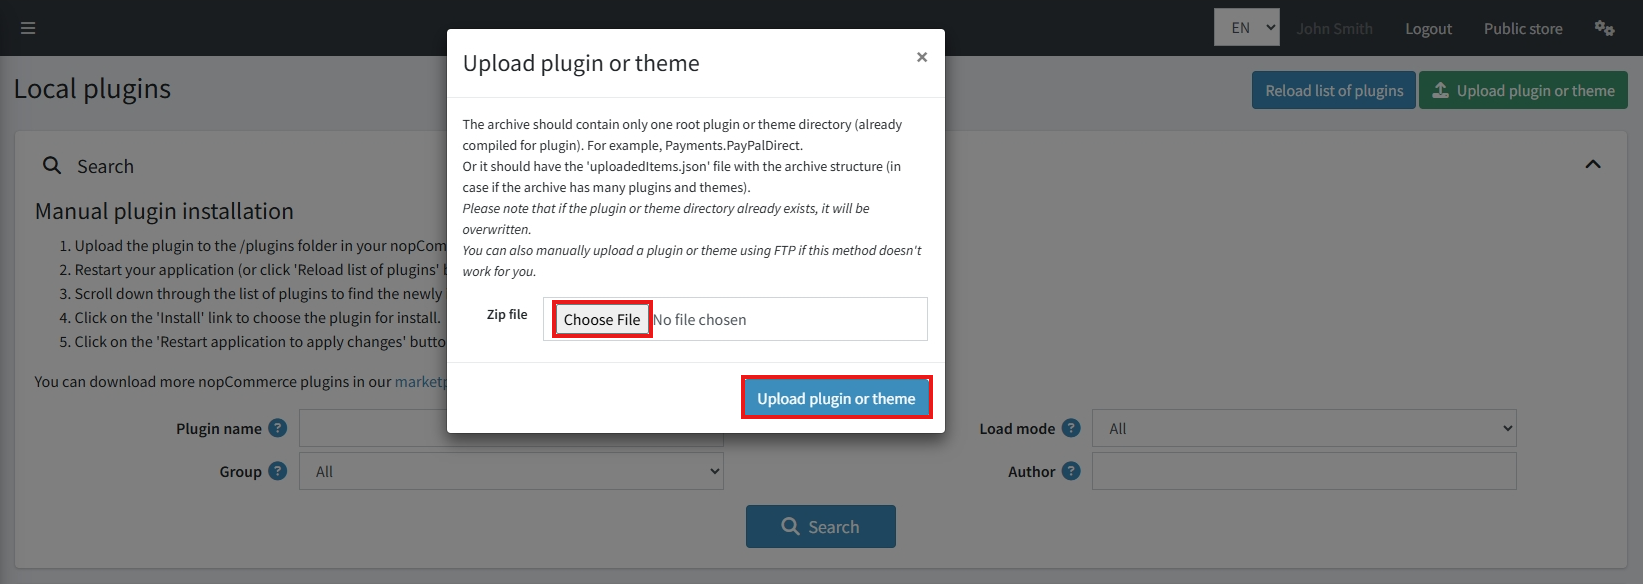
Upload the zip files using the ‘Upload plugin or theme’ button
-
After uploading, install the ‘BSS Core’ Plugin first.
-
Then scroll down or write the name of the plugin in the search bar to find and install ‘BSS Instagram Feed’
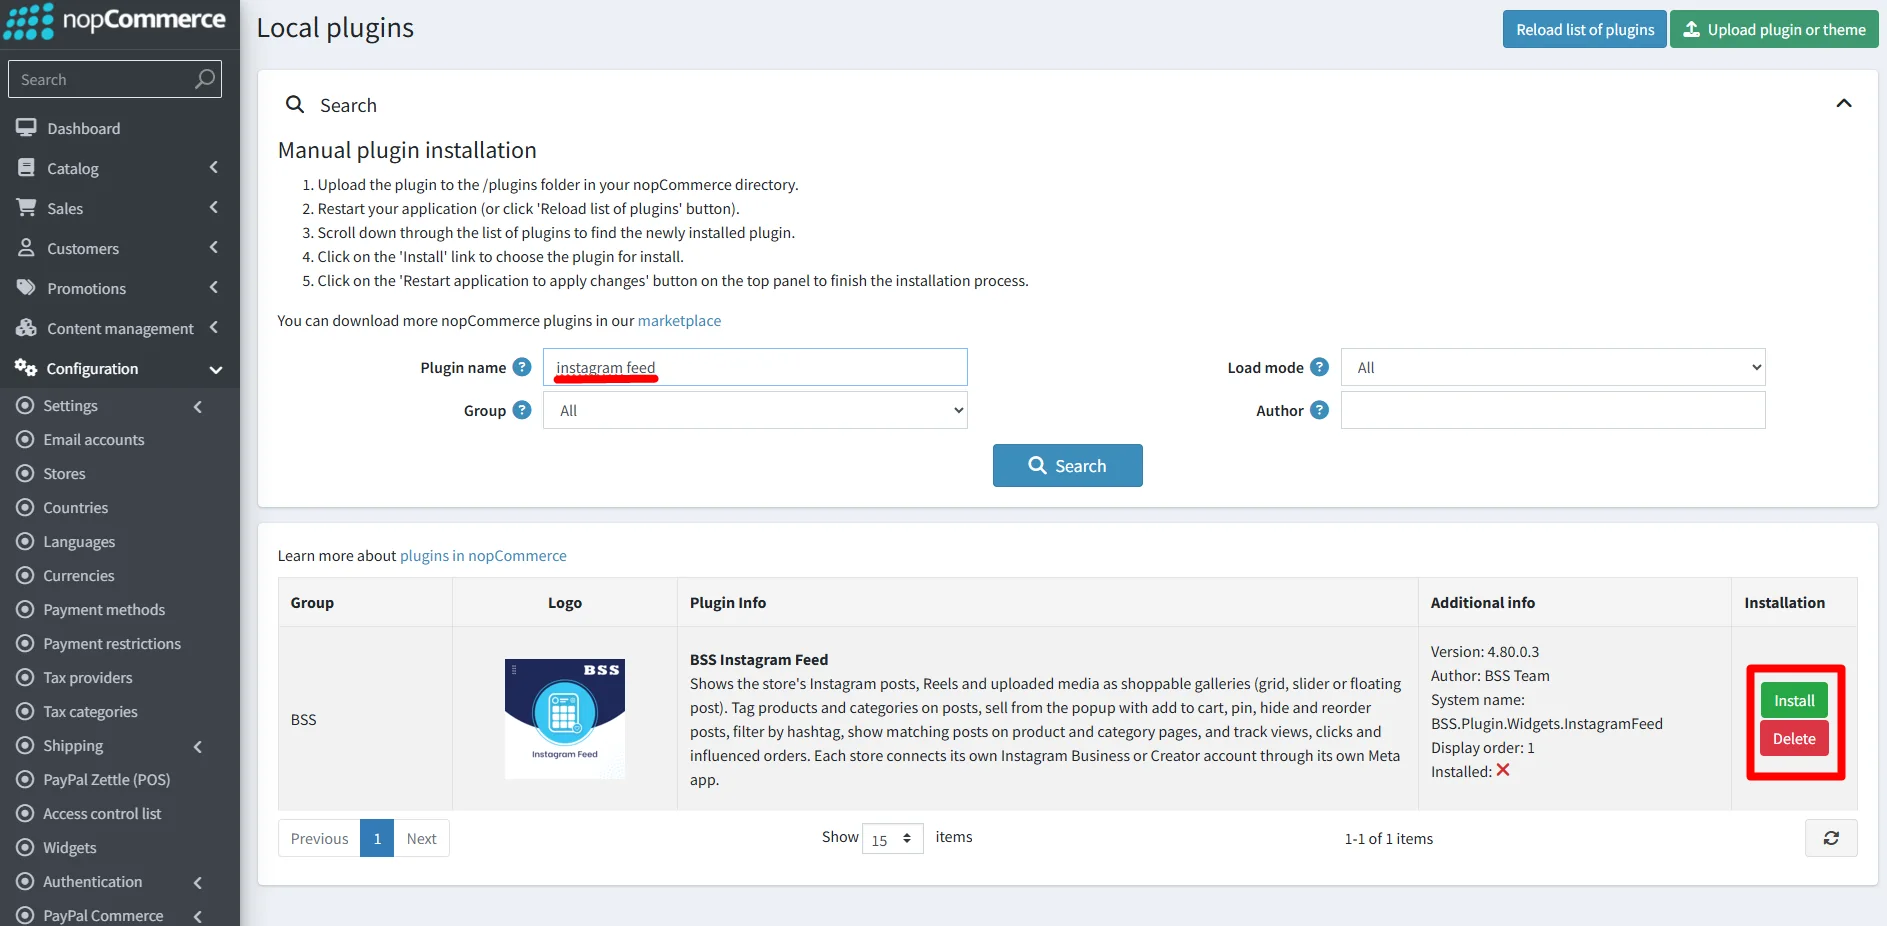
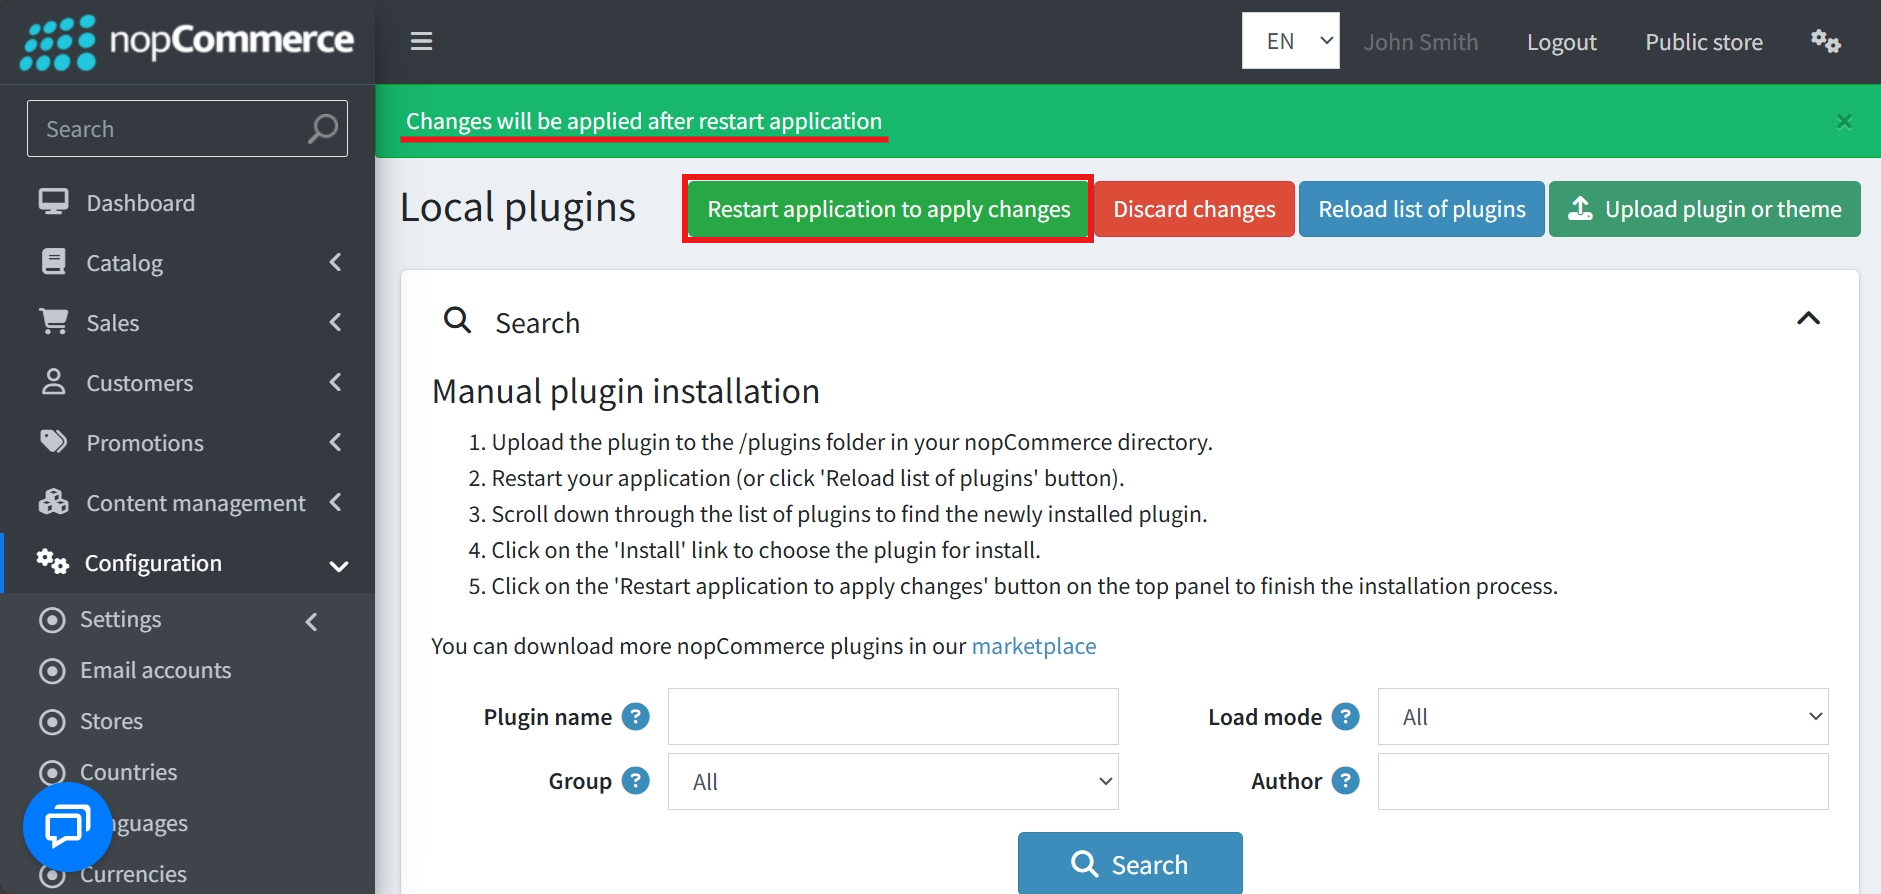
- To make the plugins functional, restart the application
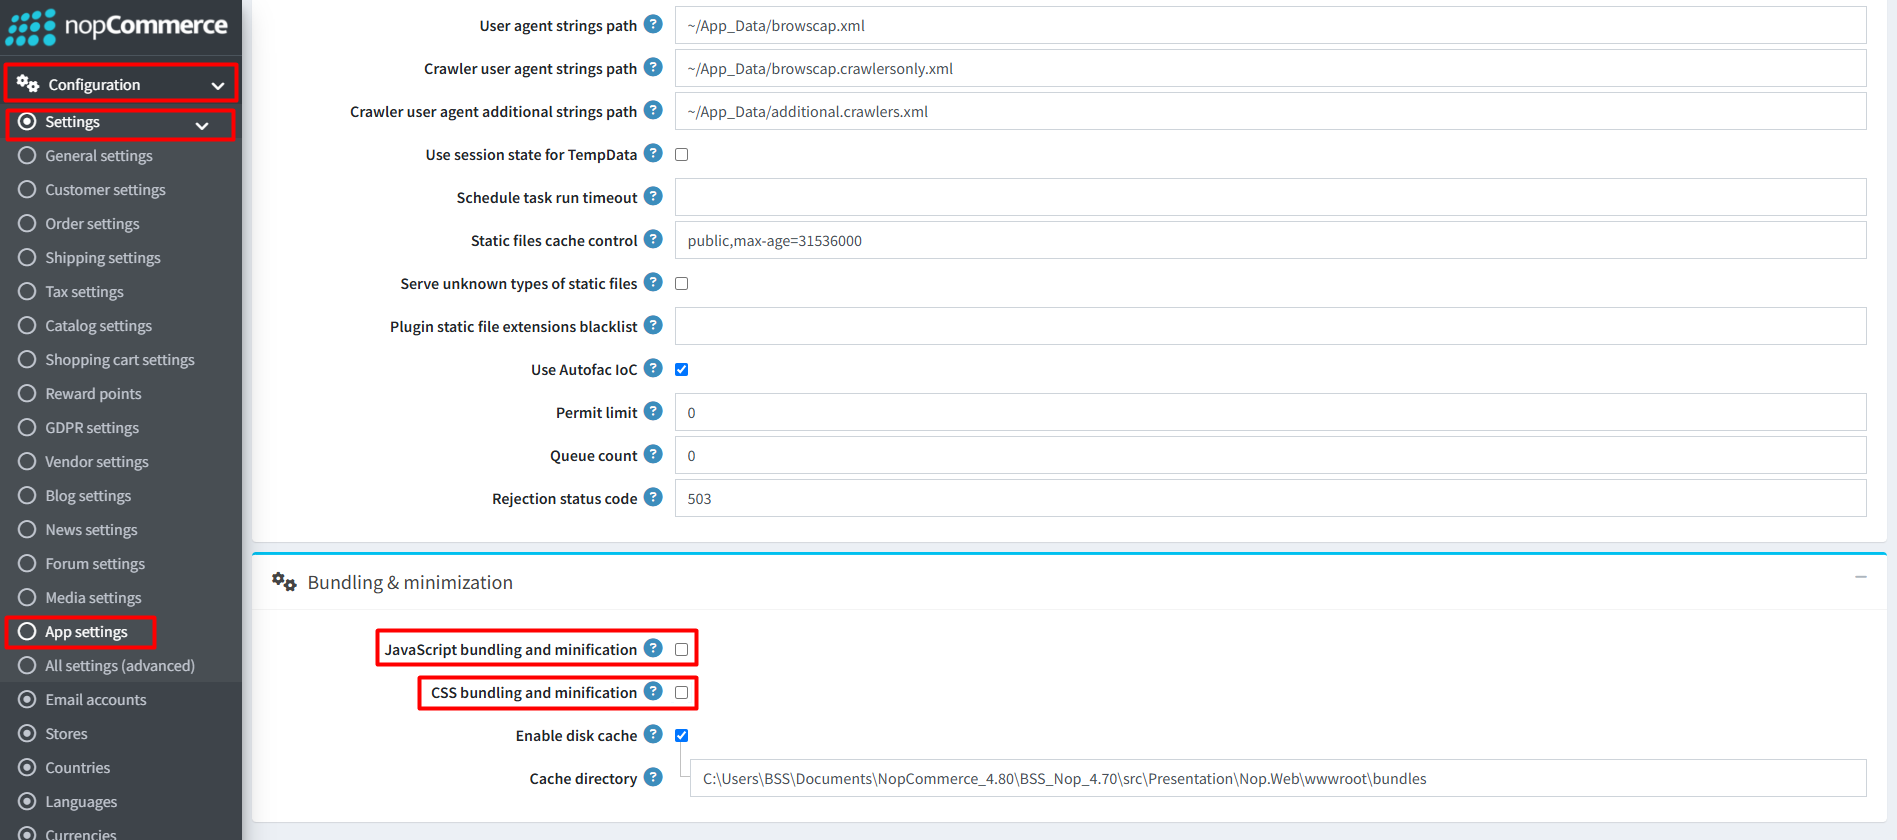
Recommendation: Go to > App Settings. If you find JavaScript bundling and minification, CSS bundling and minification are checked, then uncheck these two options and disable them.
CONFIGURE
-
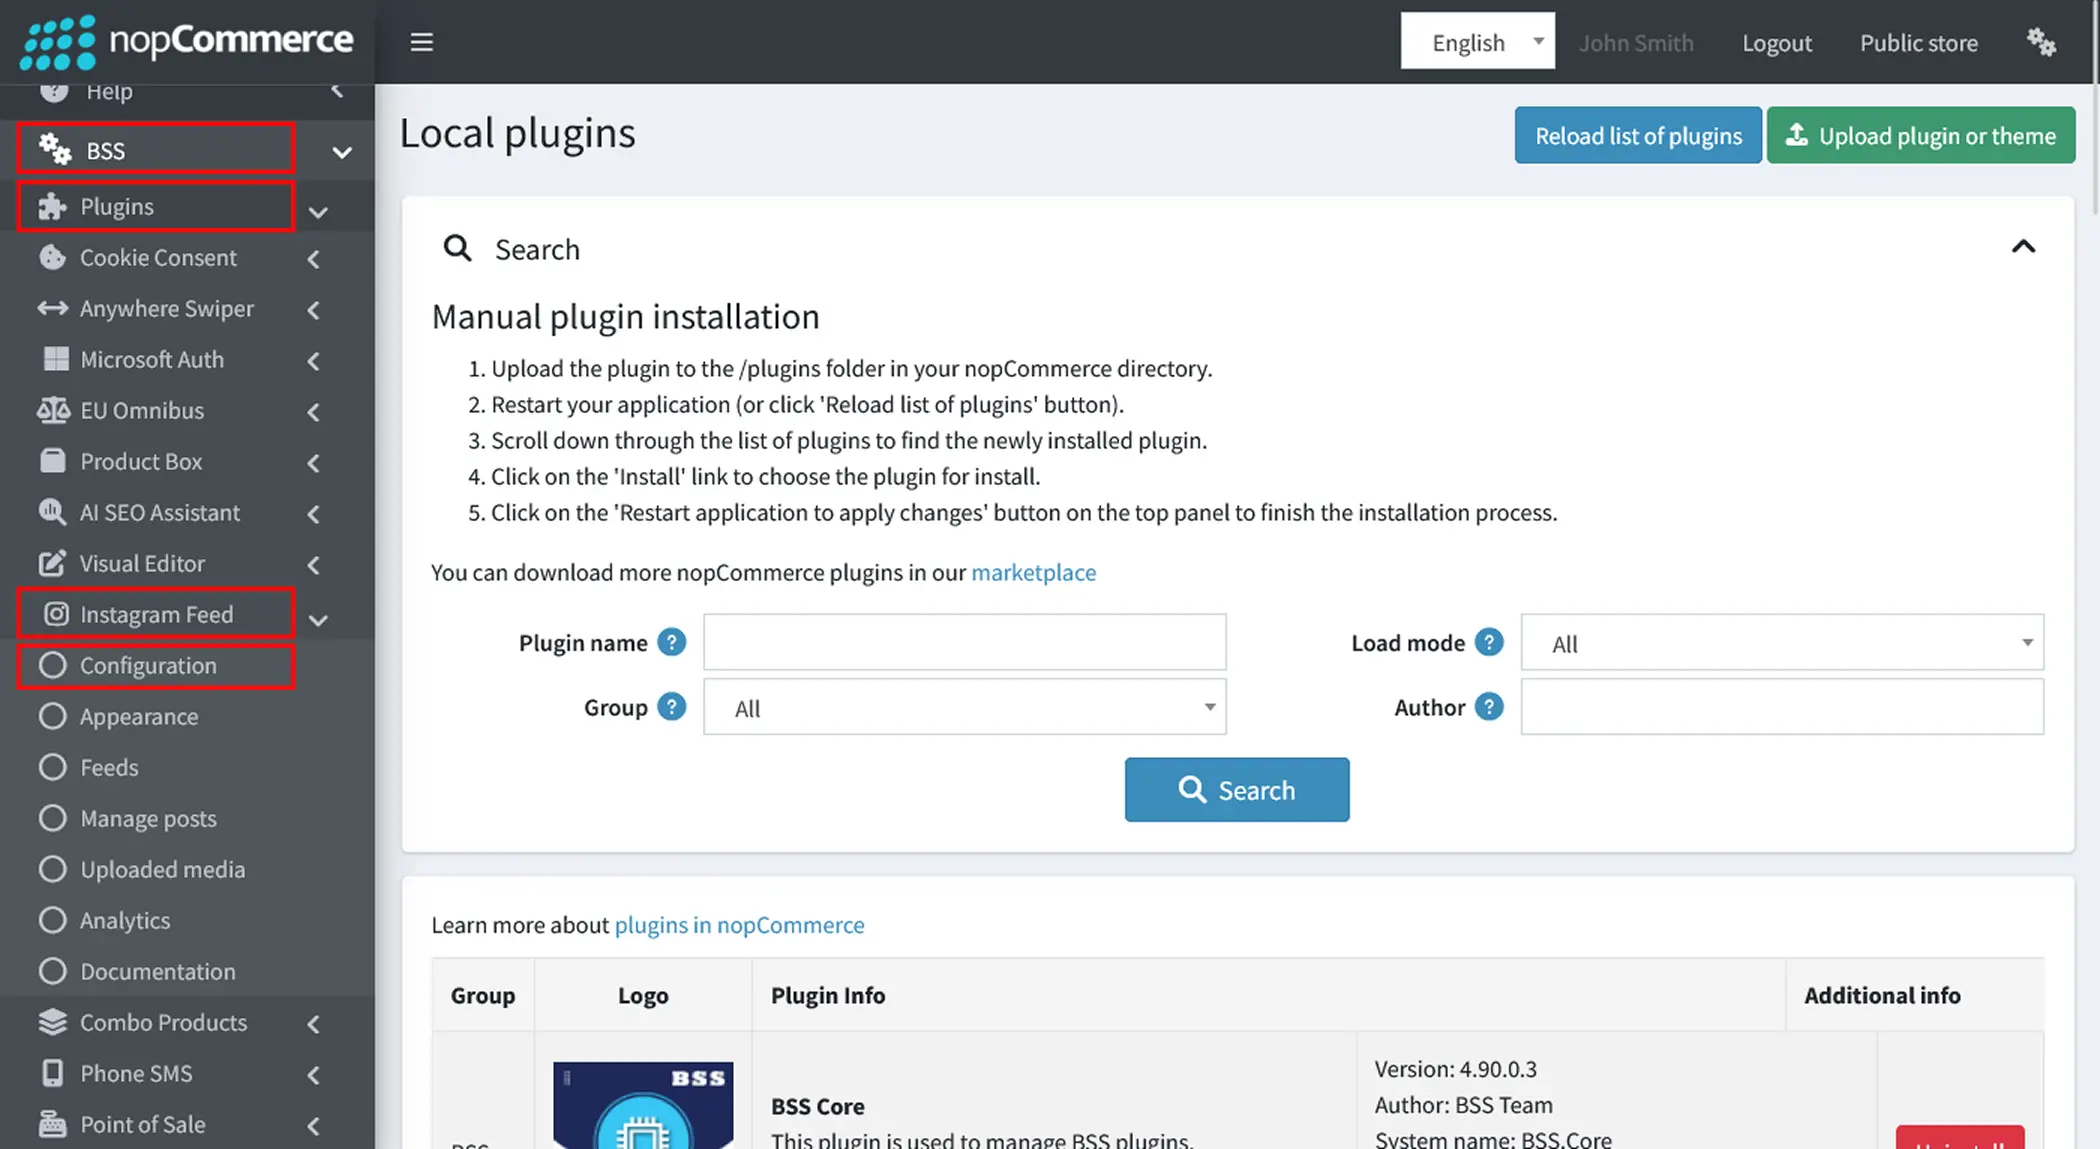
Go to Administration → BSS → Plugins → Instagram Feed → Configuration
-
Enter the License string and save it. Then clear cache.

-
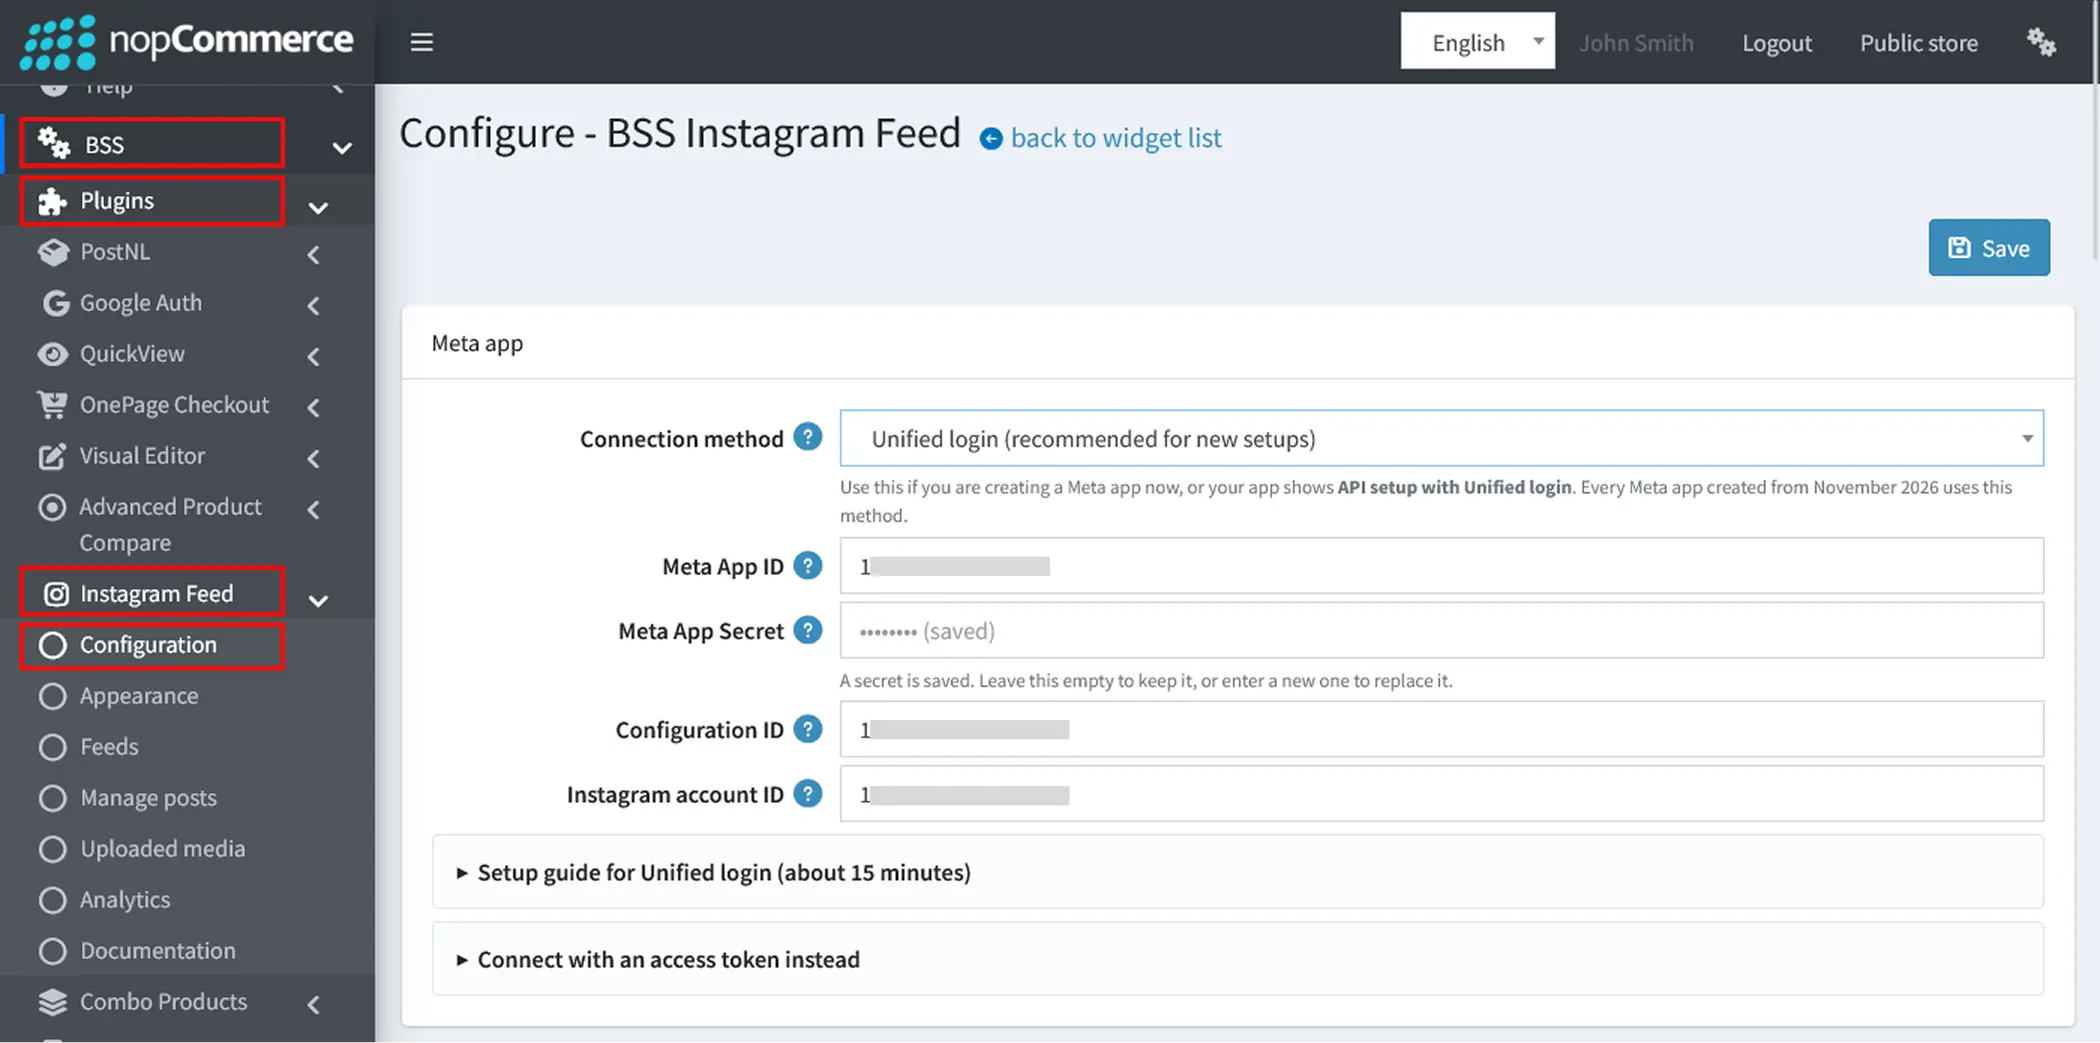
Then again go to BSS → Plugins → Instagram Feed → Configuration to set the configuration and connect your store to Instagram.
-
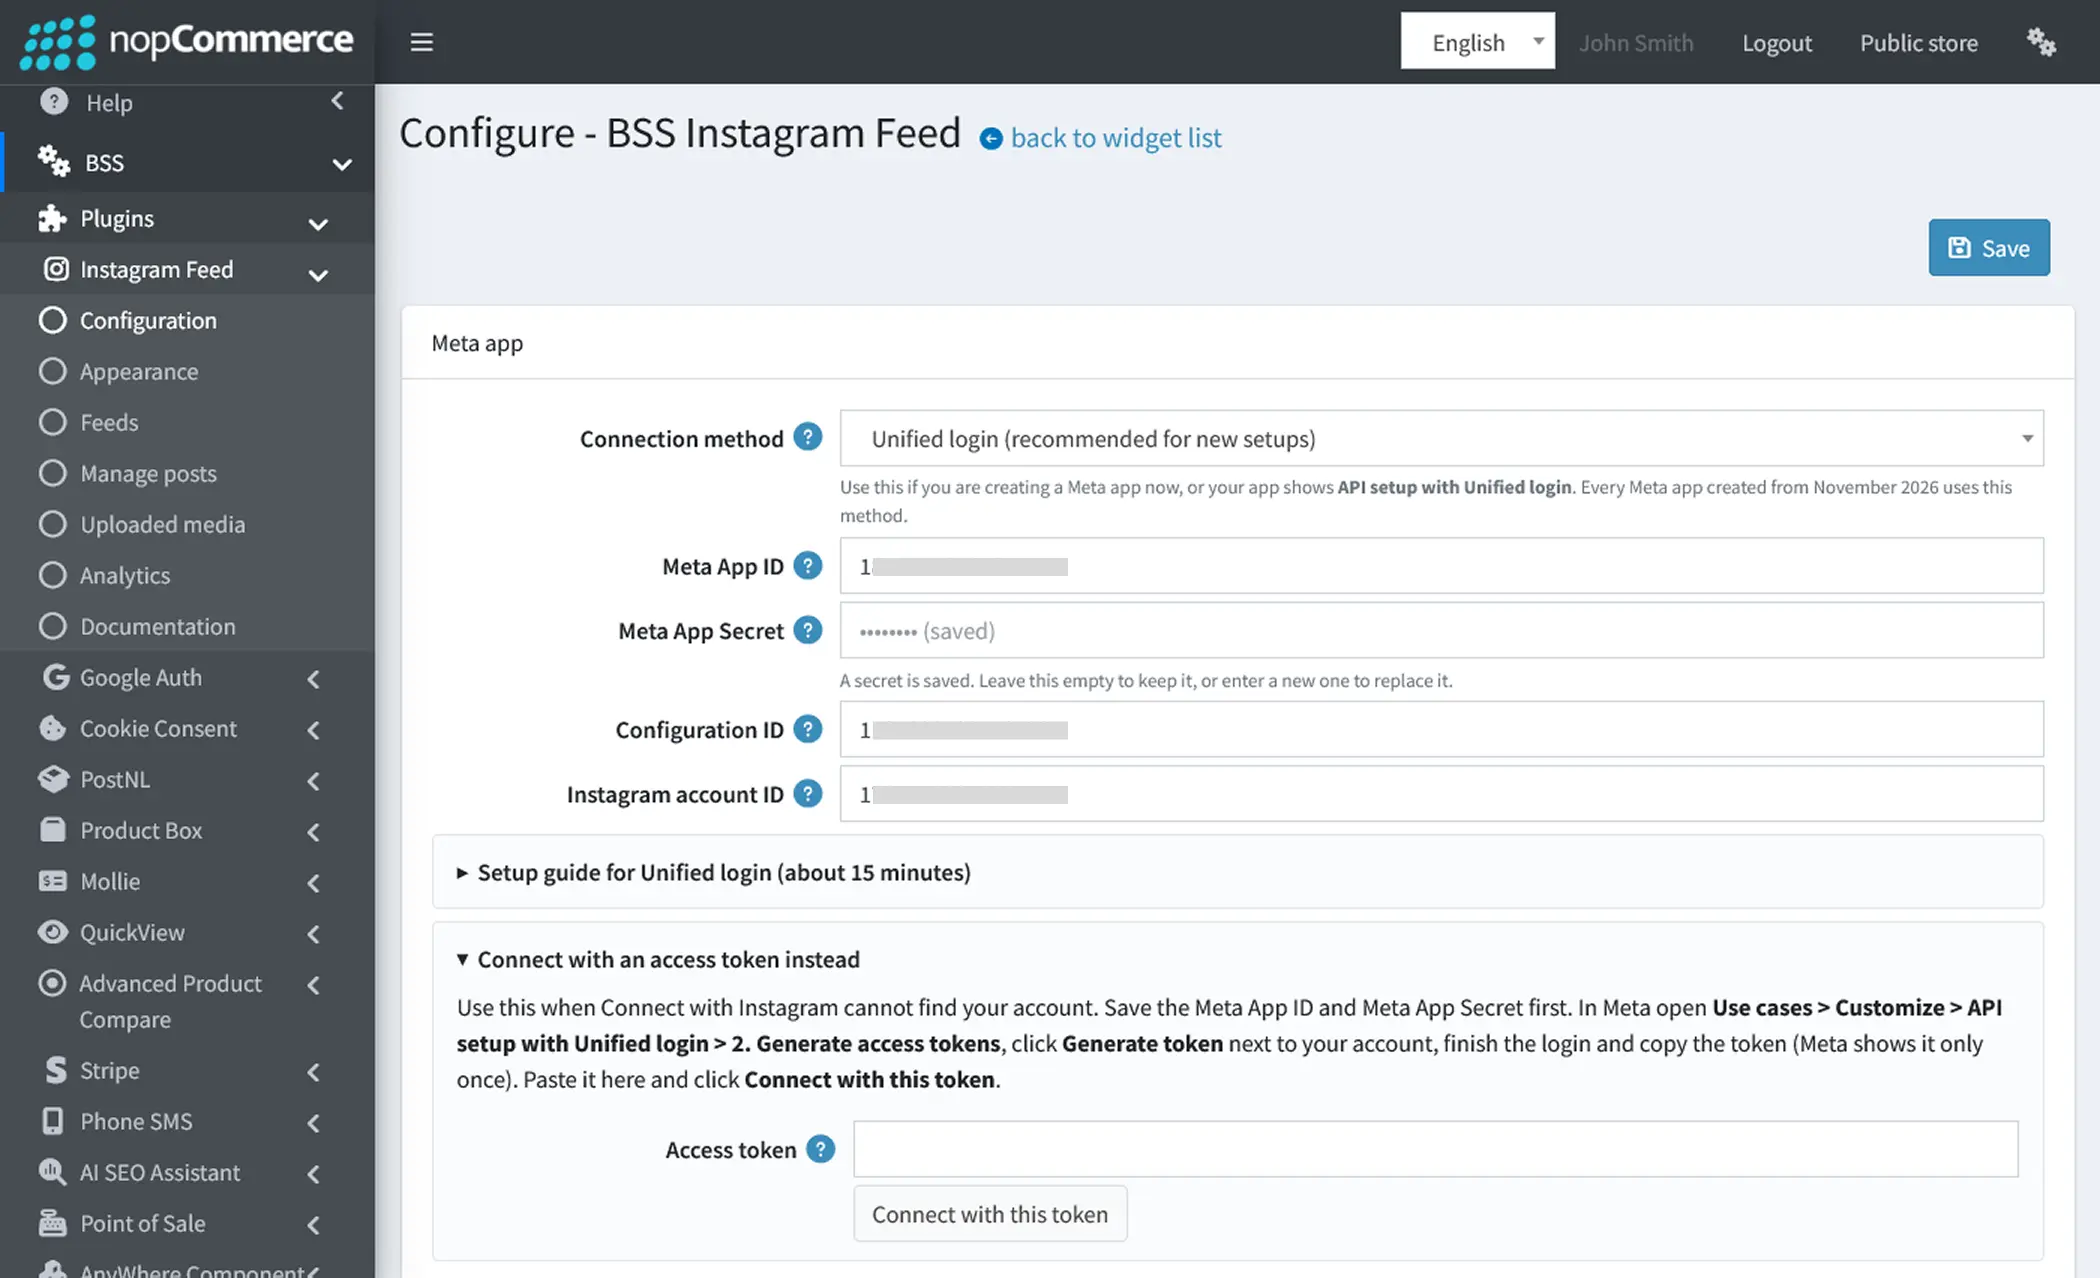
Connection Method: Choose how your store connects to your Meta app. The right choice depends on your Meta app:
-
Unified login (recommended for new setups): Choose this if you are creating a Meta app now, or if your app shows API setup with Unified login. Every Meta app created from November 2026 uses this method.
-
Instagram login (apps created before November 2026): Choose this if you already have a Meta app whose Instagram use case shows API setup with Instagram login. Meta no longer offers this method for new apps.
-
Not sure which one you have? In Meta for Developers, open your app → Use cases → Customize. The menu shows either API setup with Instagram login or API setup with Unified login. Pick the method that matches.
-
-
Meta App ID, Meta App Secret, Configuration ID & Instagram Account ID: These values come from your Meta app, so you need to create a Meta app (or open your existing one) in Meta for Developers, set up the Instagram API, and copy each value into these fields. The setup guide for your connection method shows where to find each one.
-
Setup Guides: Read the guide that matches your connection method. Click a guide below to open it. Use Meta Setup V1 for Instagram login, or Meta Setup V2 for Unified login.
Meta Setup V1 - Before 30 Oct, 2026 (Instagram login)
BEFORE YOU START
-
You need a Facebook account to log in to Meta for Developers.
-
Your Instagram account must be a Business or Creator account. In the Instagram app, go to Settings → Account type and tools → Switch to professional account.
-
The plugin must be installed and licensed in your nopCommerce store.
-
The setup takes about 15 minutes. No App Review and no business verification are needed when you connect your own account.
PART 1: CREATE THE META APP
-
Go to developers.facebook.com/apps and log in. The first time, register as a developer.
-
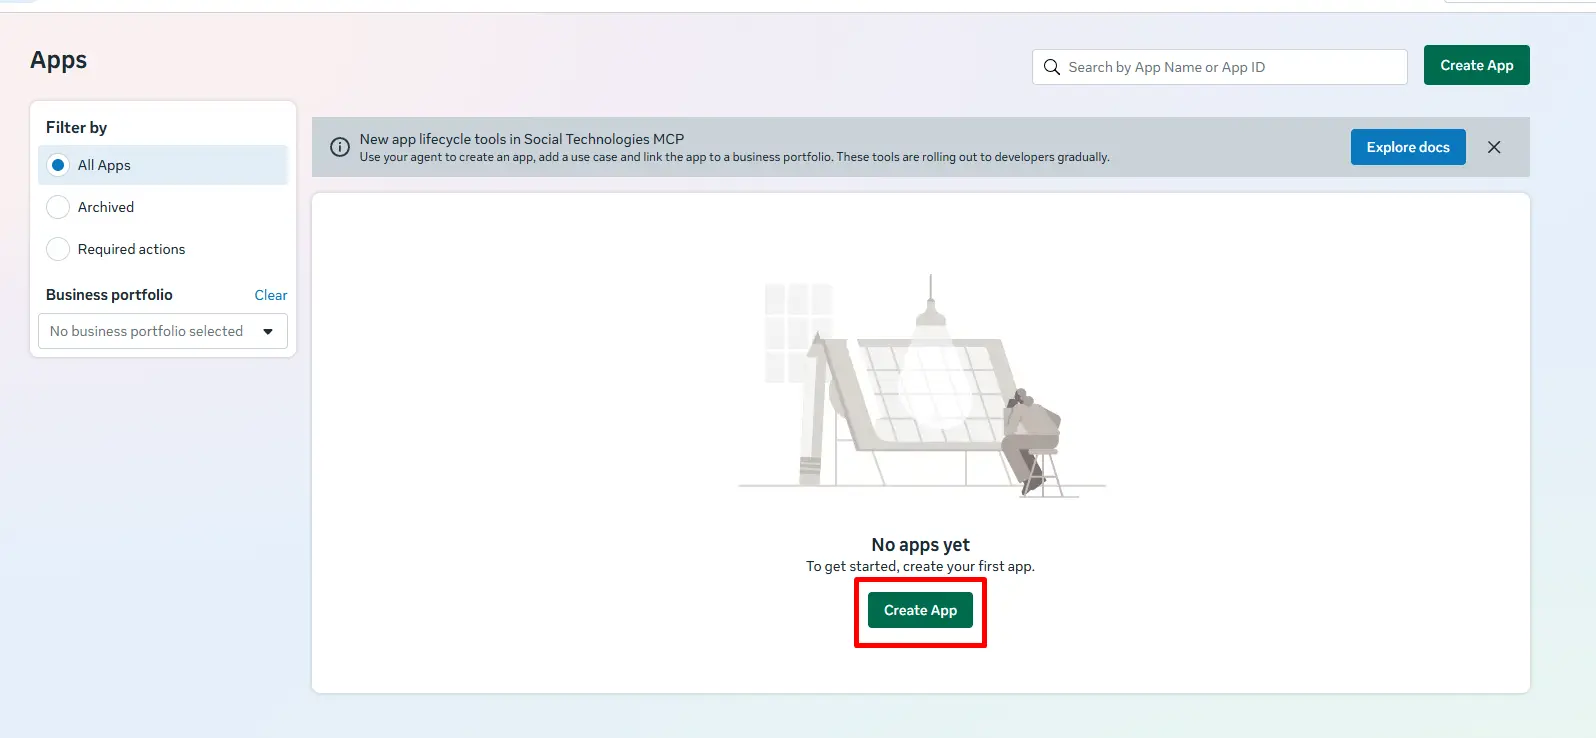
Click Create app.
-
App details: Enter a name (for example "My Store Feed") and your contact email, then click Next.
-
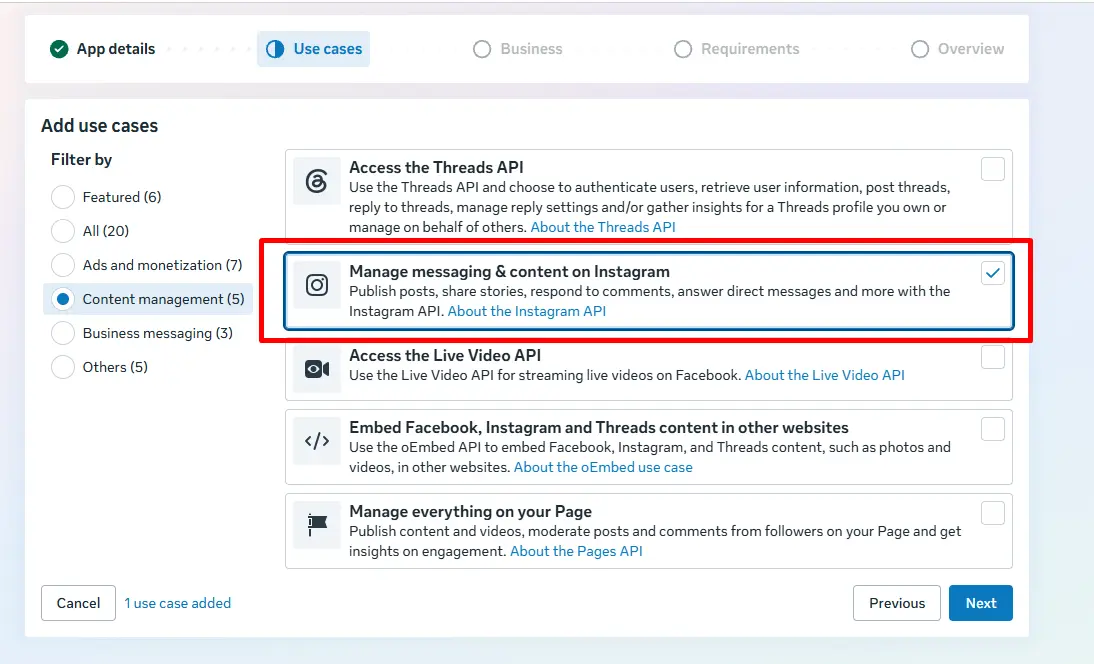
Use cases: Under Content management (or All), tick Manage messaging & content on Instagram, then click Next. Don't pick "Authenticate and request data from users with Facebook Login".
-
Business: Choose I don't want to connect a business portfolio yet, then click Next.
-
Requirements: Click Next.
-
Overview: Click Create app.
PART 2: INSTAGRAM LOGIN SETTINGS
-
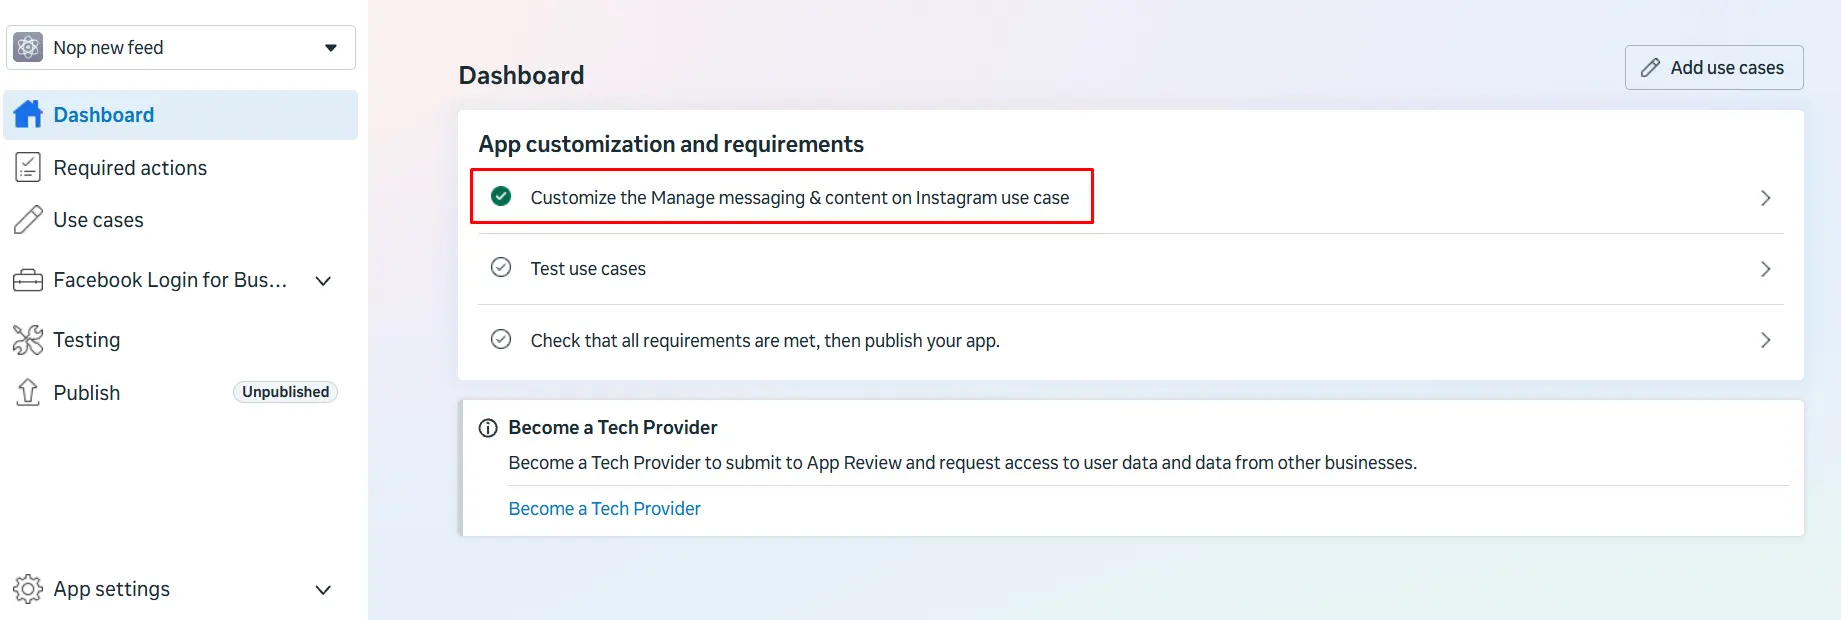
On the app's Dashboard, click "Customize the Manage messaging & content on Instagram use case", then click API setup with Instagram login.
-
Note the Instagram app ID and Instagram app secret at the top. Use these, not the Meta app ID in the browser address bar.
-
In your store admin, go to Administration → BSS → Plugins → Instagram Feed → Configuration and copy the three URLs in the Meta app card.
-
Back in Meta, go to 4. Set up Instagram business login → Set up. Paste the OAuth Redirect URI from the plugin and click Save.
-
Open Business login settings and fill in:
-
OAuth redirect URIs: The same Redirect URI. Check that Meta didn't add a "/" at the end.
-
Deauthorize callback URL: Copy it from the plugin.
-
Data deletion request URL: Copy it from the plugin.
-
-
Click Save.
-
Note: Skip "3. Configure webhooks" and "5. Complete app review". Meta says app review isn't needed if you only connect your own Instagram account. If a pop-up asks you to continue to app review, close it.
PART 3: MAKE YOUR INSTAGRAM ACCOUNT A TESTER
-
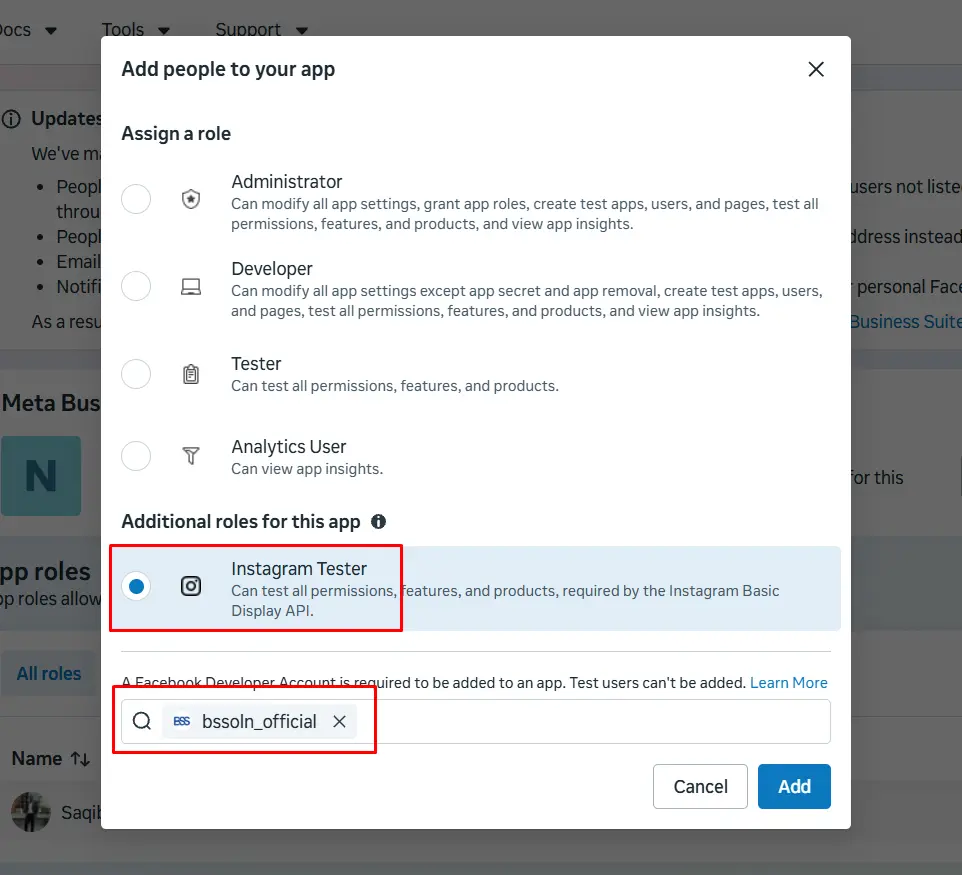
In the Meta app, go to App roles → Roles → Add people.
-
Choose Instagram Tester, the role under "Additional roles for this app". The plain "Tester" role is the wrong one.
-
Enter your Instagram username and click Add.
-
Accept the invite with the same Instagram account:
-
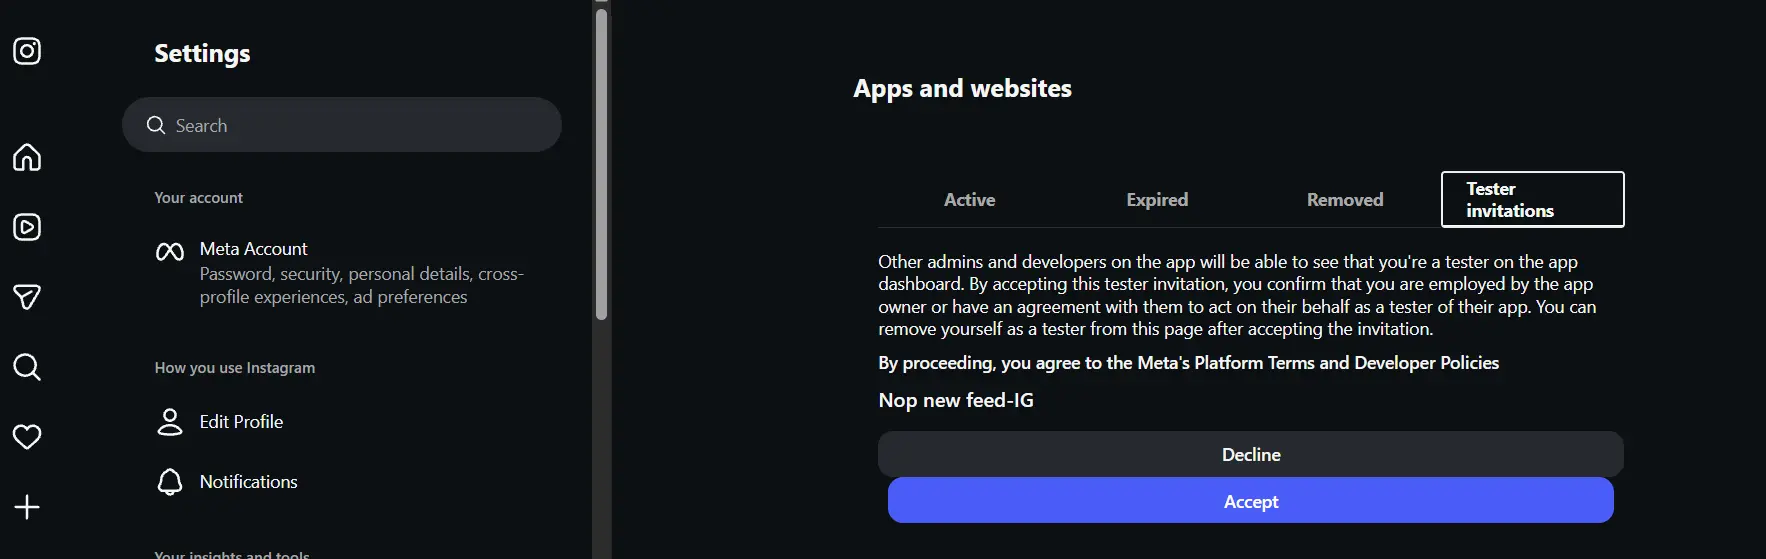
Web: Go to instagram.com/accounts/manage_access → Tester invites → Accept.
-
App: Go to Settings → Website permissions → Apps and websites → Tester invites.
-
PART 4: CONNECT THE PLUGIN
-
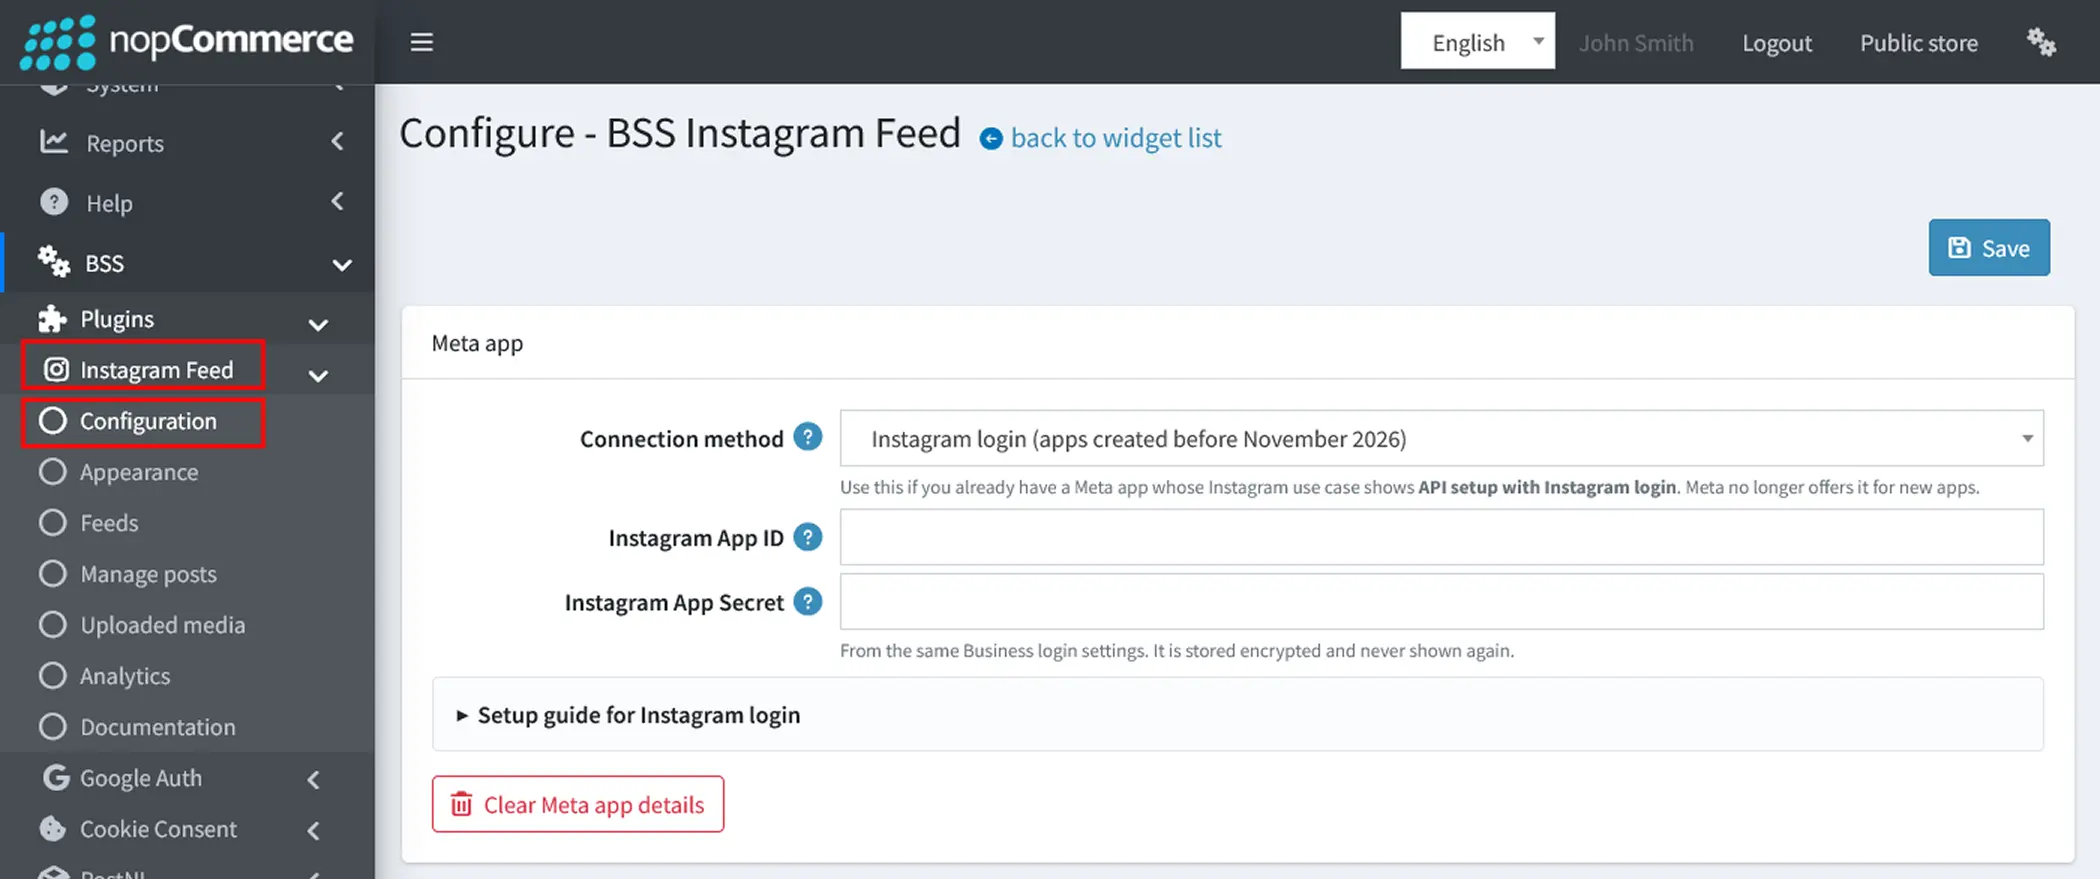
Go to Administration → BSS → Plugins → Instagram Feed → Configuration. With Connection method set to Instagram login (apps created before November 2026), click Save and then, enter the Instagram App ID and Instagram App Secret, then click Save. The secret is stored encrypted and never shown again.
-
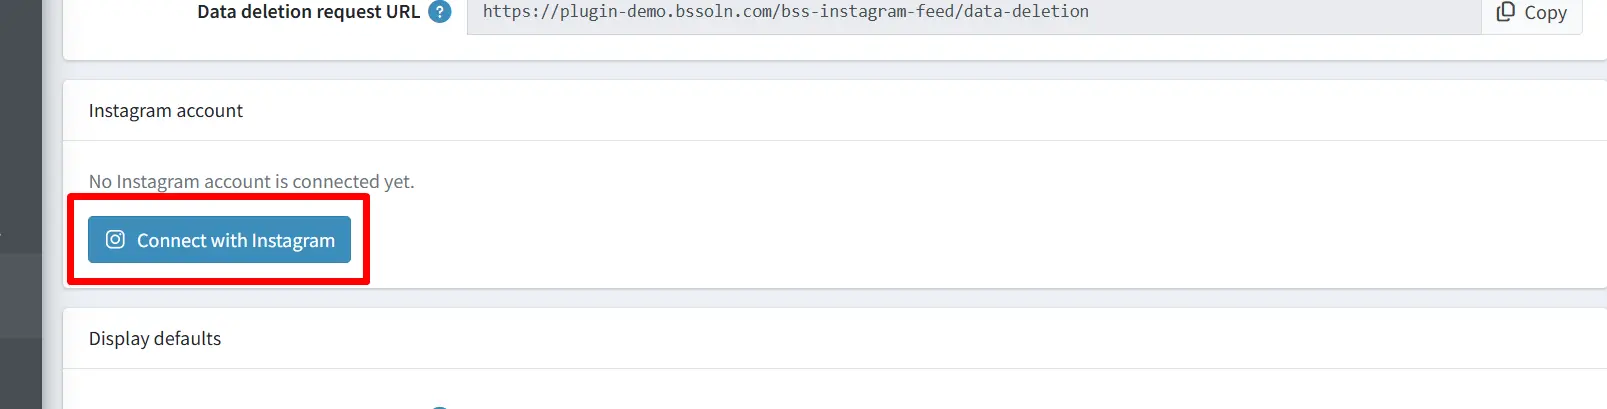
Click Connect with Instagram, log in with the tester account, and click Allow.
-
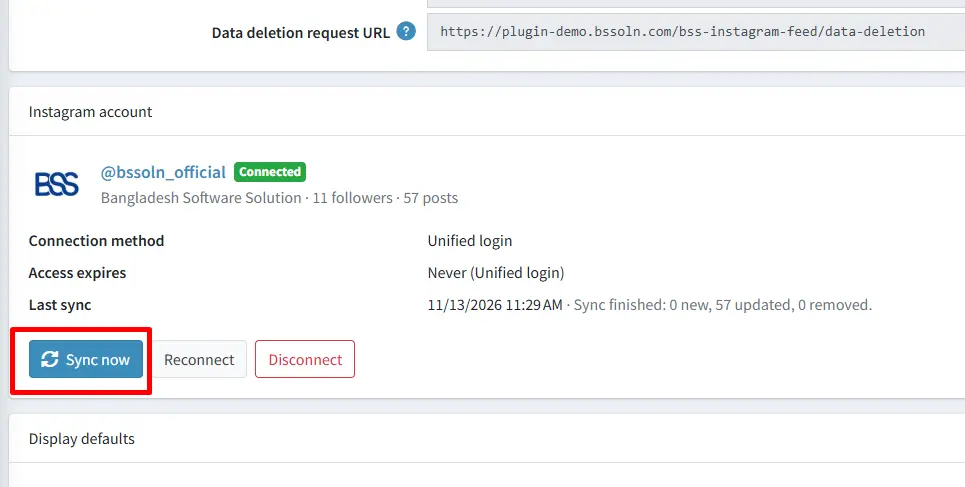
You return to the Configuration page with "Connected to @yourname" and a sync result. Posts then sync every hour, and you can change the interval under System → Schedule tasks.
-
Optional: Click Sync now to fetch new posts immediately.
PART 5: SHOW THE FEED
-
Main Feed: The Main feed is already active at the bottom of the home page.
-
Feeds: Go to Administration → BSS → Plugins → Instagram Feed → Feeds to change a feed's location, layout (grid, slider or floating post), rows, columns and popup, with a live preview. Add more feeds for other pages, for example product pages showing only matching posts.
-
Manage Posts: Hide or show posts, drag to pin them, and tag products or categories. Tagged products appear in the popup with their price and an Add to cart button.
-
Appearance: The feed follows your theme's font, colours and buttons. Only set colours here if your theme needs it.
-
Uploaded Media: Add your own photos and videos to the feeds.
TROUBLESHOOTING
| Message or problem | Cause and fix |
|---|---|
| "Insufficient developer role" on Instagram | The Instagram account you logged in with isn't an accepted Instagram Tester. Accept the invite (Part 3, step 4), make sure you're logged in to Instagram with that same account, and click Connect again. |
| "Invalid redirect_uri" / "URL blocked" | The OAuth redirect URI in Meta doesn't match the plugin's exactly. Copy it again from the plugin and remove any trailing /. |
| Connect button is greyed out | Save the App ID and App Secret first. |
| "The connection request has expired" | More than 30 minutes passed, or the page was reloaded. Click Connect with Instagram again. |
| Personal Instagram account | Switch it to a Business or Creator account, then connect again. |
| Warning banner "access expires on…" | The plugin renews access automatically every week. If renewal failed, click Reconnect. |
| Feed shows no posts | Check that the feed is Active and placed in a location your theme shows, and that "My Instagram posts" is ticked under Content. Then use Sync now. |
| You changed the App ID | The old connection belongs to the old app. Click Connect with Instagram again. |
Meta Setup V2 - After 30 Oct, 2026 (Unified login)
This guide is for Meta apps created after 30 October 2026. Meta no longer offers API setup with Instagram login for new apps. They get API setup with Unified login instead. If your Meta app still shows API setup with Instagram login, follow Meta Setup V1.
BEFORE YOU START
-
You need a Facebook account to log in to Meta for Developers.
-
Your Instagram account must be a Business or Creator account. In the Instagram app, go to Settings → Account type and tools → Switch to professional account.
-
You need a Meta business portfolio. Unified login does not work without one. If you don't have one, create it for free at business.facebook.com.
-
Log in to Instagram with the account you want to connect. If it isn't a Business or Creator account yet, switch it first.
-
The plugin must be installed and licensed in your nopCommerce store, and the store must be reachable on a public https address. Meta does not accept a localhost redirect URL. For a test on your own computer, follow the Cloudflare Tunnel Guide below.
-
The setup takes about 15 minutes. No App Review is needed when you connect your own Instagram account. Meta says you can skip it "if you're a direct developer who only builds for your own Instagram businesses".
PART 1: CREATE THE META APP
-
Go to developers.facebook.com/apps and log in. The first time, register as a developer.
-
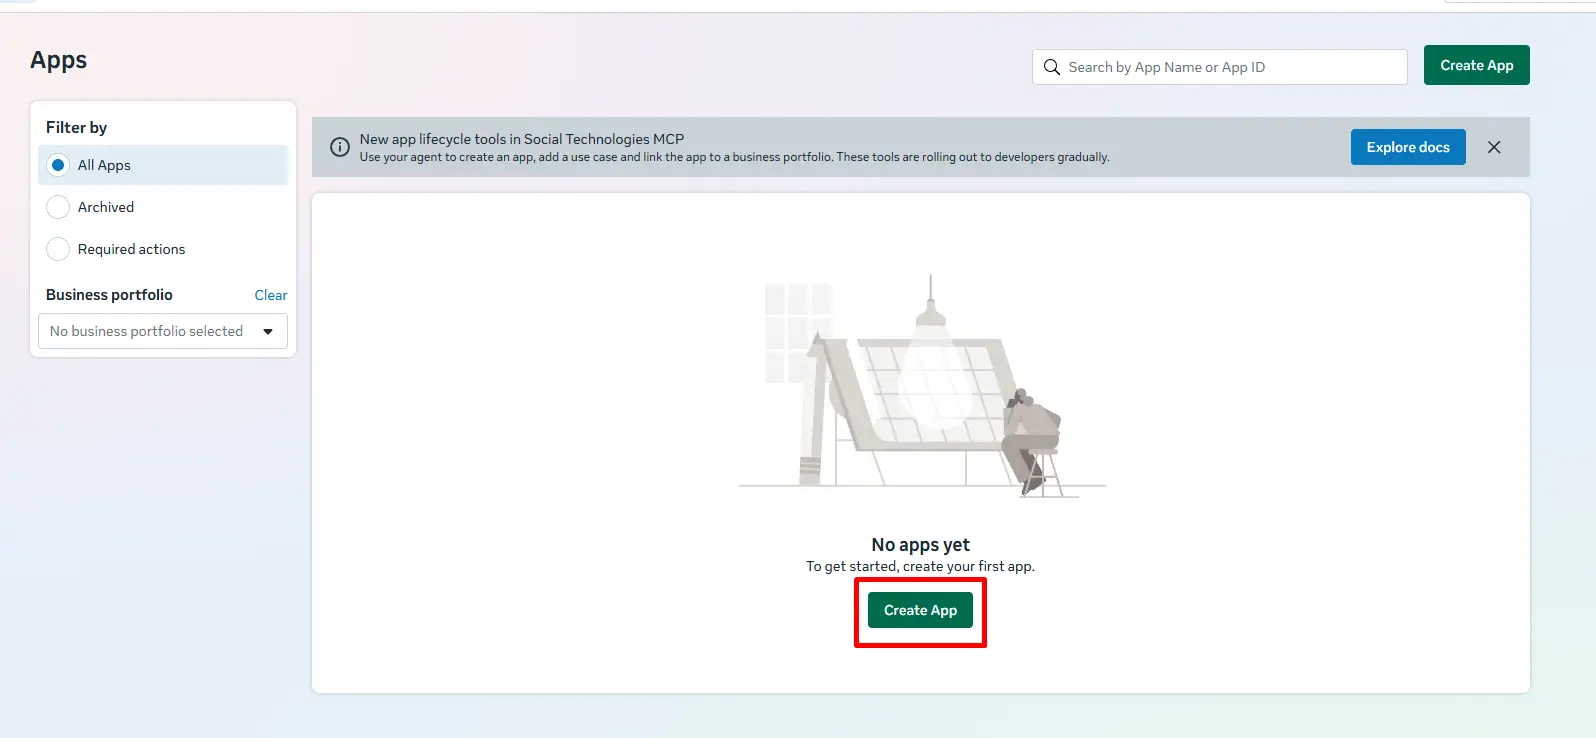
Click Create app.
-
App details: Enter a name (for example "My Store Feed") and your contact email, then click Next.
-
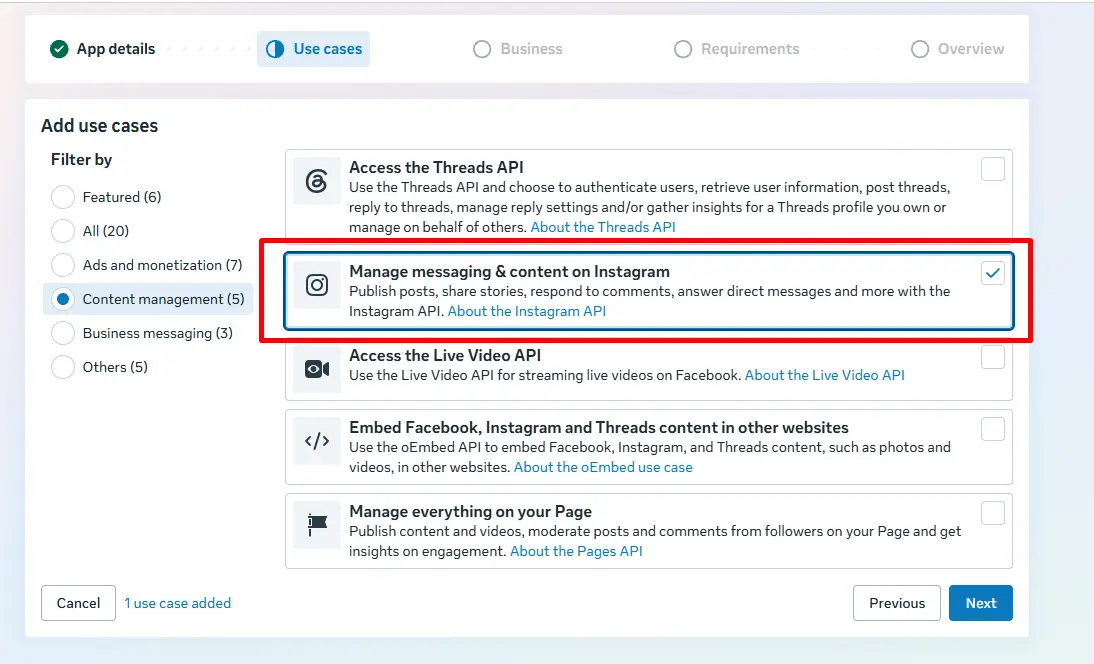
Use cases: Under Content management (or All), tick Manage messaging & content on Instagram, then click Next. Don't pick "Authenticate and request data from users with Facebook Login".
-
Business: Choose your business portfolio, then click Next. Without one, the setup page later says "Business portfolio selection is mandatory to use the Instagram API setup with Unified login". If you don't have a business portfolio, create one and choose to verify it later.
-
Requirements: Click Next.
-
Overview: Click Create app.
PART 2: UNIFIED LOGIN SETTINGS
-
On the app's Dashboard, click "Customize the Manage messaging & content on Instagram use case", then click API setup with Unified login. A banner says "API setup with Instagram login is not available for newer apps". This is expected.
-
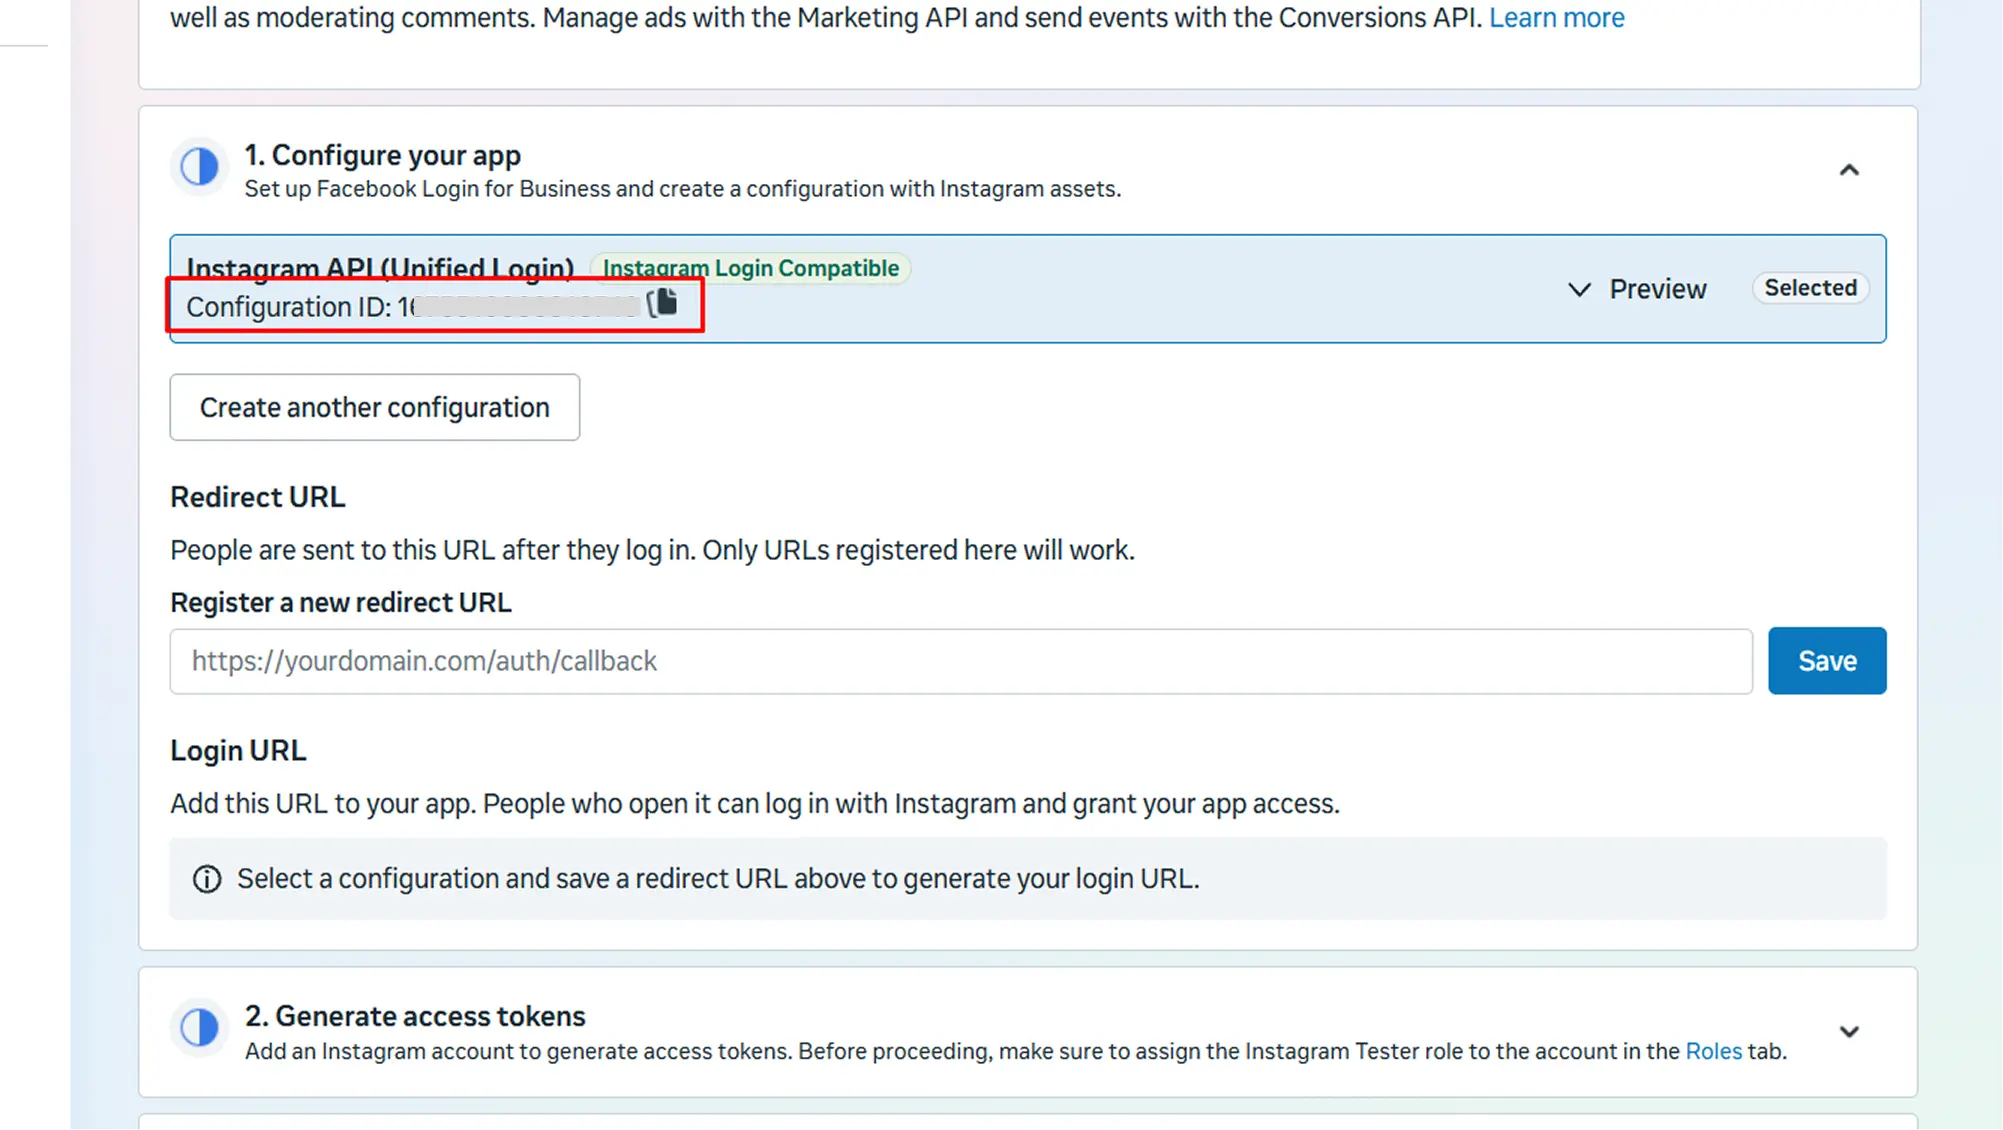
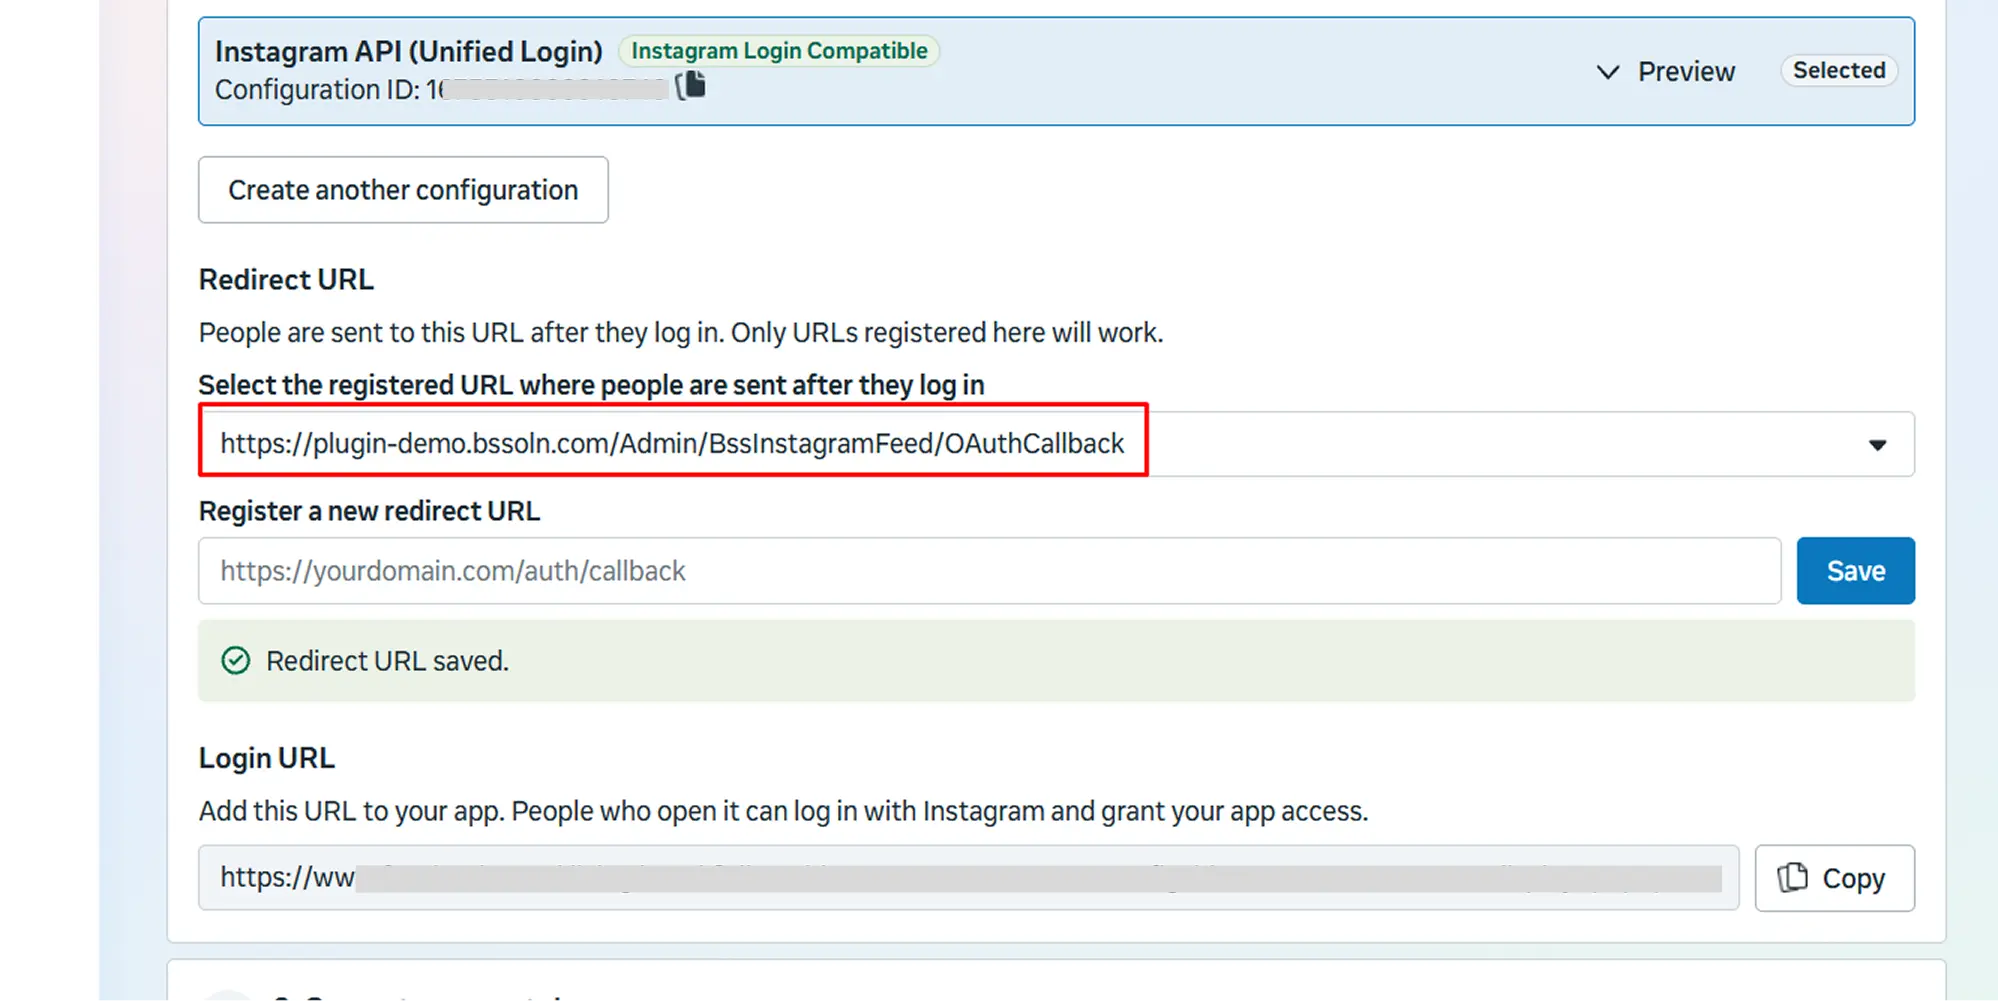
Under 1. Configure your app, click Create new configuration, then click Create from template. The configuration "Instagram API (Unified Login)" appears with its Configuration ID under the name. Note it.
-
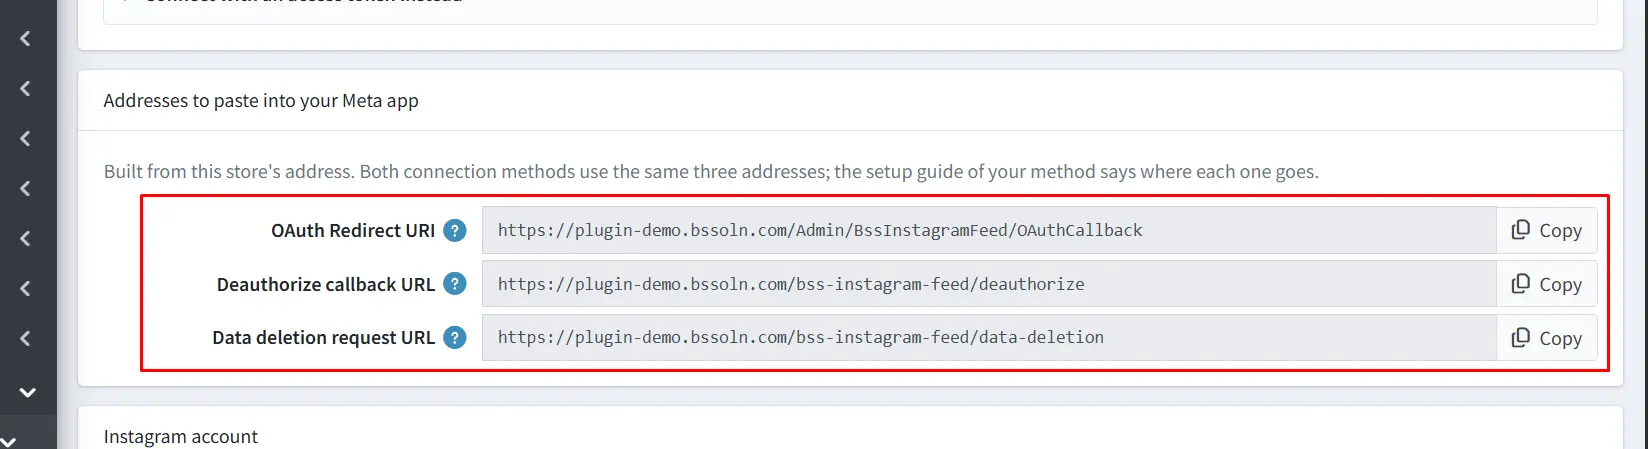
In your store admin, go to Administration → BSS → Plugins → Instagram Feed → Configuration. Set Connection method to Unified login (recommended for new setups) and copy the three URLs from the card Addresses to paste into your Meta app.
-
Back in Meta, go to Redirect URL → Register a new redirect URL. Paste the OAuth Redirect URI from the plugin and click Save. Meta shows "Redirect URL saved" and a Login URL. You don't need to copy the Login URL, because the plugin builds it.
-
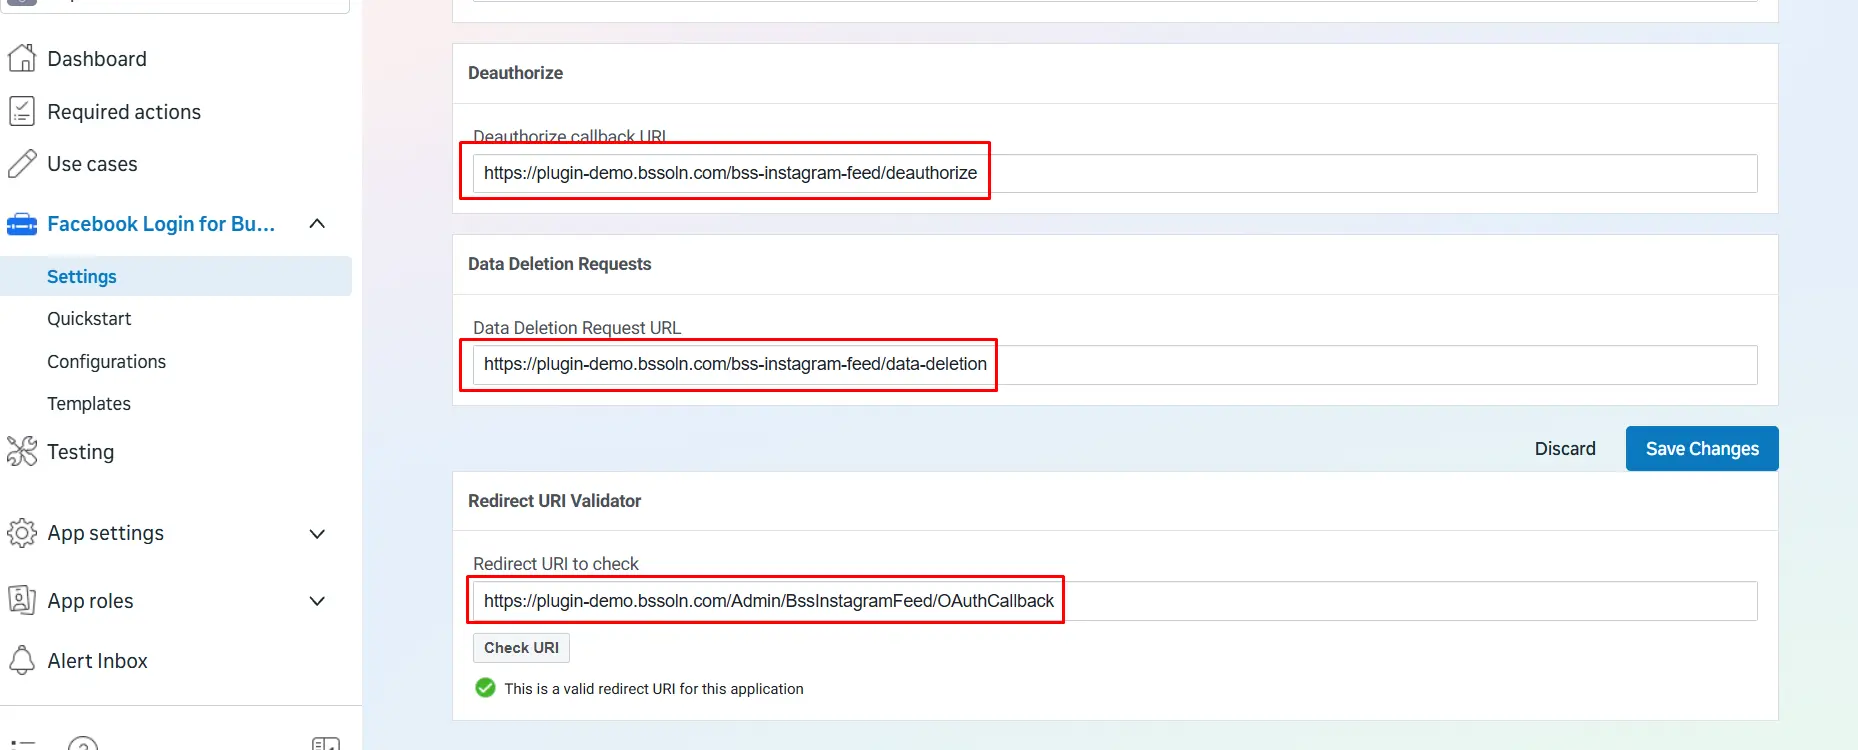
Go to the Dashboard and open Facebook Login for Business → Settings. In the app's left menu, click Facebook Login for Business, then click Settings below it. The direct link is developers.facebook.com/apps/<your app ID>/business-login/settings/. If the menu doesn't show Facebook Login for Business yet, create the configuration first (see Create new configuration above).
-
On that page, fill in:
-
Deauthorize callback URL: Copy it from the plugin.
-
Data Deletion Request URL: Copy it from the plugin.
-
Valid OAuth Redirect URIs: Check that the Redirect URI you registered earlier is listed, with no extra "/" at the end.
-
-
Click Save changes.
-
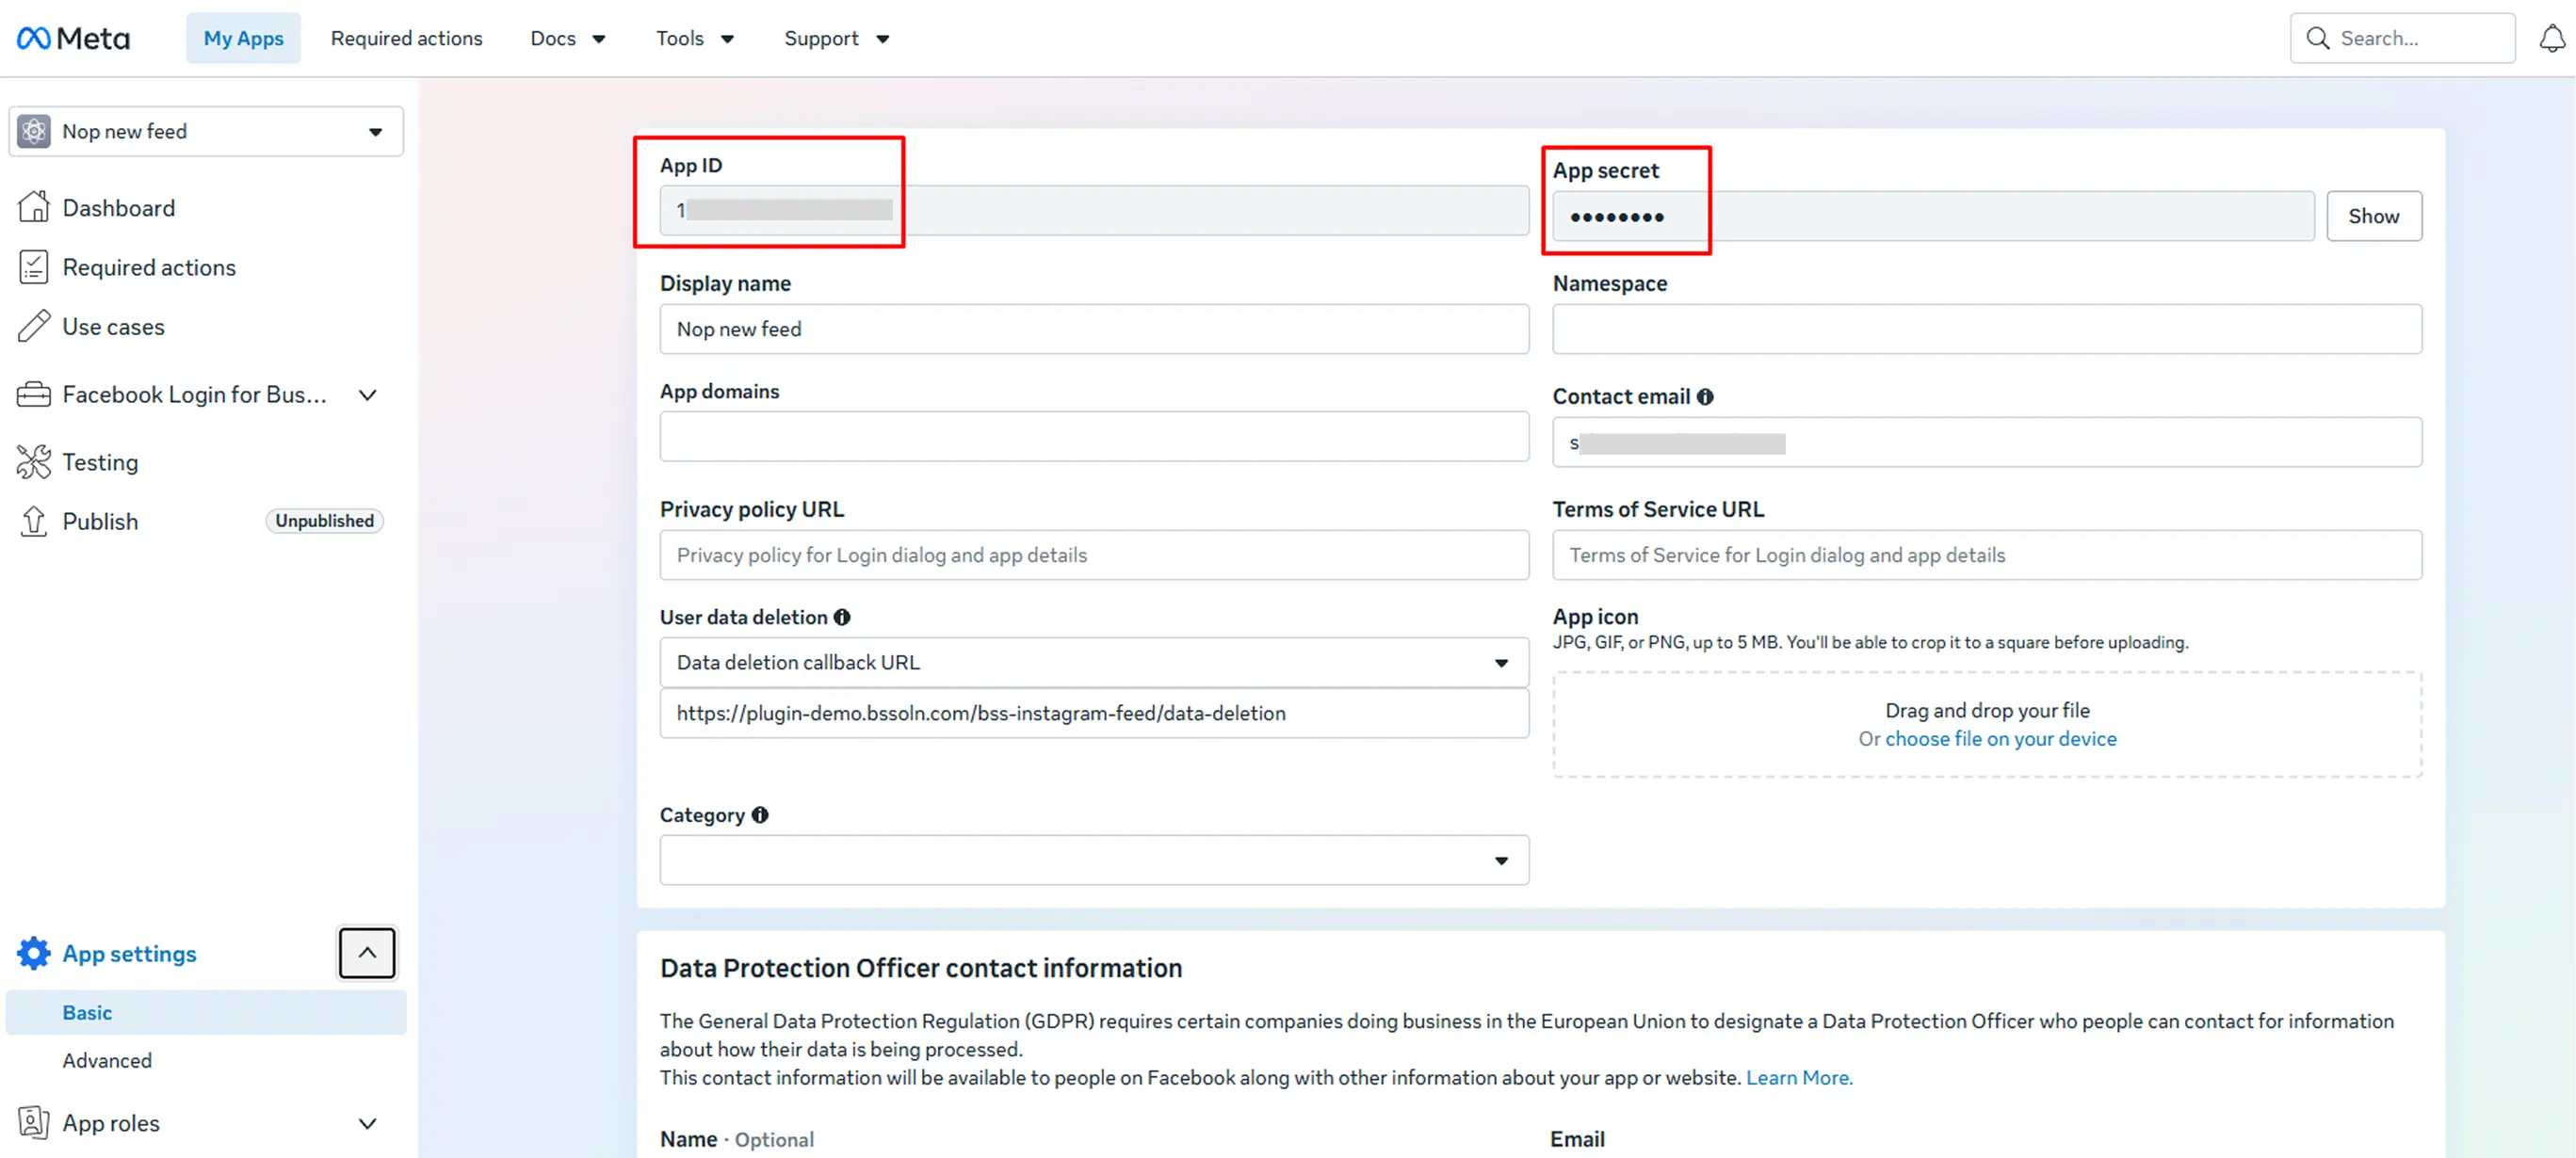
Go to App settings → Basic. Note the App ID and the App secret (click Show). This is the Meta App ID, not an Instagram app ID.
-
On the same page (App settings → Basic), fill in:
-
Privacy policy URL and Terms of service URL: Your store's privacy notice and conditions of use pages work, for example https://yourstore.com/privacy-notice and https://yourstore.com/conditions-of-use.
-
User data deletion: Set it to Data deletion callback URL and enter the plugin's Data deletion request URL.
-
Category: Choose one, for example Business and pages.
-
-
Click Save changes.
-
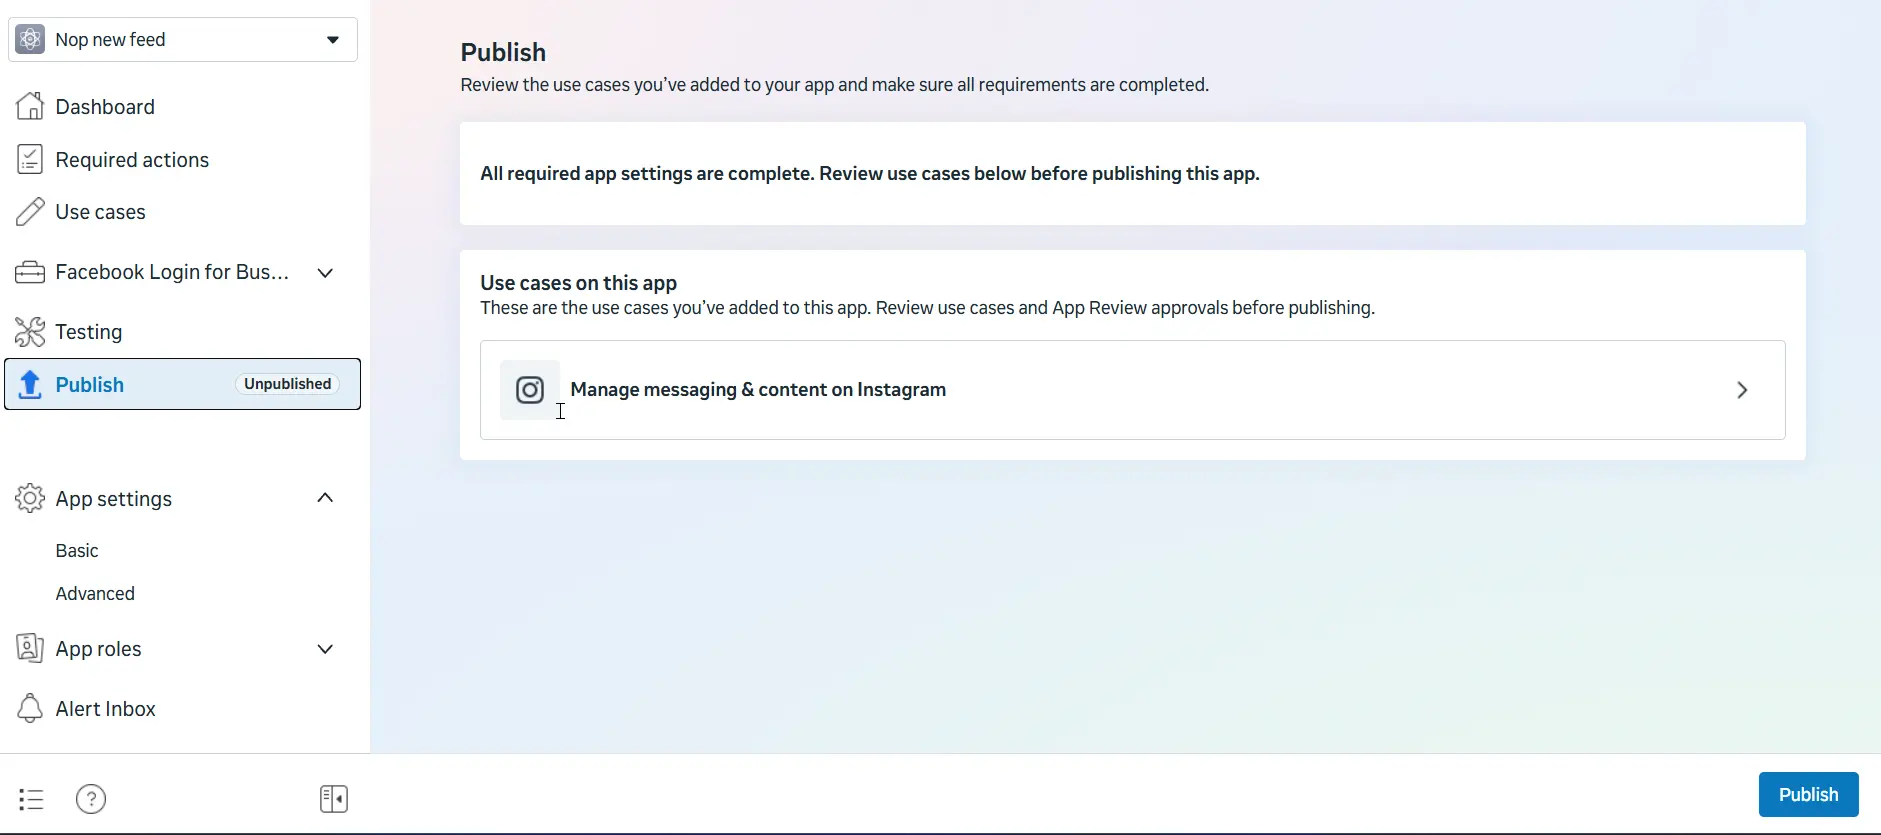
Click Publish in the left menu and publish the app. Meta asks for the fields from the previous step first. The app then shows Live at the top.
-
Note: Skip "3. Configure webhooks" and "4. Complete App Review". Meta's template also lists messaging, publishing and ads permissions, but the plugin only reads your profile and posts.
PART 3: MAKE YOUR INSTAGRAM ACCOUNT A TESTER
-
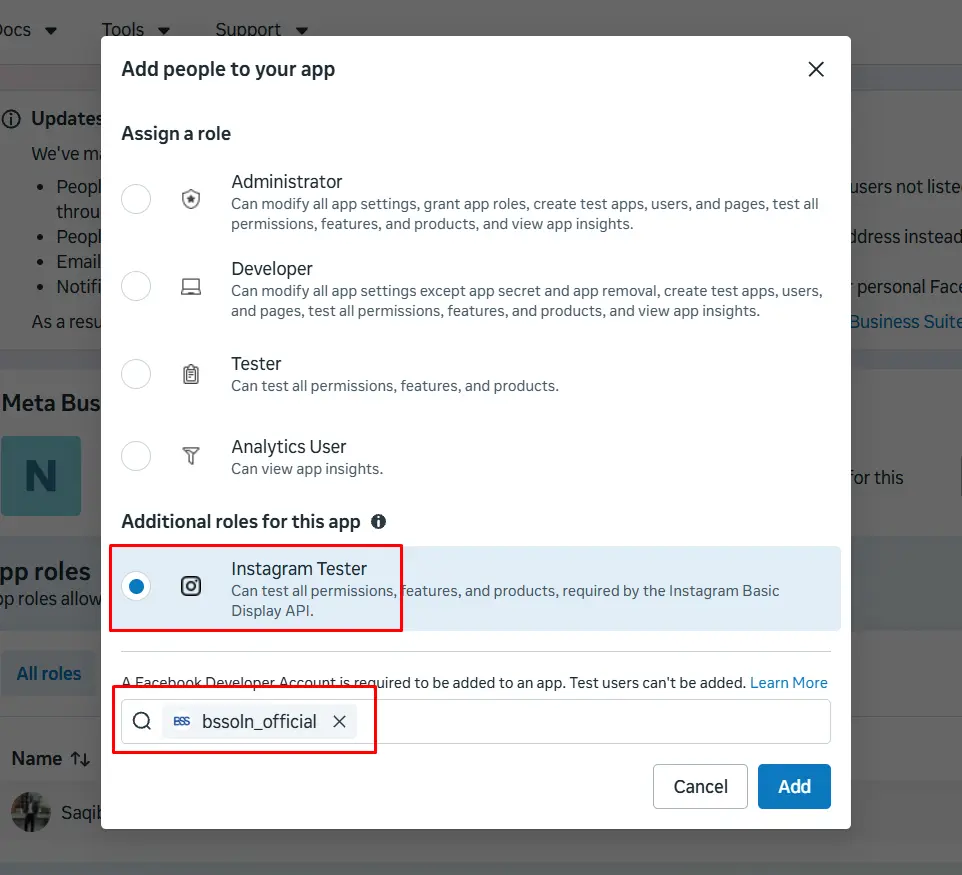
In the Meta app, go to App roles → Roles → Add people.
-
Choose Instagram Tester, the role under "Additional roles for this app". The plain "Tester" role is the wrong one.
-
Enter your Instagram username and click Add.
-
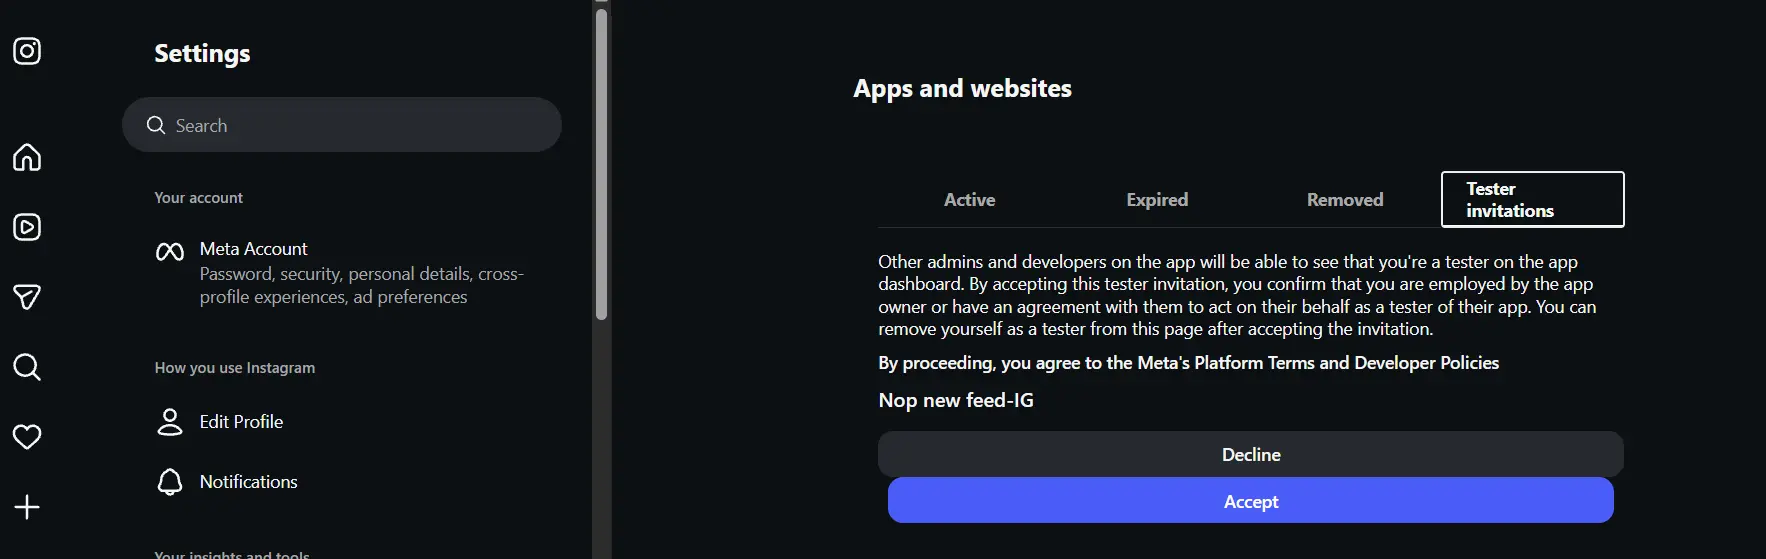
Accept the invite with the same Instagram account:
-
Web: Go to instagram.com/accounts/manage_access → Tester invites → Accept.
-
App: Go to Settings → Website permissions → Apps and websites → Tester invites.
-
-
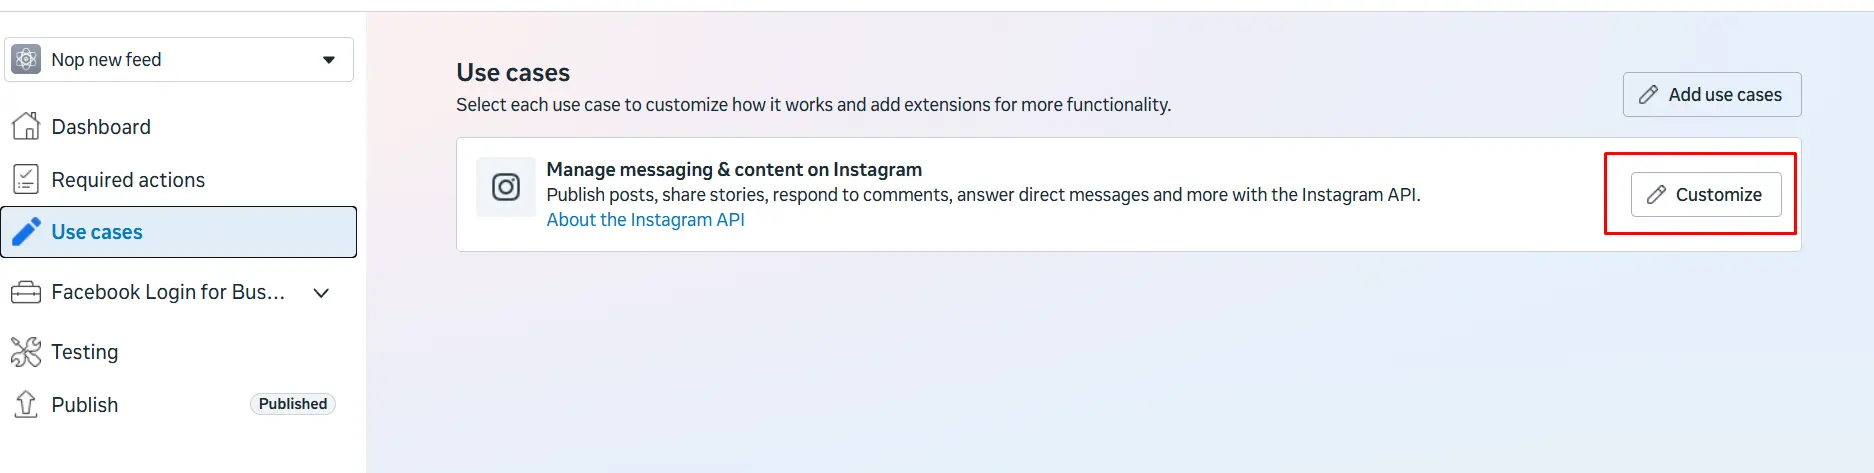
Go back to your Meta app and click Use cases in the left menu.
-
In the Manage messaging & content on Instagram box, click Customize.
-
On the Unified login page, go to 2. Generate access tokens.
-
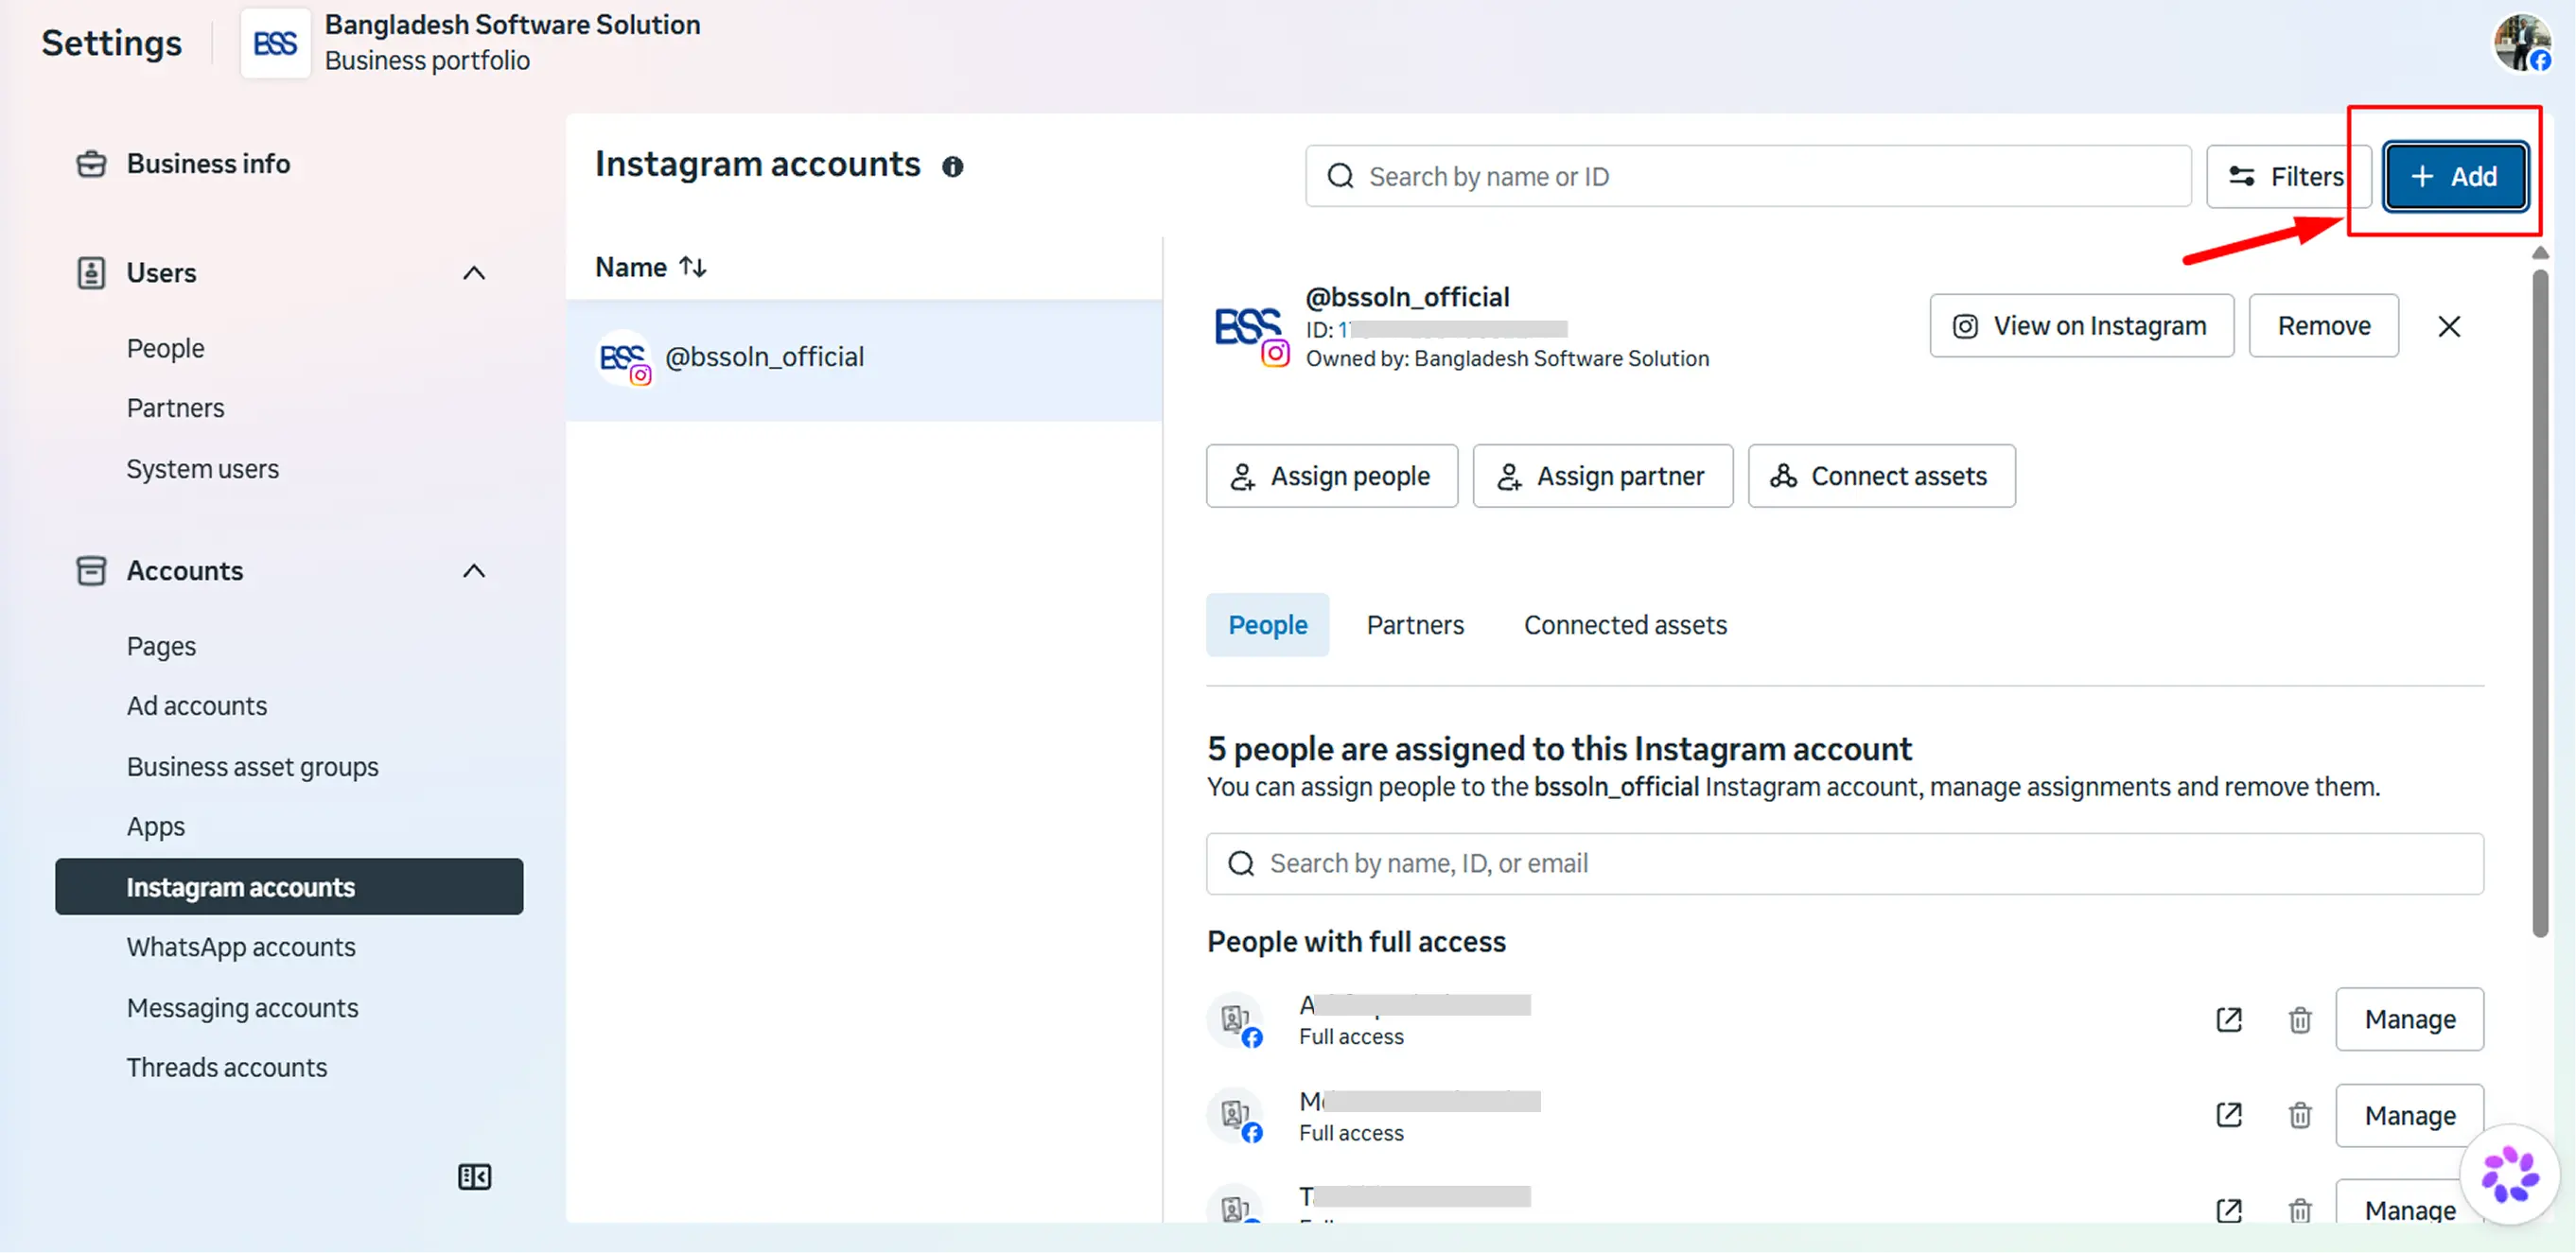
Add the Instagram account to the same business portfolio as the app. Go to business.facebook.com/settings → Accounts → Instagram accounts → Add, and log in to Instagram. If the page says "Request Sent", approve the request in the Instagram account first.
-
Note: An Instagram account can belong to only one business portfolio. If Meta says "Unable to add Instagram account. Failed to remove the existing ownership", the account is already in another portfolio. Remove it there first (that portfolio → Accounts → Instagram accounts → select the account → Remove) and add it again. Or create the Meta app under the portfolio that already owns the account.
-
In the same place, select the Instagram account, click Assign people, choose yourself and give Content and Insights access. Meta's login window only offers Instagram accounts of the portfolio that are assigned to you.
PART 4: CONNECT THE PLUGIN
-
Go to Administration → BSS → Plugins → Instagram Feed → Configuration. With Connection method set to Unified login (recommended for new setups), enter the Meta App ID, Meta App Secret, Configuration ID and Instagram account ID (the number shown under your Instagram account in 2. Generate access tokens on the Unified login page).
-
Click Save. The secret is stored encrypted and never shown again.
-
Click Connect with Instagram, log in, choose your Instagram account and allow access.
-
You return to the Configuration page with "Connected to @yourname" and a sync result. The Instagram account card shows Connection method "Unified login" and Access expires "Never". This connection does not expire, so there is nothing to renew. Posts then sync every hour, and you can change the interval under System → Schedule tasks.
-
Optional: Click Sync now to fetch new posts immediately.
PART 5: SHOW THE FEED
-
Main Feed: The Main feed is already active at the bottom of the home page.
-
Feeds: Go to Administration → BSS → Plugins → Instagram Feed → Feeds to change a feed's location, layout (grid, slider or floating post), rows, columns and popup, with a live preview. Add more feeds for other pages, for example product pages showing only matching posts.
-
Manage Posts: Hide or show posts, drag to pin them, and tag products or categories. Tagged products appear in the popup with their price and an Add to cart button.
-
Appearance: The feed follows your theme's font, colours and buttons. Only set colours here if your theme needs it.
-
Uploaded Media: Add your own photos and videos to the feeds.
TROUBLESHOOTING
| Message or problem | Cause and fix |
|---|---|
| "Business portfolio selection is mandatory to use the Instagram API setup with Unified login" | The app has no business portfolio. Click + Business portfolio on that page and choose or create one. |
| "Enter a valid HTTPS URL" when saving the Redirect URL | Meta does not accept localhost. Use the store's public https address, or a tunnel for a local test. |
| "Invalid redirect_uri" / "URL blocked" | The Redirect URL in Meta doesn't match the plugin's exactly. Copy it again from the plugin and remove any trailing /. If the store address changed (for example a new tunnel address), register the new one. |
| Connect button is greyed out | Save the Meta App ID, Meta App Secret and Configuration ID first. |
| "Meta did not give access to an Instagram account" | Meta's login often does not tell the app which account you chose. Enter the Instagram account ID in the Configuration (see Part 4), click Save and connect again. Also check that the account is in the app's business portfolio and assigned to you (see Part 3), is a Business or Creator account and is an accepted Instagram Tester. |
| "Insufficient developer role" | The Instagram account you logged in with isn't an accepted Instagram Tester. Accept the invite (see Part 3) and click Connect again. |
| "The connection request has expired" | More than 30 minutes passed, or the page was reloaded. Click Connect with Instagram again. |
| Personal Instagram account | Switch it to a Business or Creator account, then connect again. |
| You changed the Connection method, App ID or Configuration ID | The old connection belongs to the old settings and is removed when you save. Click Connect with Instagram again. The other method's details stay saved. |
| Feed shows no posts | Check that the feed is Active and placed in a location your theme shows, and that "My Instagram posts" is ticked under Content. Then use Sync now. |
| "Unable to add Instagram account. Failed to remove the existing ownership for the Instagram account" | The Instagram account already belongs to another business portfolio, and an account can belong to only one. Open that portfolio in business.facebook.com/settings → Accounts → Instagram accounts, select the account and click Remove, then add it to your app's portfolio again. Or create the Meta app under the portfolio that already owns the account. |
Cloudflare Tunnel Guide - Test on your own computer (localhost)
Meta does not accept a localhost redirect URL. If your store runs on your own computer, use a free Cloudflare quick tunnel (cloudflared) to give it a public https address for testing.
INSTALL CLOUDFLARED ON WINDOWS (FIRST TIME ONLY)
-
Open PowerShell or Command Prompt as Administrator (or approve the UAC prompt when winget asks) and run this command to install cloudflared with the Windows Package Manager:
winget install --id Cloudflare.cloudflared-
Note: Restart your terminal window after the installation finishes so that your system's PATH variable updates. cloudflared installs to C:\Program Files (x86)\cloudflared\cloudflared.exe, and a terminal opened before the install does not find it.
-
Check that the installation worked:
cloudflared --versionSTART THE TUNNEL
-
Make sure your nopCommerce store is running on your computer, for example on https://localhost:59579.
-
Run this command for your store:
cloudflared tunnel --no-autoupdate --url https://localhost:59579 --no-tls-verify-
Port: Tunnel the https port of your store (59579 is only an example, use yours), not the http one. If you tunnel http, the plugin builds an http:// redirect URL, which Meta rejects.
-
--no-tls-verify: This is needed because the local site uses a self-signed development certificate.
-
Cloudflare connects and shows a public URL in the terminal, like this:
https://your-random-words.trycloudflare.com-
Keep this terminal window running. Closing it breaks the tunnel.
USE THE TUNNEL ADDRESS
-
Open the store admin through the trycloudflare URL, not localhost, before you click Connect with Instagram. The plugin builds the redirect URL from the address you browse on.
-
Go to Administration → BSS → Plugins → Instagram Feed → Configuration and copy the OAuth Redirect URI, Deauthorize callback URL and Data deletion request URL into the Meta app.
-
Use the tunnel address for the app's Privacy policy URL and Terms of service URL too.
-
New URL after every restart: Every restart of cloudflared gives a new URL. Register all of the URLs above in Meta again, or keep the tunnel running for the whole test session.
GOOD TO KNOW
-
Quick tunnels are for testing only. There is no uptime guarantee, at most 200 requests can be in flight (more get error 429), and no Cloudflare account is needed.
-
Browsing through the tunnel works without changing the store URL in nopCommerce. Emails and some absolute links still use the Store URL under Configuration → Stores.
CONNECT WITH AN ACCESS TOKEN INSTEAD
-
Once you have followed the setup guide for your connection method, selected the Connection method and entered the Meta App ID, Meta App Secret, Configuration ID and Instagram account ID, your account should connect. If it still isn't connected, connect with an access token instead. Open Connect with an access token instead on the Configuration page:
-
Save the Meta App ID and Meta App Secret first.
-
In Meta, go to Use cases → Customize → API setup with Unified login → 2. Generate access tokens.
-
Click Generate token next to your account and finish the login.
-
Copy the token. Meta shows it only once.
-
Back in the plugin, paste the token into Access token and click Connect with this token.
-
Note: The plugin uses the token once to connect, then stores it encrypted and never shows it again.
DISPLAY, SYNC AND UPLOAD SETTINGS
-
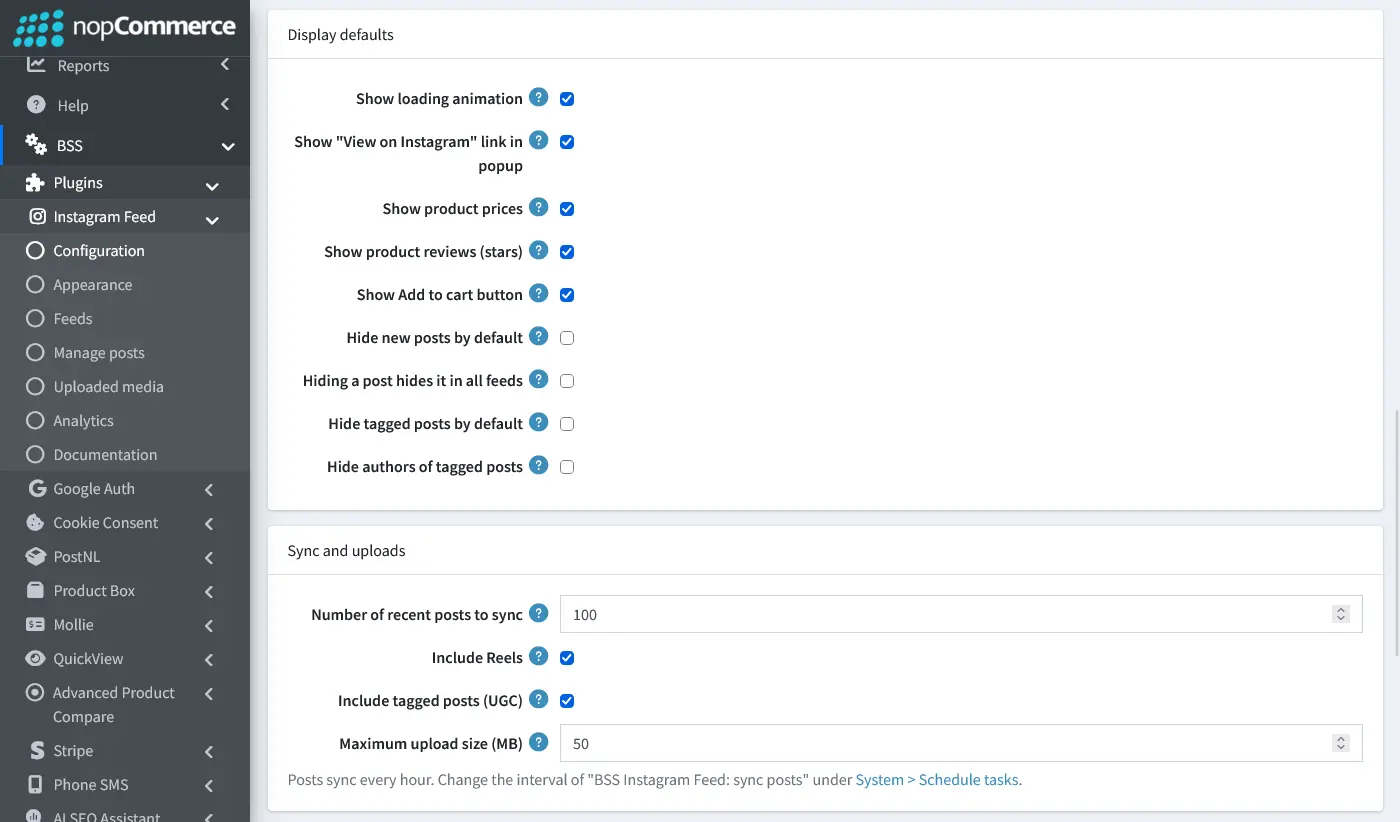
Show loading animation: Show a soft placeholder animation on posts while their images load.
-
Show "View on Instagram" link in popup: Show a link to the original post at the bottom of the popup.
-
Show product prices: Show the price of tagged products in the popup.
-
Show product reviews (stars): Show the star rating and review count of tagged products in the popup.
-
Show Add to cart button: Let customers add tagged products to the cart from the popup. Products that need options show "View product" instead.
-
Hide new posts by default: New Instagram posts stay hidden until you show them in Manage posts.
-
Hiding a post hides it in all feeds: When this is off, hiding a post in Manage posts hides it in that feed only. When it is on, the post disappears from every feed.
-
Hide tagged posts by default: Posts from other accounts that tagged you (UGC) stay hidden until you approve them.
-
Hide authors of tagged posts: Do not show the usernames of other accounts on tagged posts.
-
Number of recent posts to sync: Enter how many of your newest Instagram posts are kept in sync (1-1000).
-
Include Reels: Sync Reels together with photos and videos.
-
Include tagged posts (UGC): Also sync public posts in which other accounts tagged yours. Instagram may not allow this for every app, and the sync result tells you.
-
Maximum upload size (MB): Set the largest file accepted on the Uploaded media page.
-
Posts sync every hour. To change the interval, change the BSS Instagram Feed: sync posts task under System → Schedule tasks.
NOTIFICATIONS AND ANALYTICS SETTINGS
-
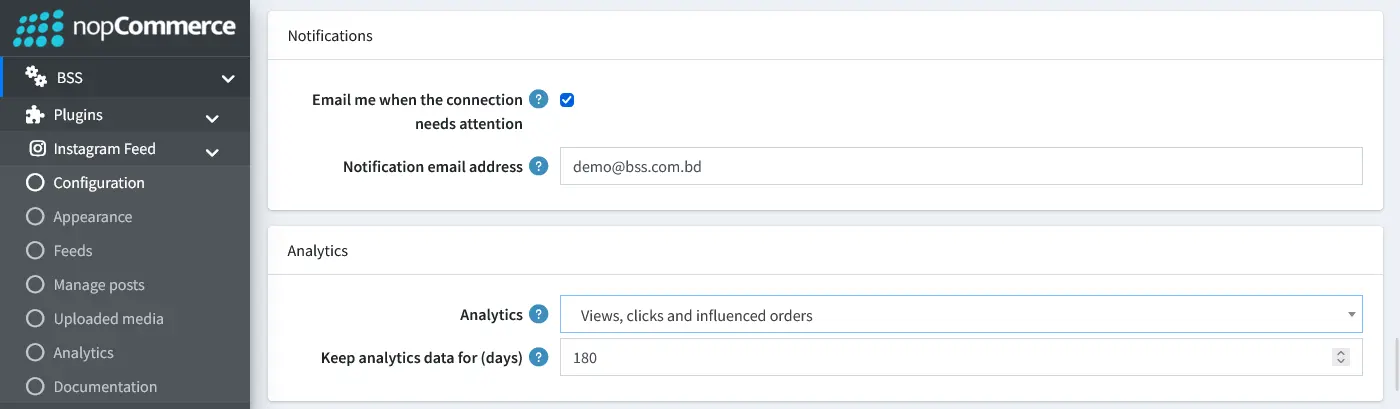
Email me when the connection needs attention: Get an email (at most one a day) when the connection fails or access is about to expire.
-
Notification email address: Enter the address that receives these emails. Leave it empty to use the store's default email account.
-
Analytics: Choose Off, Views and clicks only, or Views, clicks and influenced orders, which also counts orders placed after a click on a post. No personal data is stored.
-
Keep analytics data for (days): Enter how many days analytics data is kept. Older events are deleted every day.
MANAGE FEEDS
-
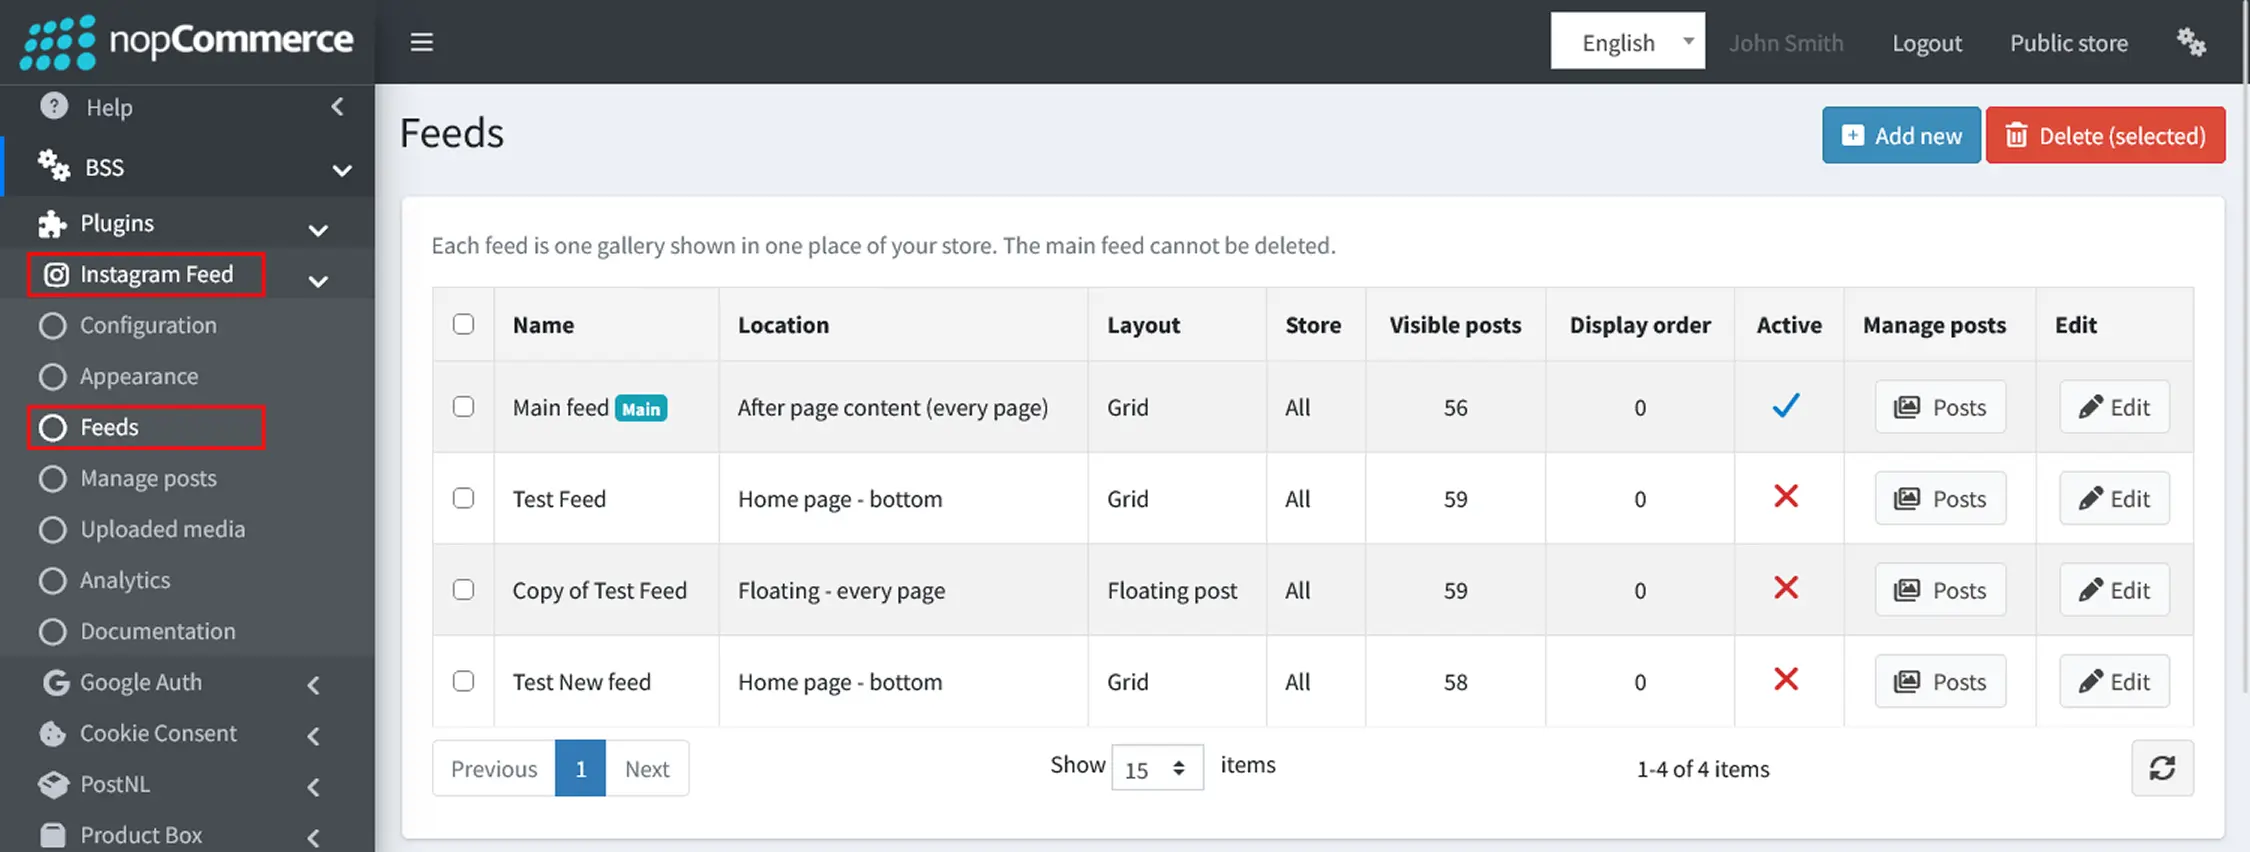
Go to Administration → BSS → Plugins → Instagram Feed → Feeds
-
Each feed is one gallery shown in one place of your store. The list shows all your feeds, and the Main badge marks the main feed.
-
Add new: Create a new feed.
-
Delete (selected): Tick one or more feeds, then click to delete them. The main feed cannot be deleted.
-
Name, Location, Layout and Store: The feed's name, where it appears in your store (for example Home page - bottom), its layout (Grid, Slider or Floating post) and the store it is shown in.
-
Visible posts: The number of posts currently shown in the feed.
-
Display order: The order of the feed when several feeds share the same location.
-
Active: A tick means the feed is shown in your store. A cross means it is hidden.
-
Posts: Open Manage posts for that feed.
-
Edit: Open the feed's settings to edit its content, header and design.
-
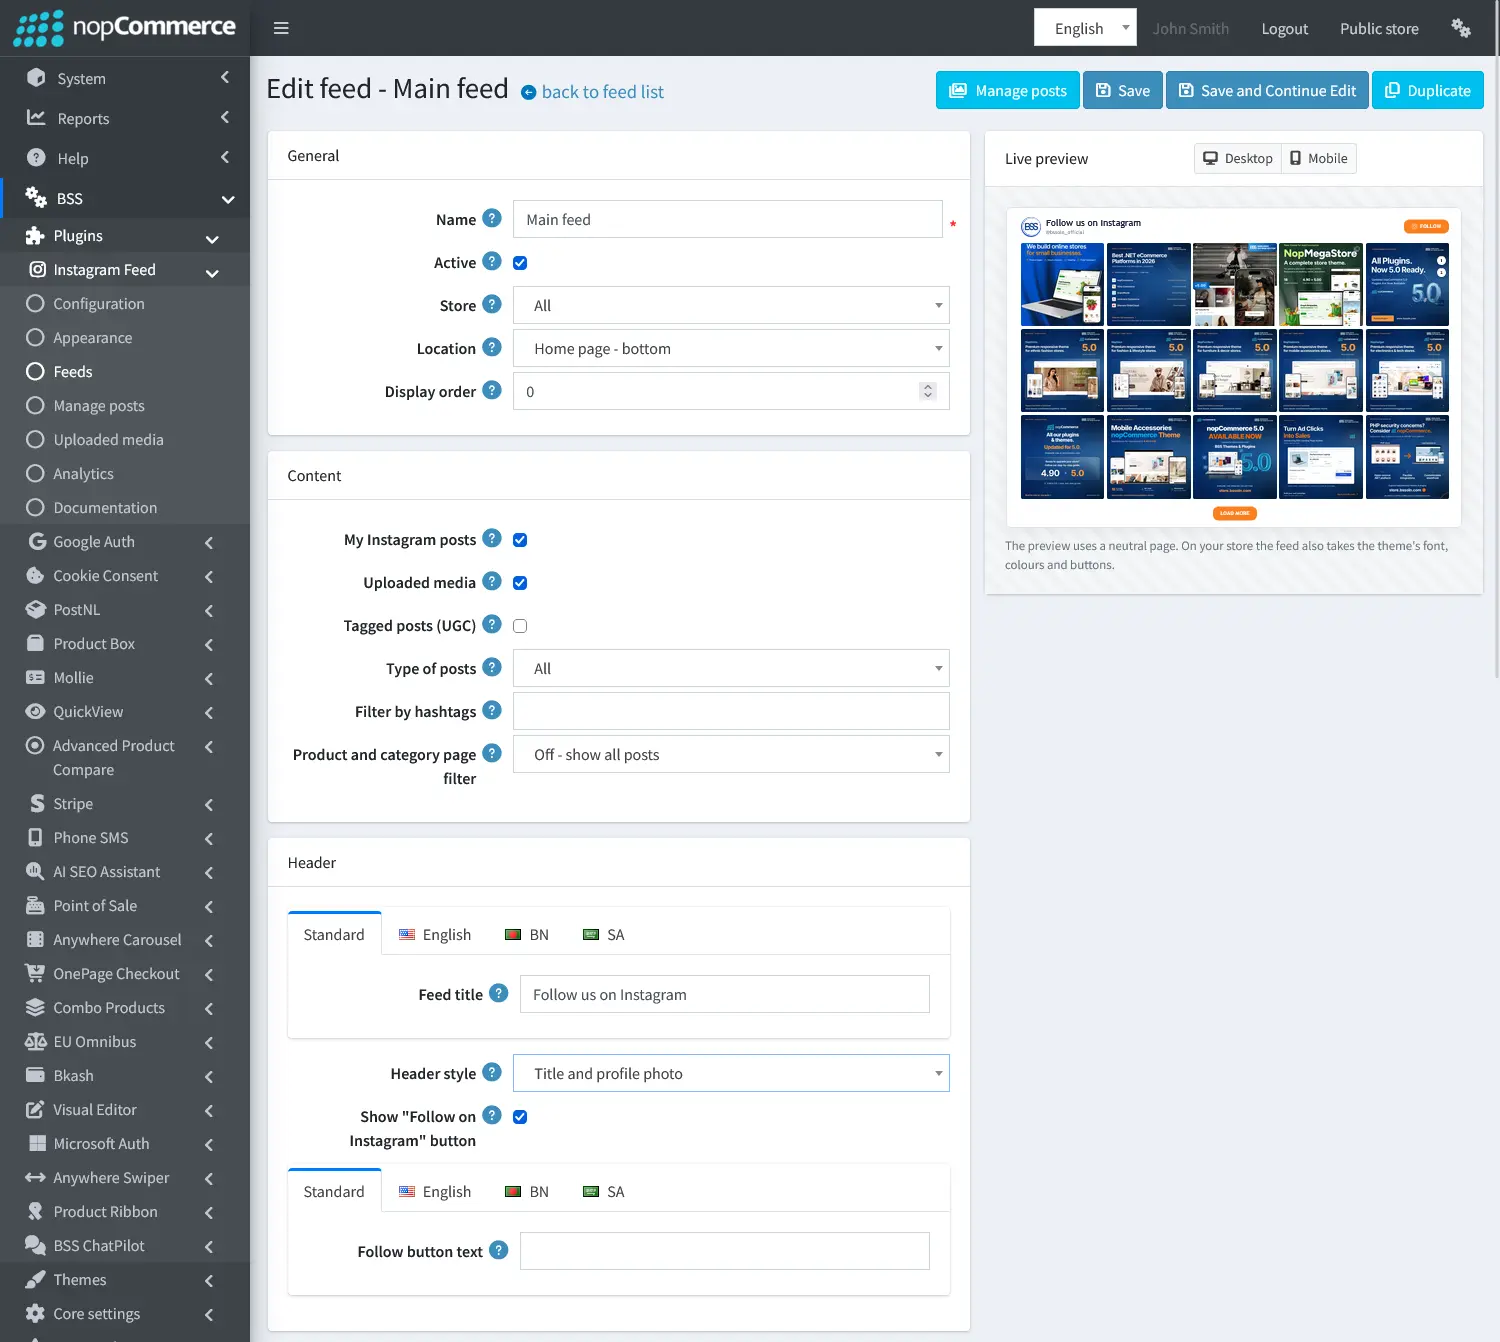
Name: Enter an internal name for the feed. Customers do not see it.
-
Active: Tick to show this feed on your store.
-
Store: Choose the store that shows this feed, or All.
-
Location: Choose where the feed appears on your store, such as the home page, product page, category page or footer. Product and category page locations can also show matching posts only (see Product and category page filter).
-
Display order: Set the order of feeds that share a location. The lower number comes first.
-
My Instagram posts: Show posts, reels and videos of the connected account.
-
Uploaded media: Show photos and videos added on the Uploaded media page.
-
Tagged posts (UGC): Show public posts in which other accounts tagged yours. This needs Include tagged posts (UGC) to be ticked on the Configuration page.
-
Type of posts: Show All posts, Photos only or Videos only.
-
Filter by hashtags: Show only posts whose caption contains at least one of these hashtags, for example #summer, #sale. Leave it empty to show all posts.
-
Product and category page filter: On product and category pages, choose Off - show all posts, On - matching posts only (posts tagged with the product or category being viewed) or On - matching posts or fallback (fills the rest with recent posts).
-
Feed title: Enter the heading shown above the feed. Leave it empty for no title. Use the language tabs to translate it.
-
Header style: Choose what the header shows next to the title: Title only, Title and followers, Title and profile photo, or Title, profile photo and followers.
-
Show "Follow on Instagram" button: Tick to show a button above the posts that opens your Instagram profile.
-
Follow button text: Enter the text on the button, up to 100 characters. Leave it empty to use the default text "Follow". Use the language tabs to translate it.
-
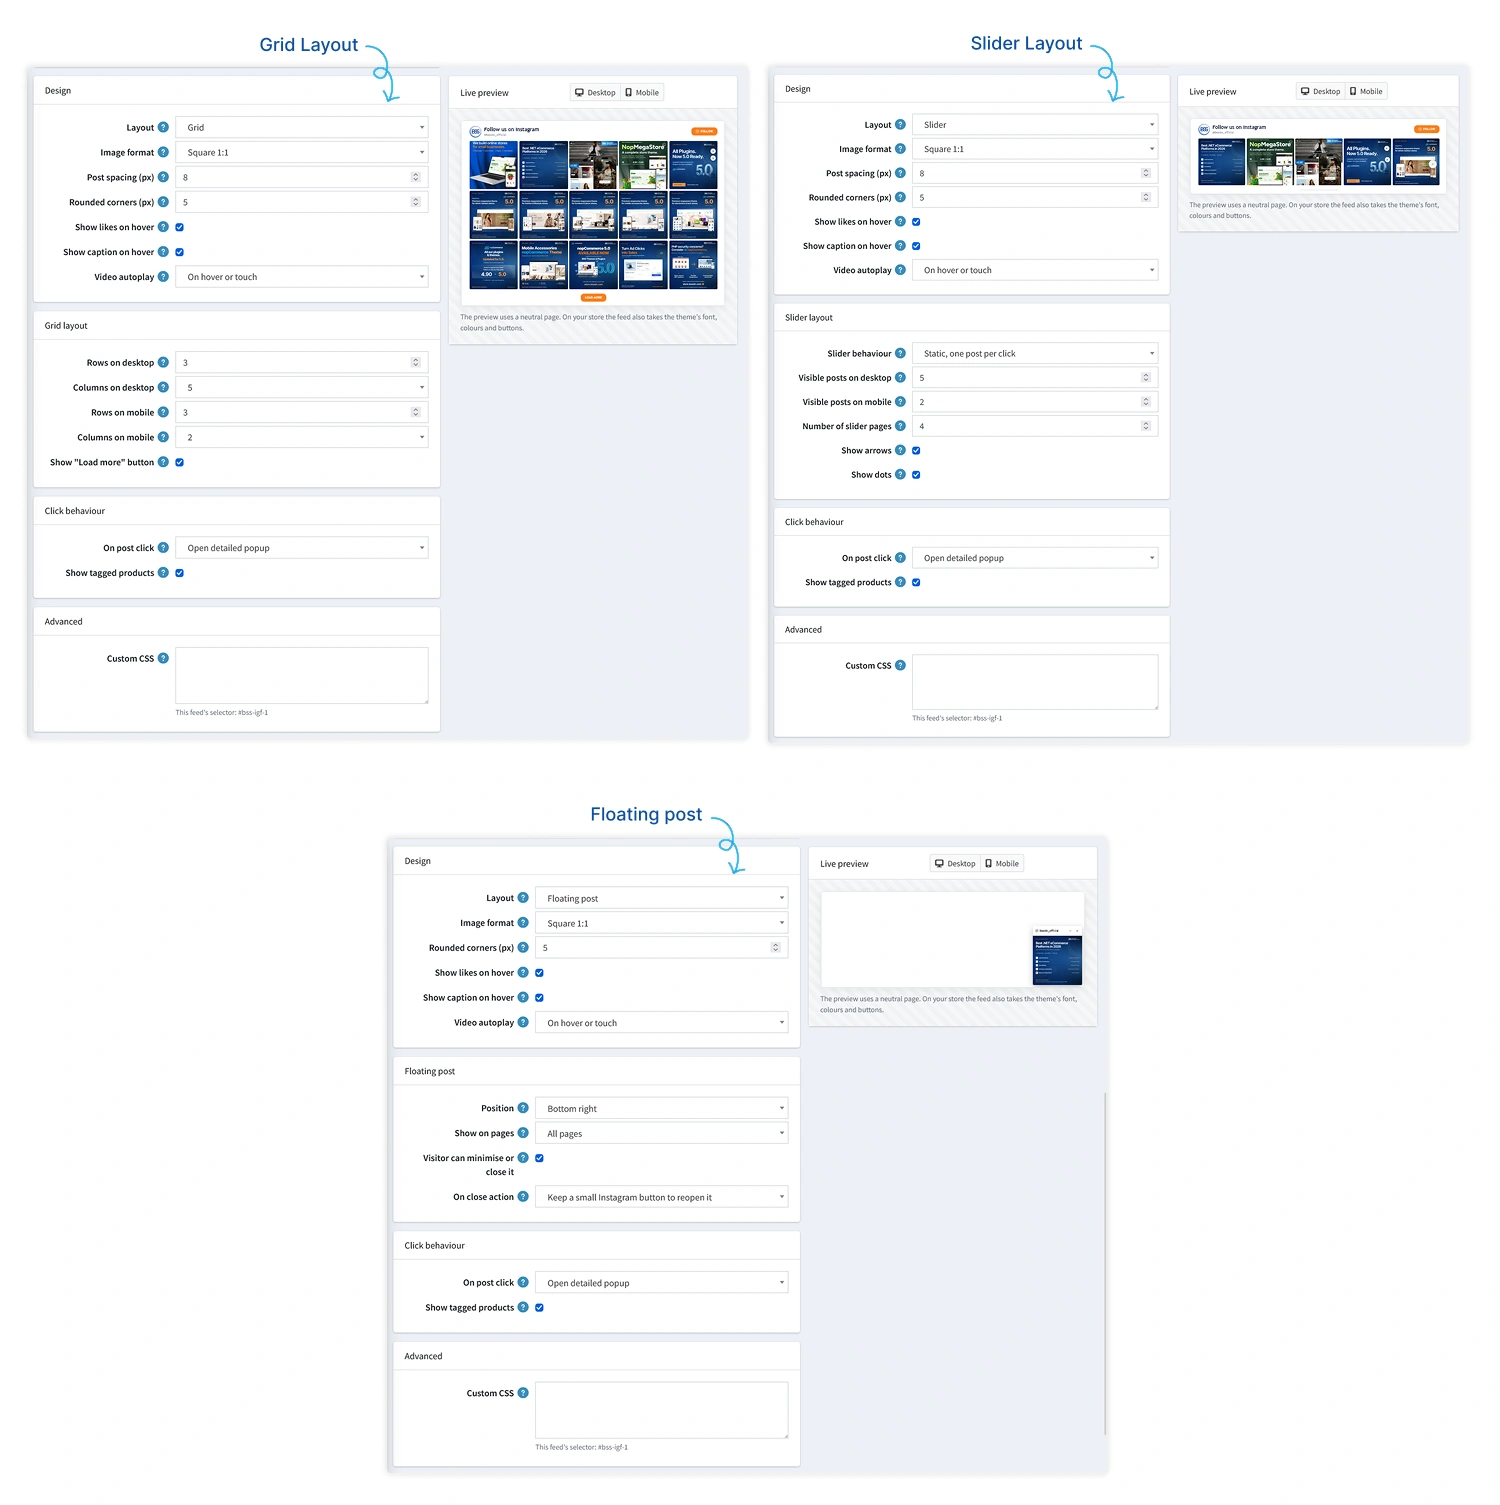
Layout: Choose Grid, Slider or Floating post (a single post in a corner of every page). The settings below change with your choice.
-
Image format: Choose the shape of each post: Square 1:1, Portrait 3:4, Portrait 4:5, Landscape 4:3, Story 9:16 or Circles. Images are cropped to fit.
-
Post spacing (px): Set the space between posts. This is available for Grid and Slider.
-
Rounded corners (px): Set how round the post corners are. Enter 0 for square corners. For a floating post, this rounds the corners of the floating card (up to 28 px).
-
Show likes on hover and Show caption on hover: Show the like count and the start of the caption when the pointer is over a post. The like count also shows in the popup.
-
Video autoplay: Choose Yes to play videos silently when they are on screen, On hover or touch to play them only then, or No to never play them.
-
Grid layout: Set the number of rows shown before Load more button and the posts per row (columns), separately for desktop and mobile. For columns, Auto picks a number that fits the space. Tick Show "Load more" button to let visitors reveal more rows of posts.
-
Slider layout: Choose the Slider behaviour. Static sliders move with the arrows, and Autoscroll sliders move on their own. Each step moves one post or a whole page. Then enter the Visible posts on desktop and mobile and the Number of slider pages. For autoscroll, also set the Autoscroll speed (seconds) and whether it stops with Pause on hover. Tick Show arrows and Show dots to show the previous and next arrows and the page dots.
-
Floating post layout: Choose the Position (Bottom right or Bottom left) to place the floating post on and Show on pages (All pages or Home page only). Tick Visitor can minimise or close it to show minimise and close buttons. Then choose the On close action: keep a small Instagram button to reopen it, hide until the browser is closed, hide for a number of days (1 to 365), never show again, or show again on the next page. Minimise is not affected.
-
On post click: Choose what happens when a visitor clicks a post: Open detailed popup, Open minimal popup, Go to Instagram or Do nothing.
-
Show tagged products: Show each post's tagged products in the popup, with the numbered markers you placed on the image. Untick to hide them in this feed.
-
Custom CSS: Add extra CSS to the page with this feed. Start your selectors with the feed's selector shown below the box (for example #bss-igf-1) to affect this feed only.
-
Note: When you choose Floating post, the Location field in the General card and the whole Header card disappear.
MANAGE POSTS
-
Go to Admin → BSS → Plugins → Instagram Feed → Manage posts, or click Posts next to a feed on the Feeds page.
-
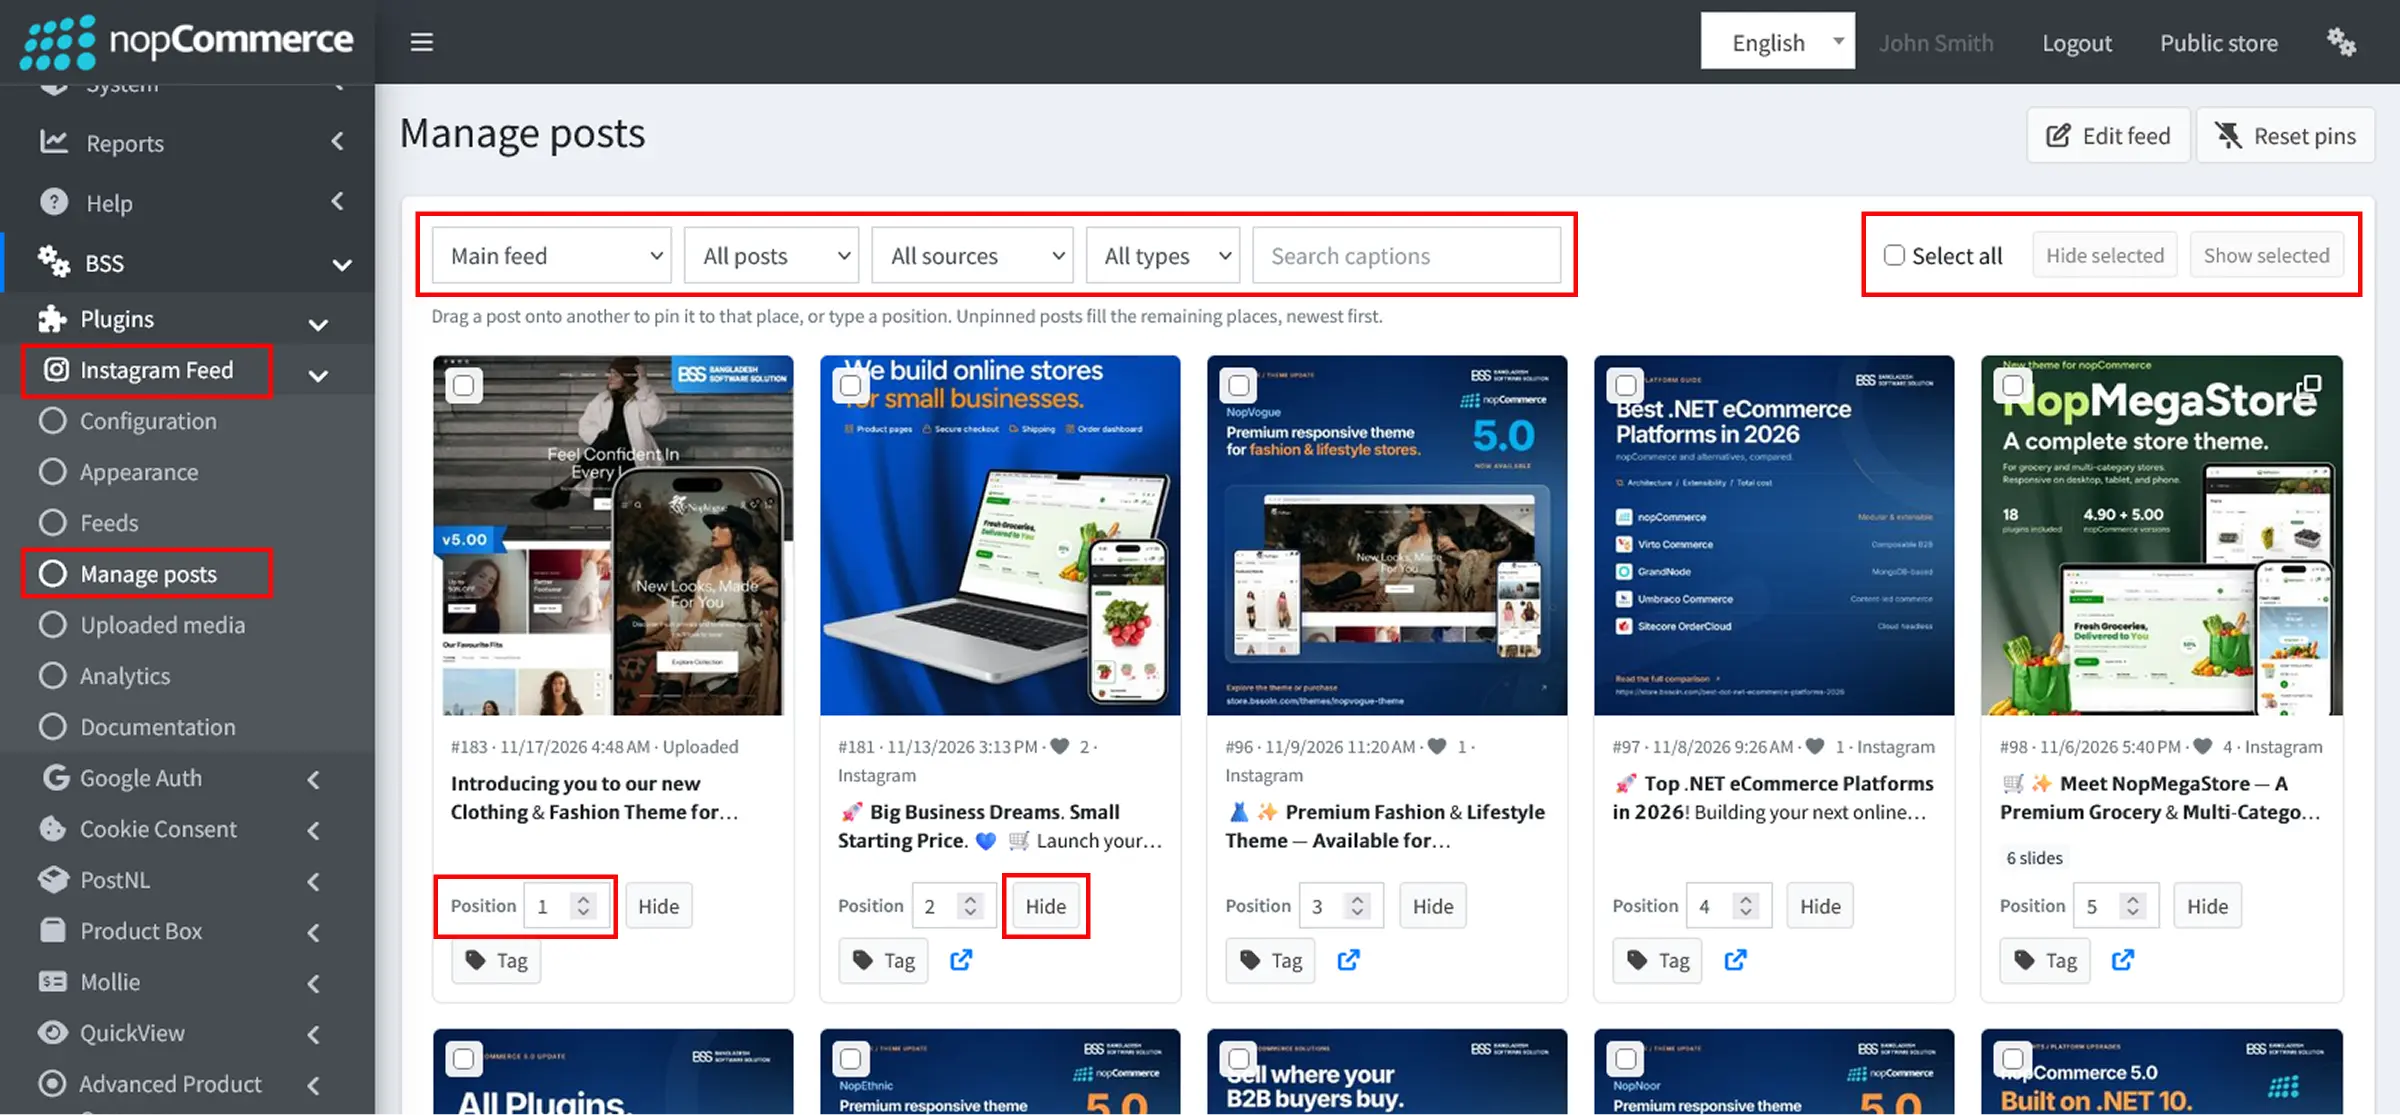
Feed, filters and search: Use the first dropdown to choose the feed. Then narrow the posts with the other dropdowns and the Search captions box.
-
Select all, Hide selected and Show selected: Tick several posts, or tick Select all, then click Hide selected or Show selected to hide or show them at once.
-
Pin a post: Drag a post onto another to pin it to that place, or type a number in Position on the post card. Unpinned posts fill the remaining places, newest first. Pinned posts show a Pinned badge. Click Unpin to release one post, or Reset pins at the top to release all of them.
-
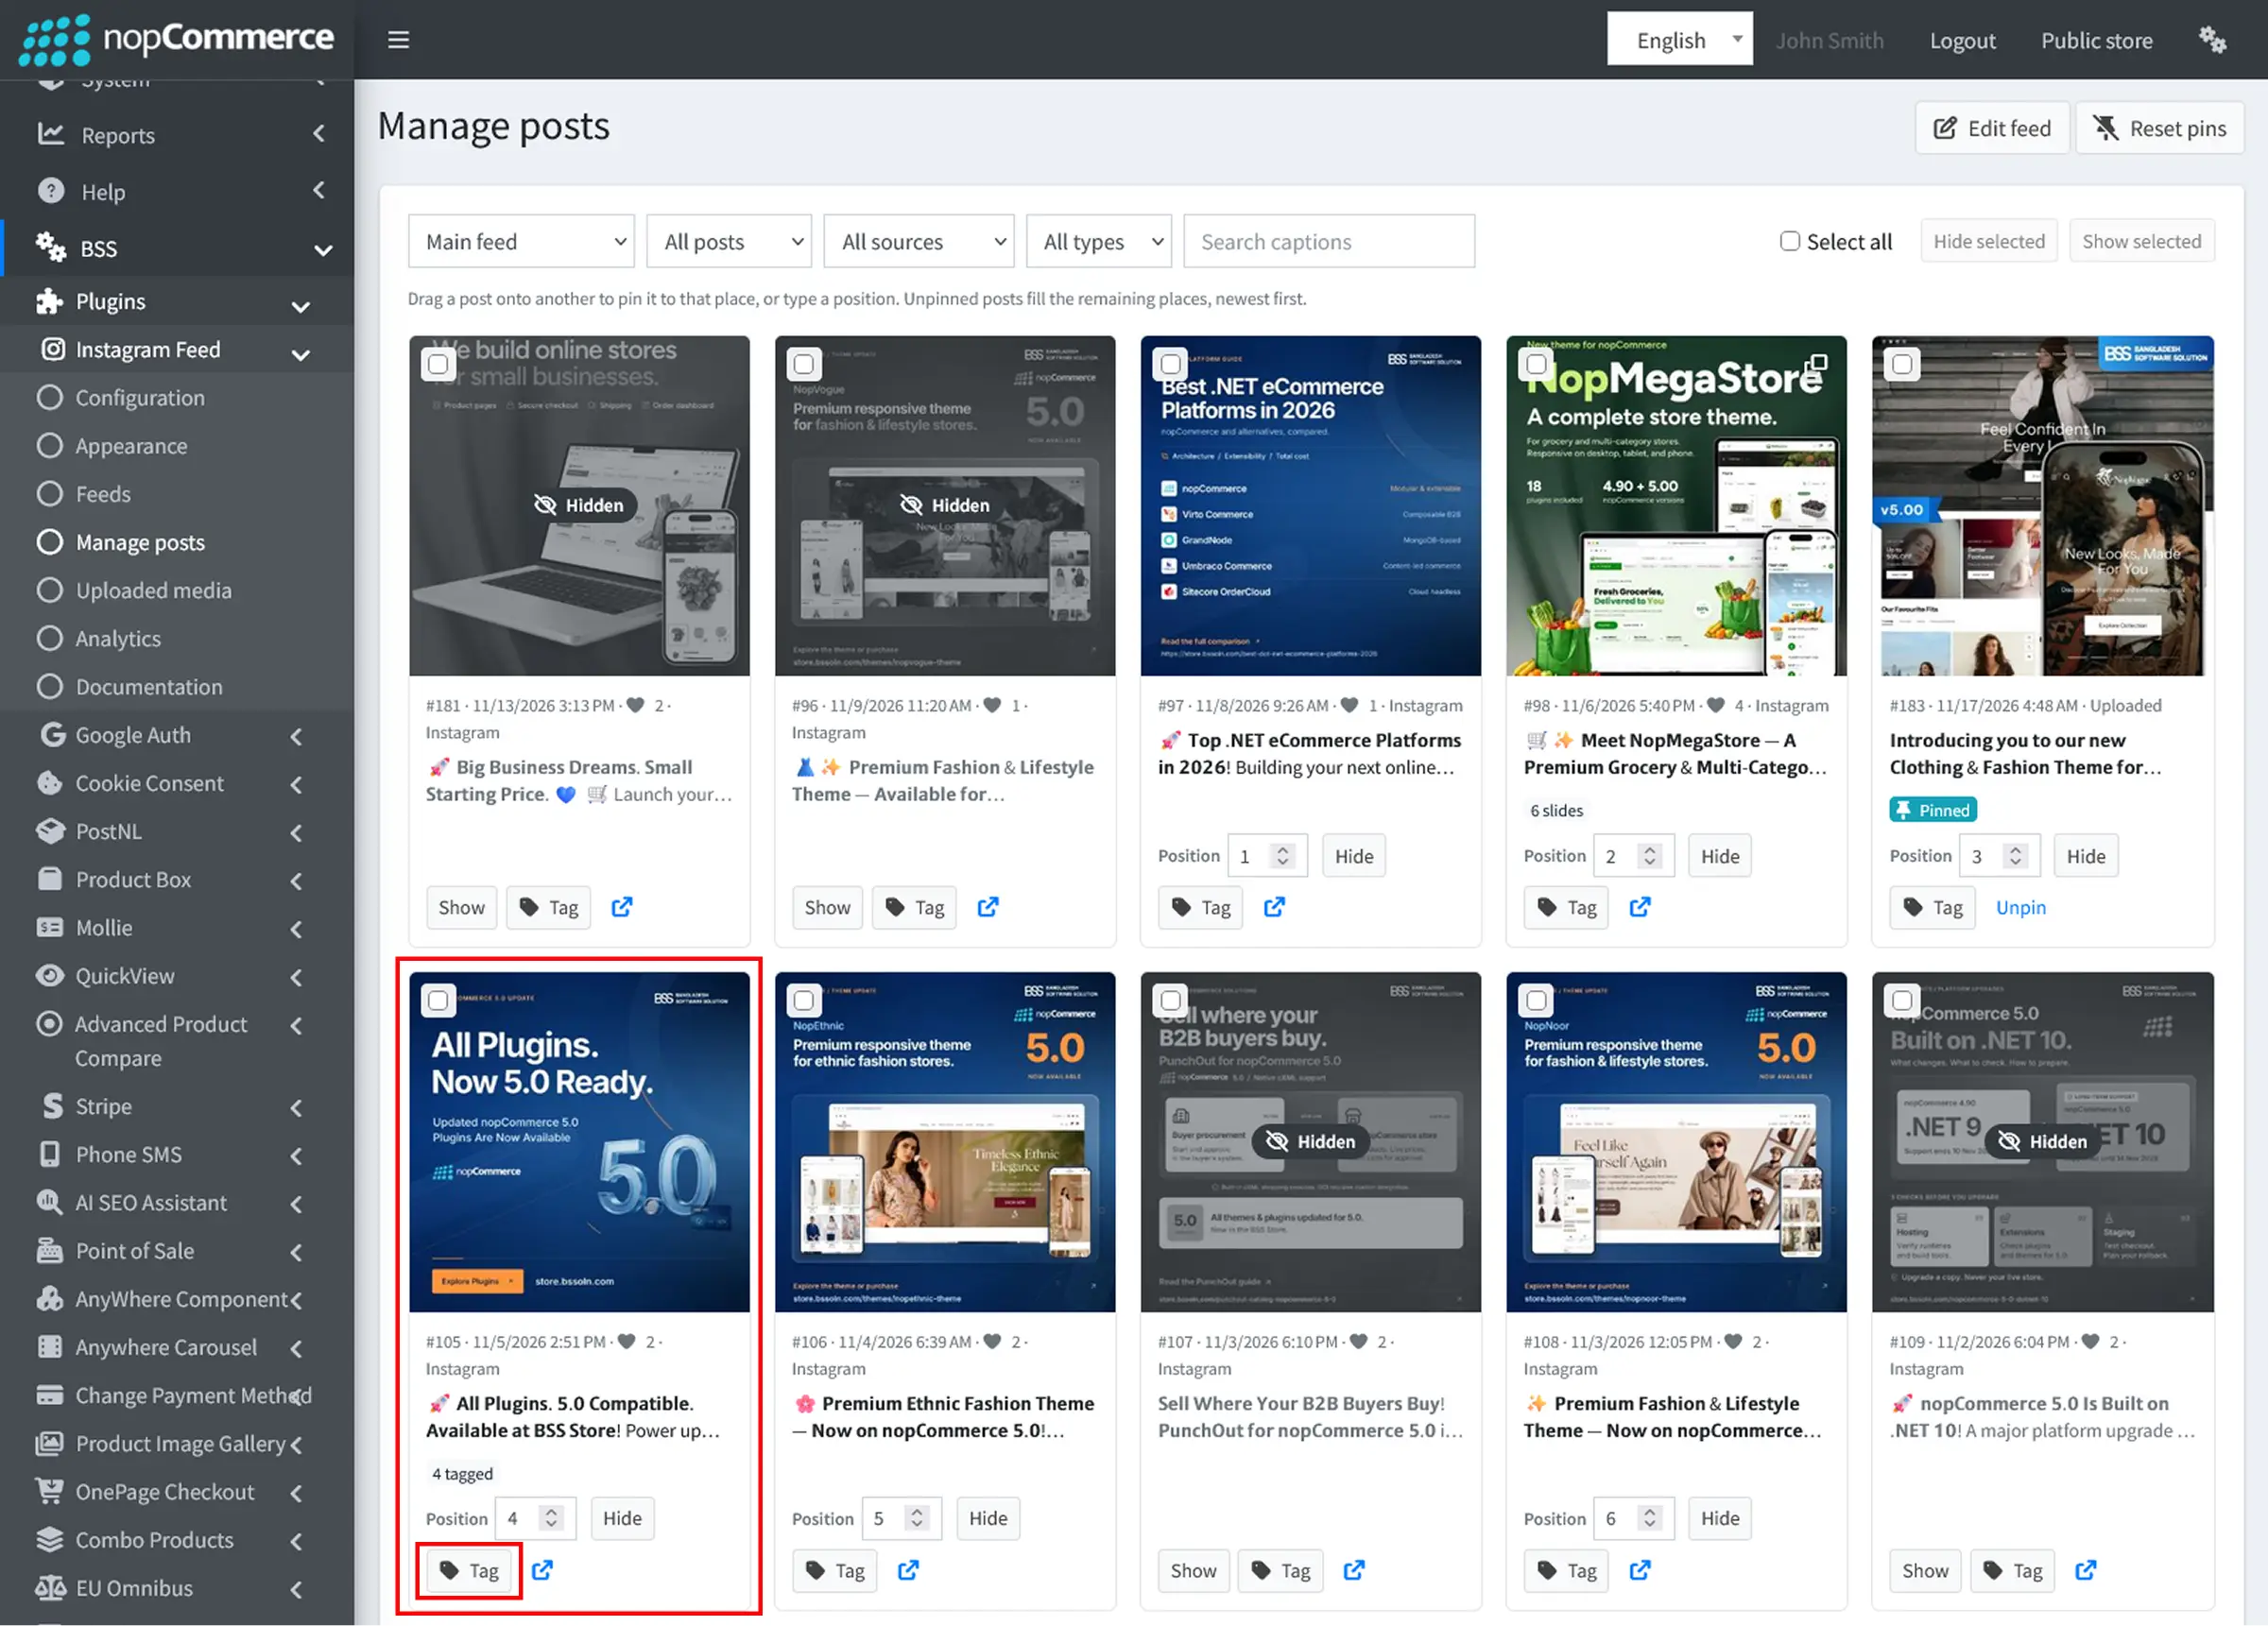
Hide a post: Click Hide on the post card. A hidden post is greyed out and marked Hidden. Click Show to bring it back. Whether a hidden post is hidden in this feed only or in all feeds depends on the Hiding a post hides it in all feeds setting on the Configuration page.
-
View on Instagram: Click the blue arrow icon on a post card to open the original post on Instagram.
-
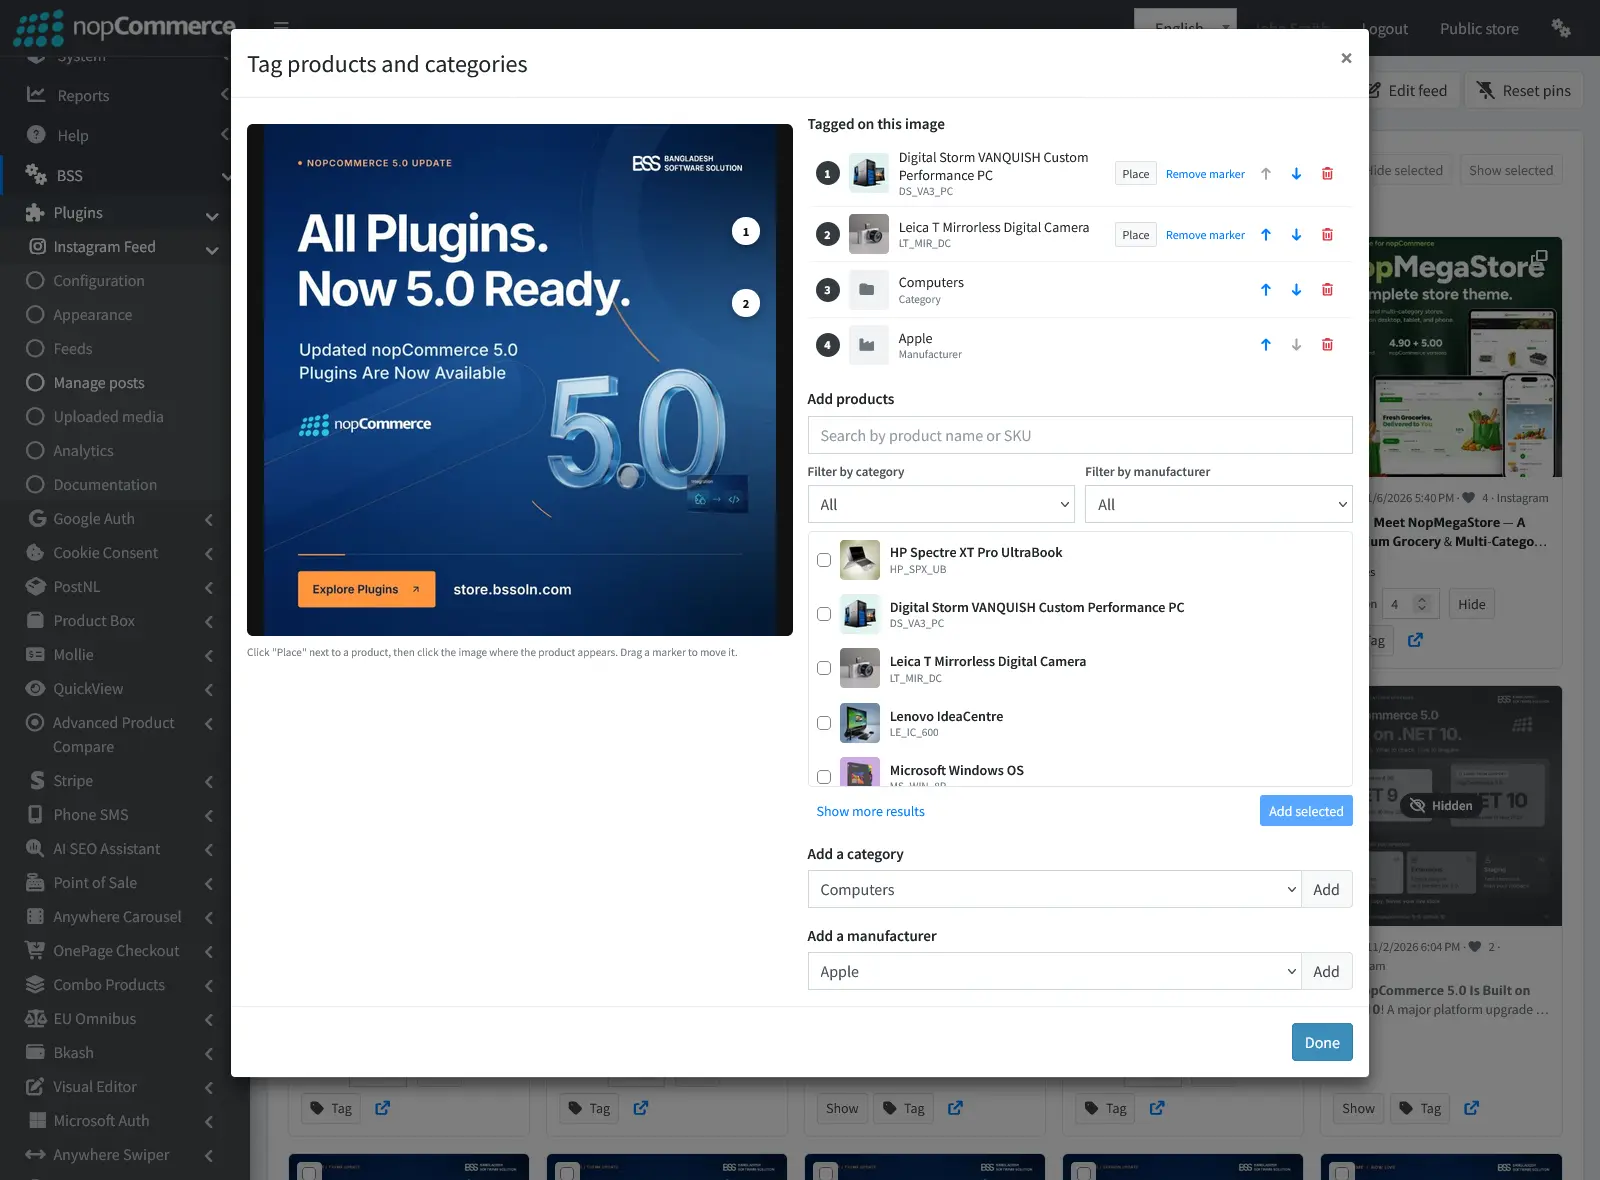
Tag: Click Tag on a post card to tag products and categories on that post. A popup opens.
-
Place a marker: Click Place next to a product, then click on the desired spot on the popup image to add a marker. Customers can click this marker to navigate to the corresponding product page. Drag the marker to reposition it, or click Remove marker to remove only the marker.
-
Tagged on this image: See everything tagged on the post, in numbered order. Use the up and down arrows to change the order, and the bin icon to remove a tag. Categories and manufacturers have no marker.
-
Add products by searching for them, filtering them or selecting them from the list, then click Add selected.
-
Add a category or a manufacturer by choosing it from the dropdown and clicking Add.
-
Click Done to apply the changes.
UPLOADED MEDIA
-
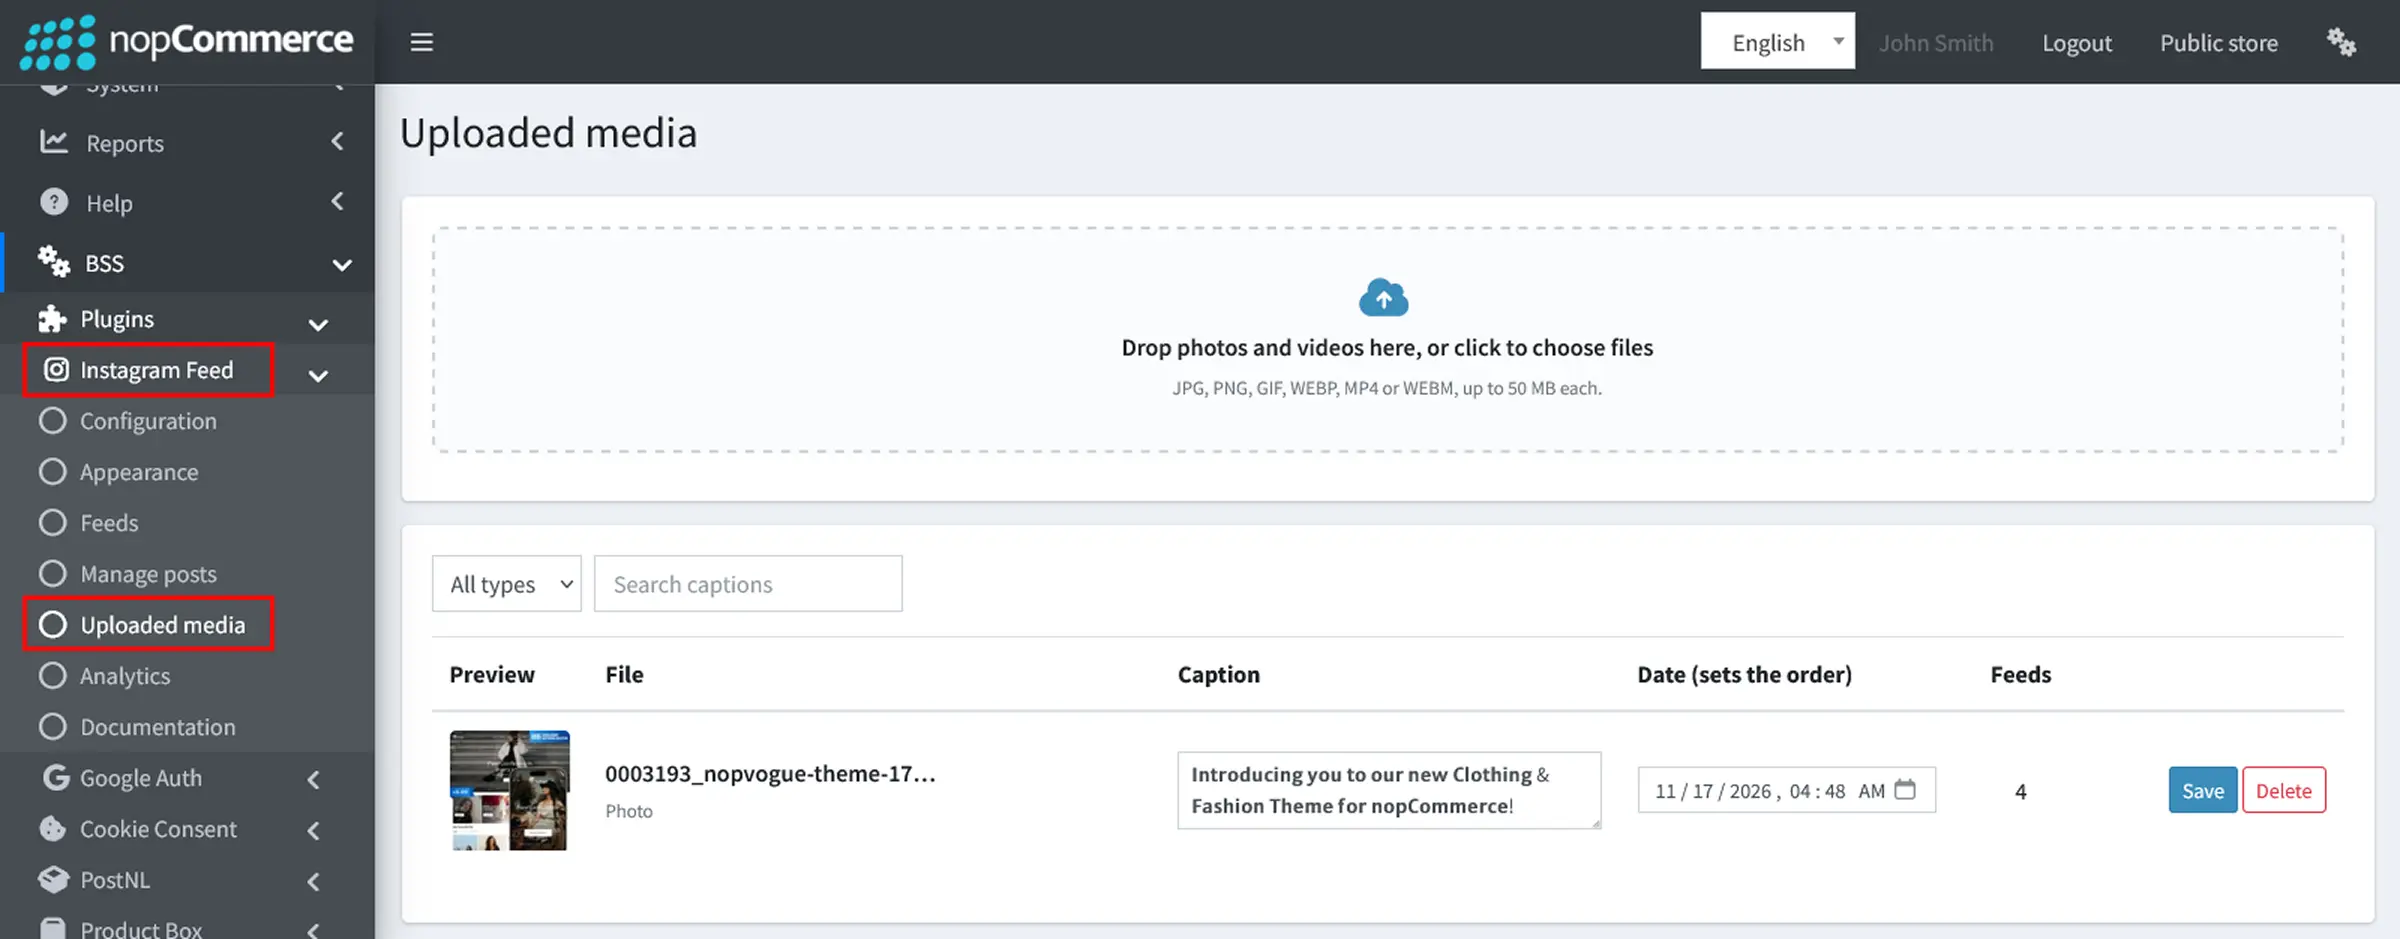
Go to Administration → BSS → Plugins → Instagram Feed → Uploaded media.
-
Drag and drop photos or videos into the upload area, or click to select files. Supported formats are JPG, PNG, GIF, WEBP, MP4, and WEBM, with a maximum file size of 50 MB each. You can upload multiple files at once.
-
Use the All types dropdown to filter photos or videos, or use Search captions to find specific uploaded media.
-
Review the uploaded files in the table, including their preview, filename, media type, caption, date, and the number of feeds using each file.
-
Edit the Caption or Date (sets the order) as needed, then click Save to apply the changes.
-
Click Delete to remove a file. Deleted files disappear from every feed where they are used.
FEED APPEARANCE
-
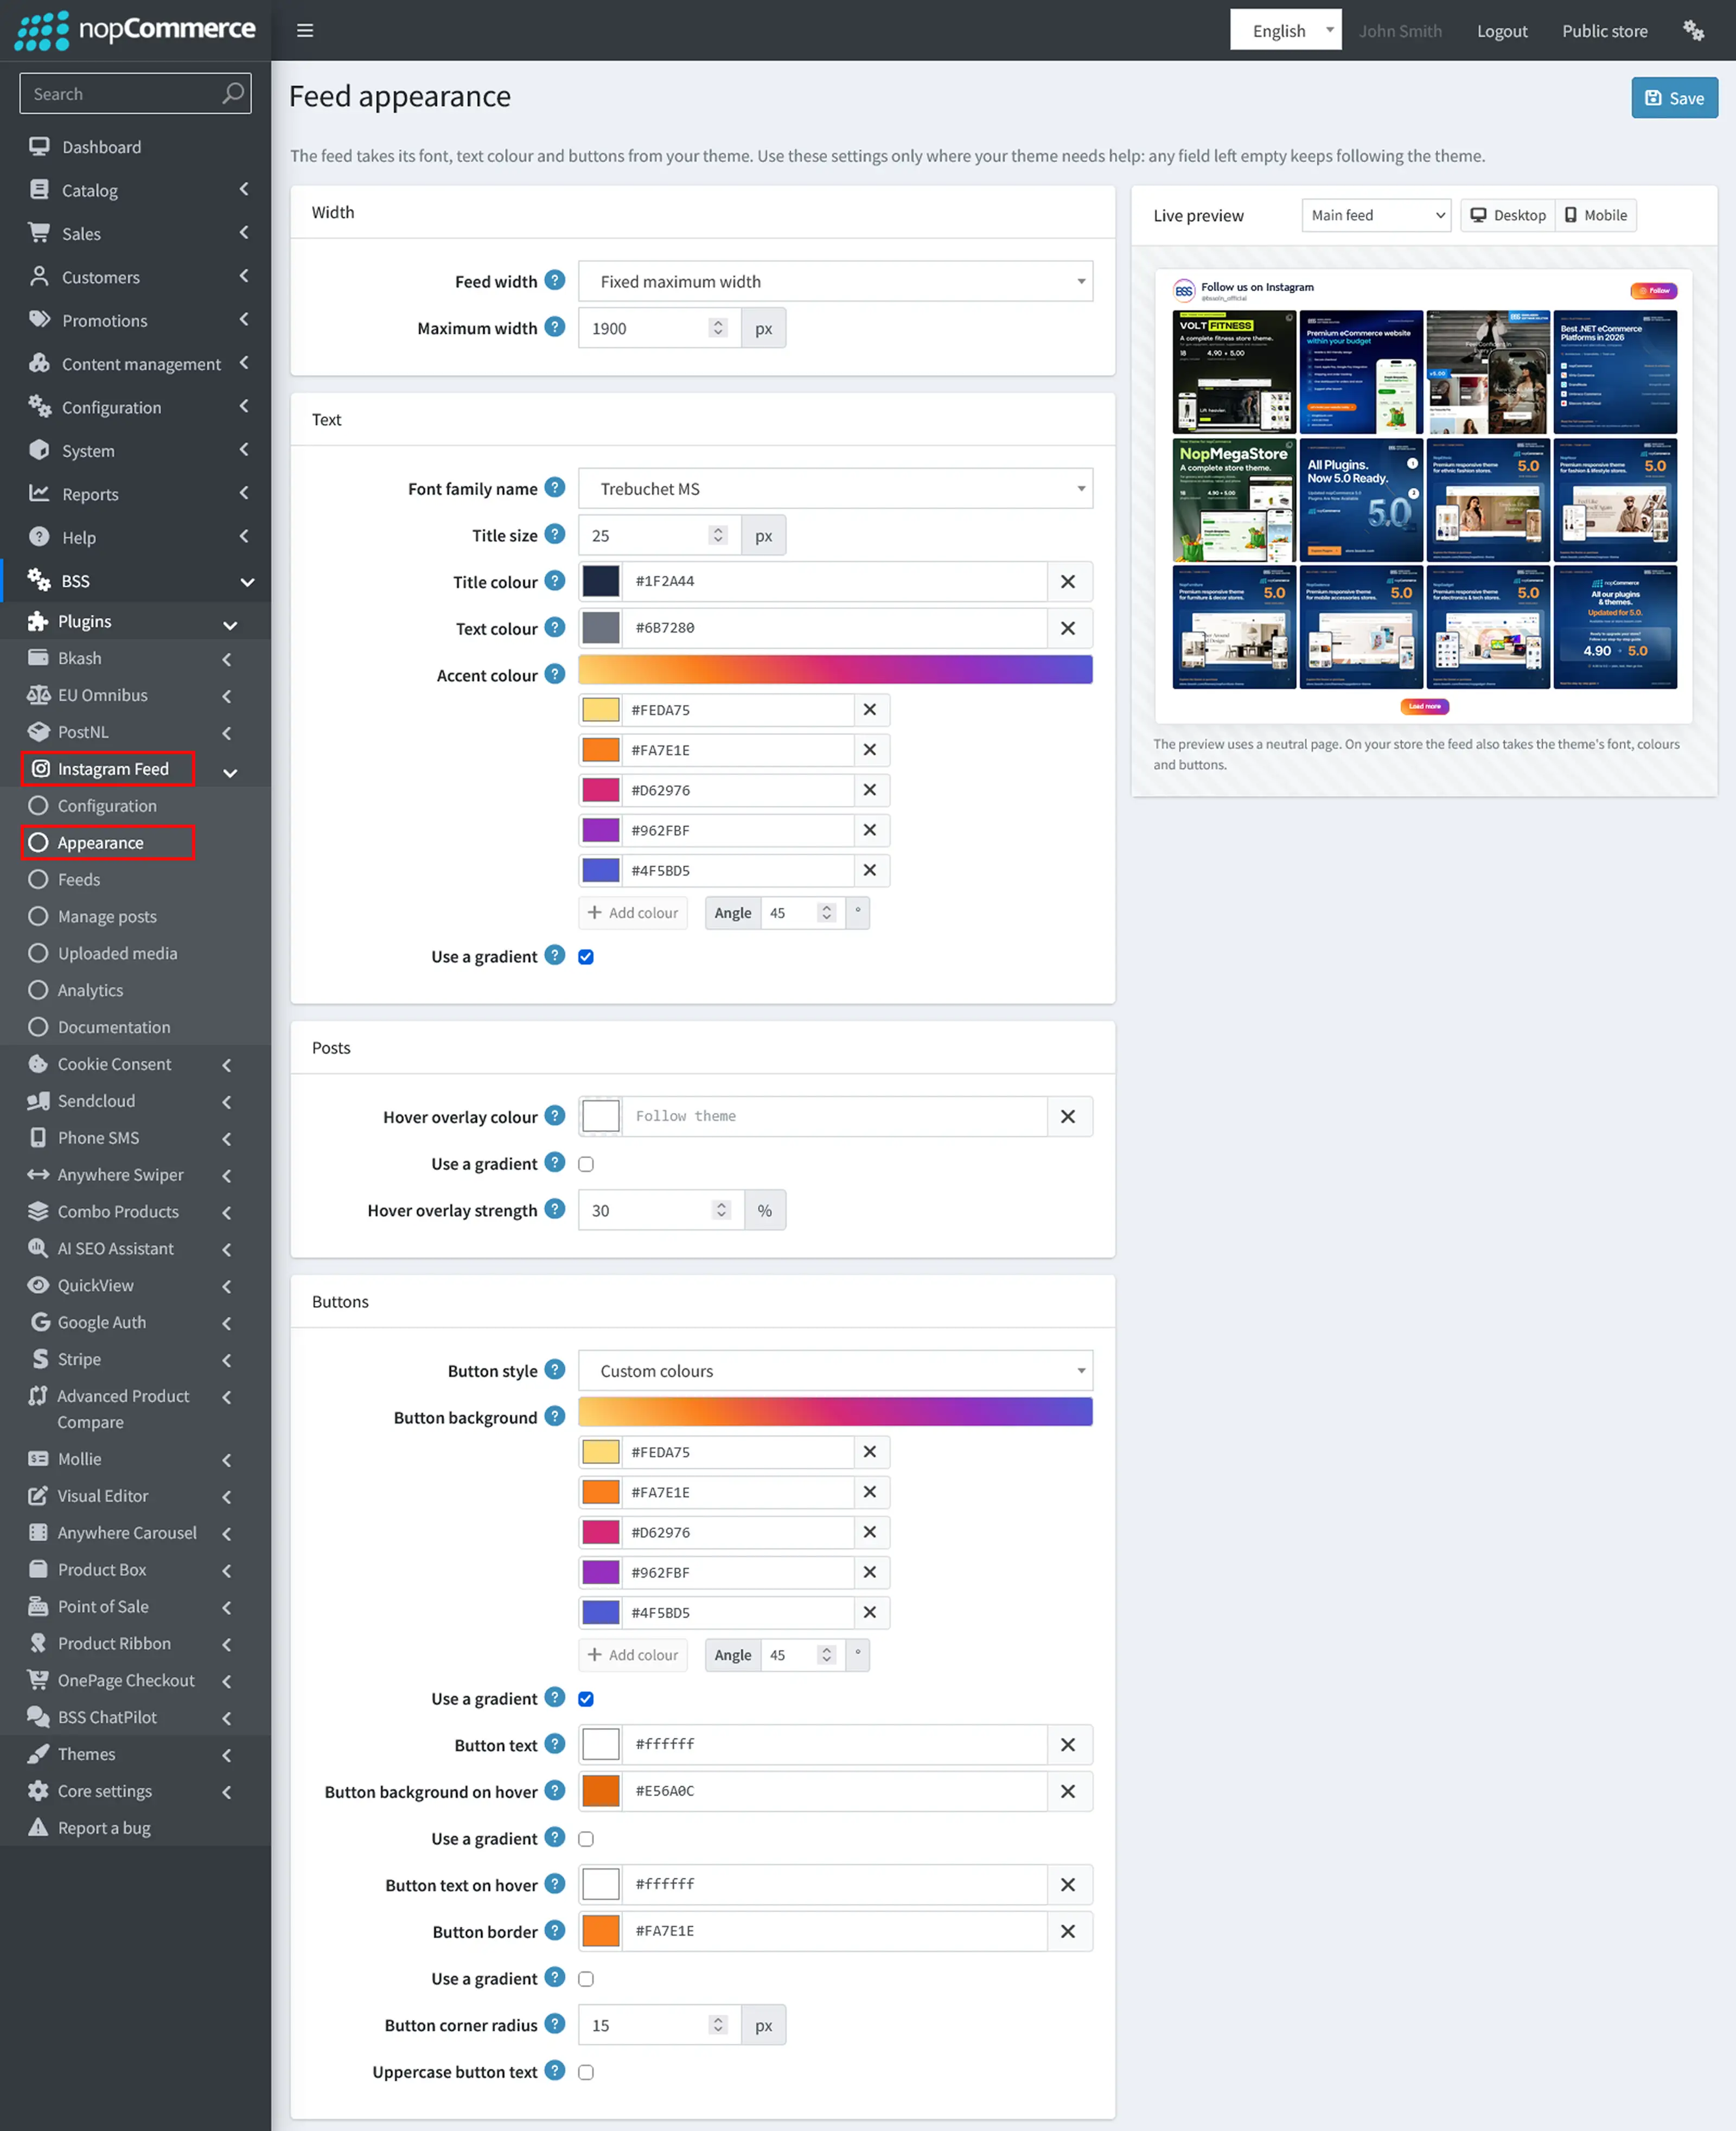
Go to Administration → BSS → Plugins → Instagram Feed → Appearance to customize the overall look and feel of your Instagram feed on the storefront. The feed follows your store's theme by default, so you only need to adjust the settings you want to change.
-
Width: Choose a Feed width option:
Auto: Matches the theme's content width.
Full width: Displays the feed edge to edge.
Fixed maximum width: Limits the feed to a specified width. Enter the Maximum width in pixels. The feed is centered on the page.
-
Text:
Font and size: Choose a Font family name for the feed title, captions, and buttons, and adjust the Title size in pixels. Select Follow theme for the font or enter -1 for the title size to use your theme's settings.
Colours: Customize the Title colour, Text colour, and Accent colour for the feed heading, text, profile photo ring, focus outlines, and rating stars.
-
Posts: Set the Hover overlay colour and adjust its strength (0–100%) to control how the overlay appears when hovering over a post.
-
Buttons: Choose Theme buttons to use your store's button design, or select Custom colours to customize the button background, text, hover colours, and border. You can also adjust the Button corner radius and enable Uppercase button text.
-
Gradients: Tick Use a gradient under the accent colour, hover overlay colour, button background, button background on hover or button border to blend several colours instead of using one. Click Add colour to add more colours to the gradient, and set the Angle to change the direction of the blend.
-
Live preview: Use the preview panel on the right to see how your feed looks with the selected settings. Choose a feed from the dropdown and switch between Desktop and Mobile to check its appearance on different screen sizes. The preview uses a neutral page; on your storefront, the feed also inherits your theme's styling.
-
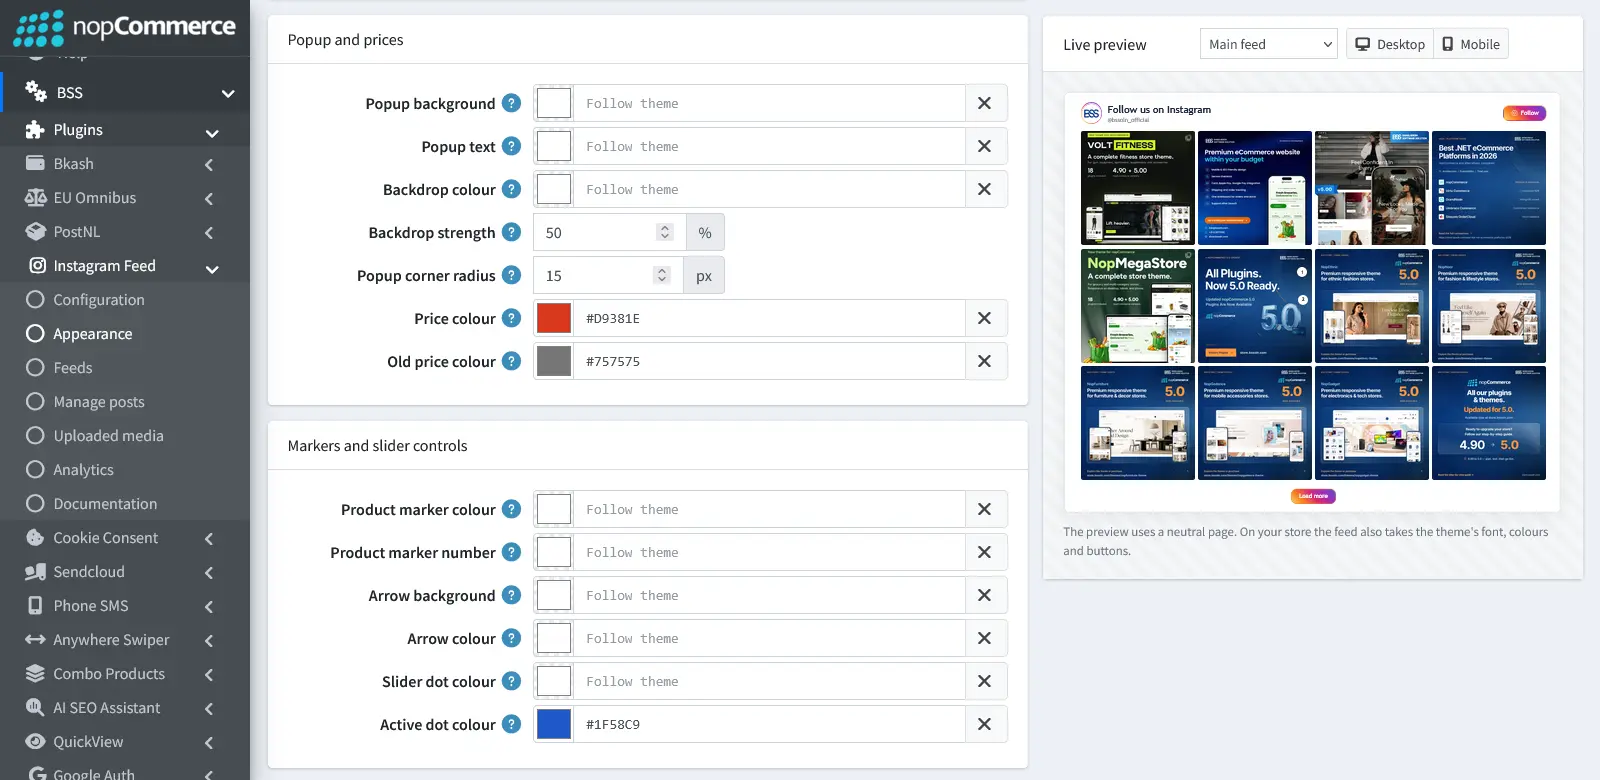
Popup and prices: Customize the Popup background and Popup text colours, adjust the Backdrop colour and strength (0–100%), and set the Popup corner radius. You can also choose separate colours for the Price and Old price.
-
Markers and slider controls: Set the Product marker colour and Product marker number colour. Customize the Arrow background, Arrow colour, Slider dot colour, and Active dot colour to match your store's design.
-
For colour settings, use the colour picker or enter a colour code. Click the × icon to clear a colour and return to the theme's styling. Once you are satisfied with the appearance, click Save to apply your changes.
ANALYTICS
-
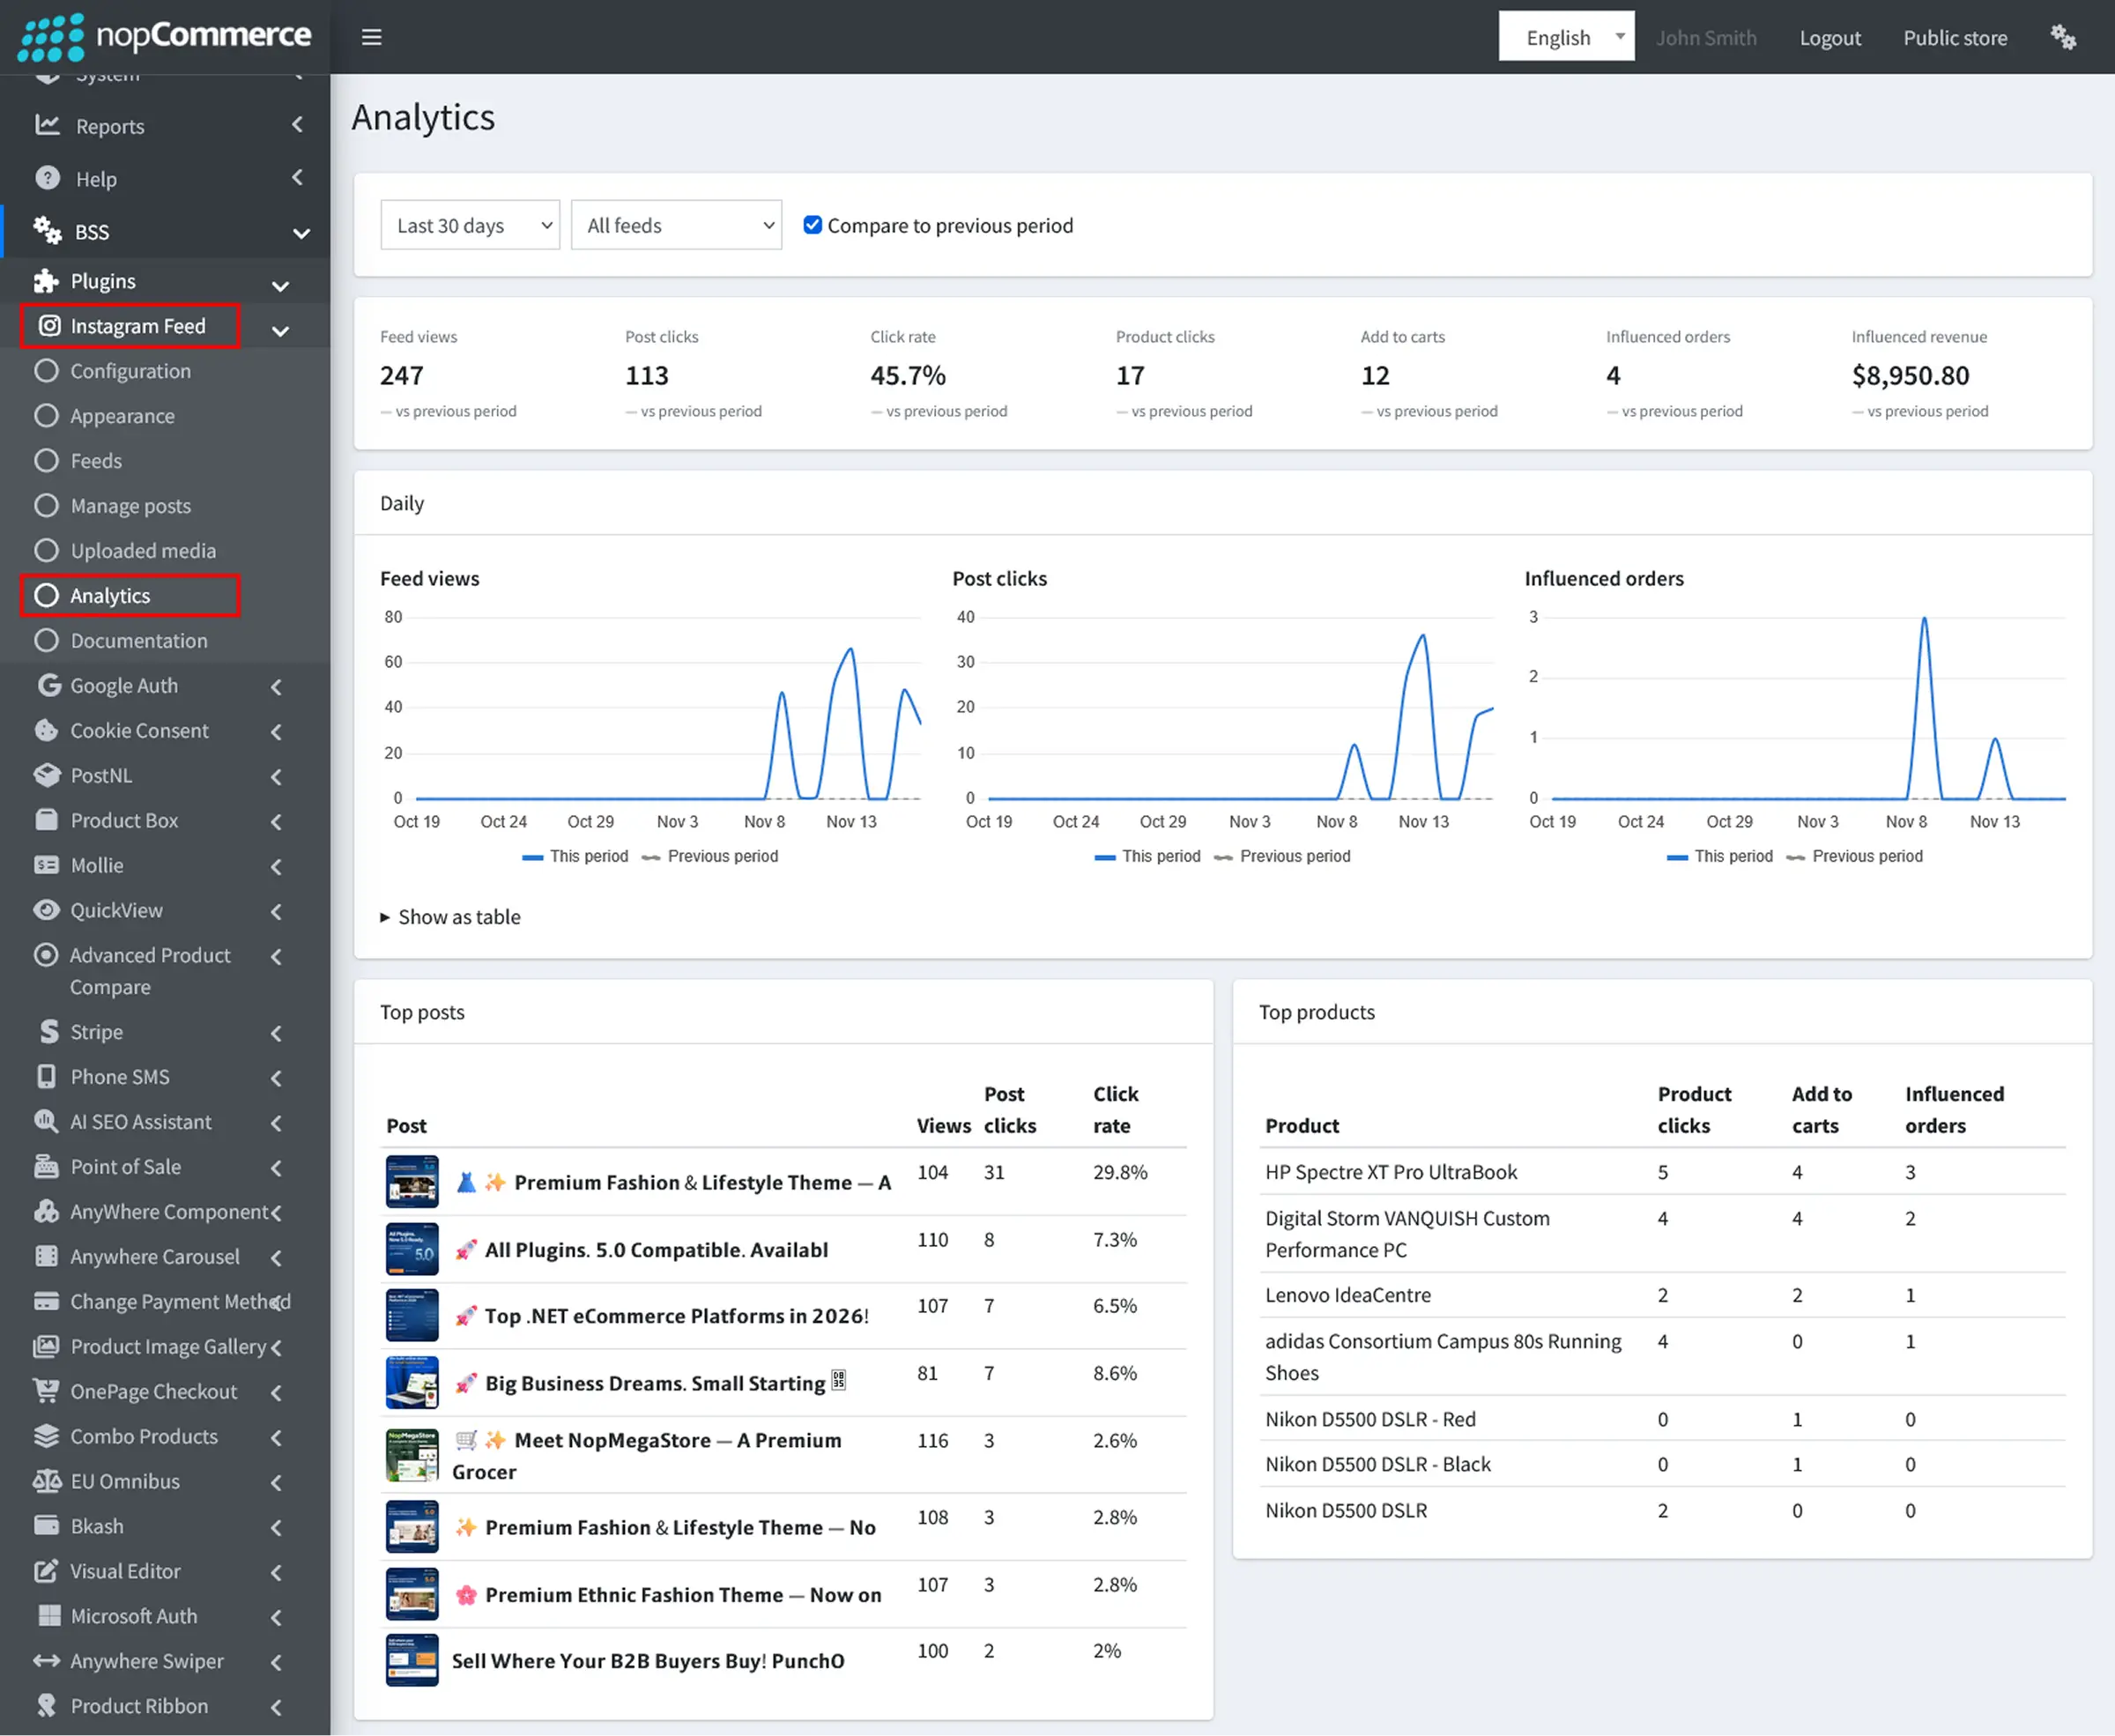
Go to Administration → BSS → Plugins → Instagram Feed → Analytics to track your Instagram feeds' performance and customer engagement.
-
Filters: Select a date range and choose All feeds or a specific feed to view its performance. Enable Compare to previous period to compare results with the preceding period.
-
Performance overview: View key metrics, including Feed views, Post clicks, Click rate, Product clicks, Add to carts, Influenced orders, and Influenced revenue.
-
Daily trends: Use the charts to track Feed views, Post clicks, and Influenced orders over time. Click Show as table to view the data in a tabular format.
-
Top posts: Identify your best-performing posts by comparing their Views, Post clicks, and Click rate.
-
Top products: See which products receive the most engagement through the number of Product clicks, Add to carts, and Influenced orders.
PUBLIC VIEW
-
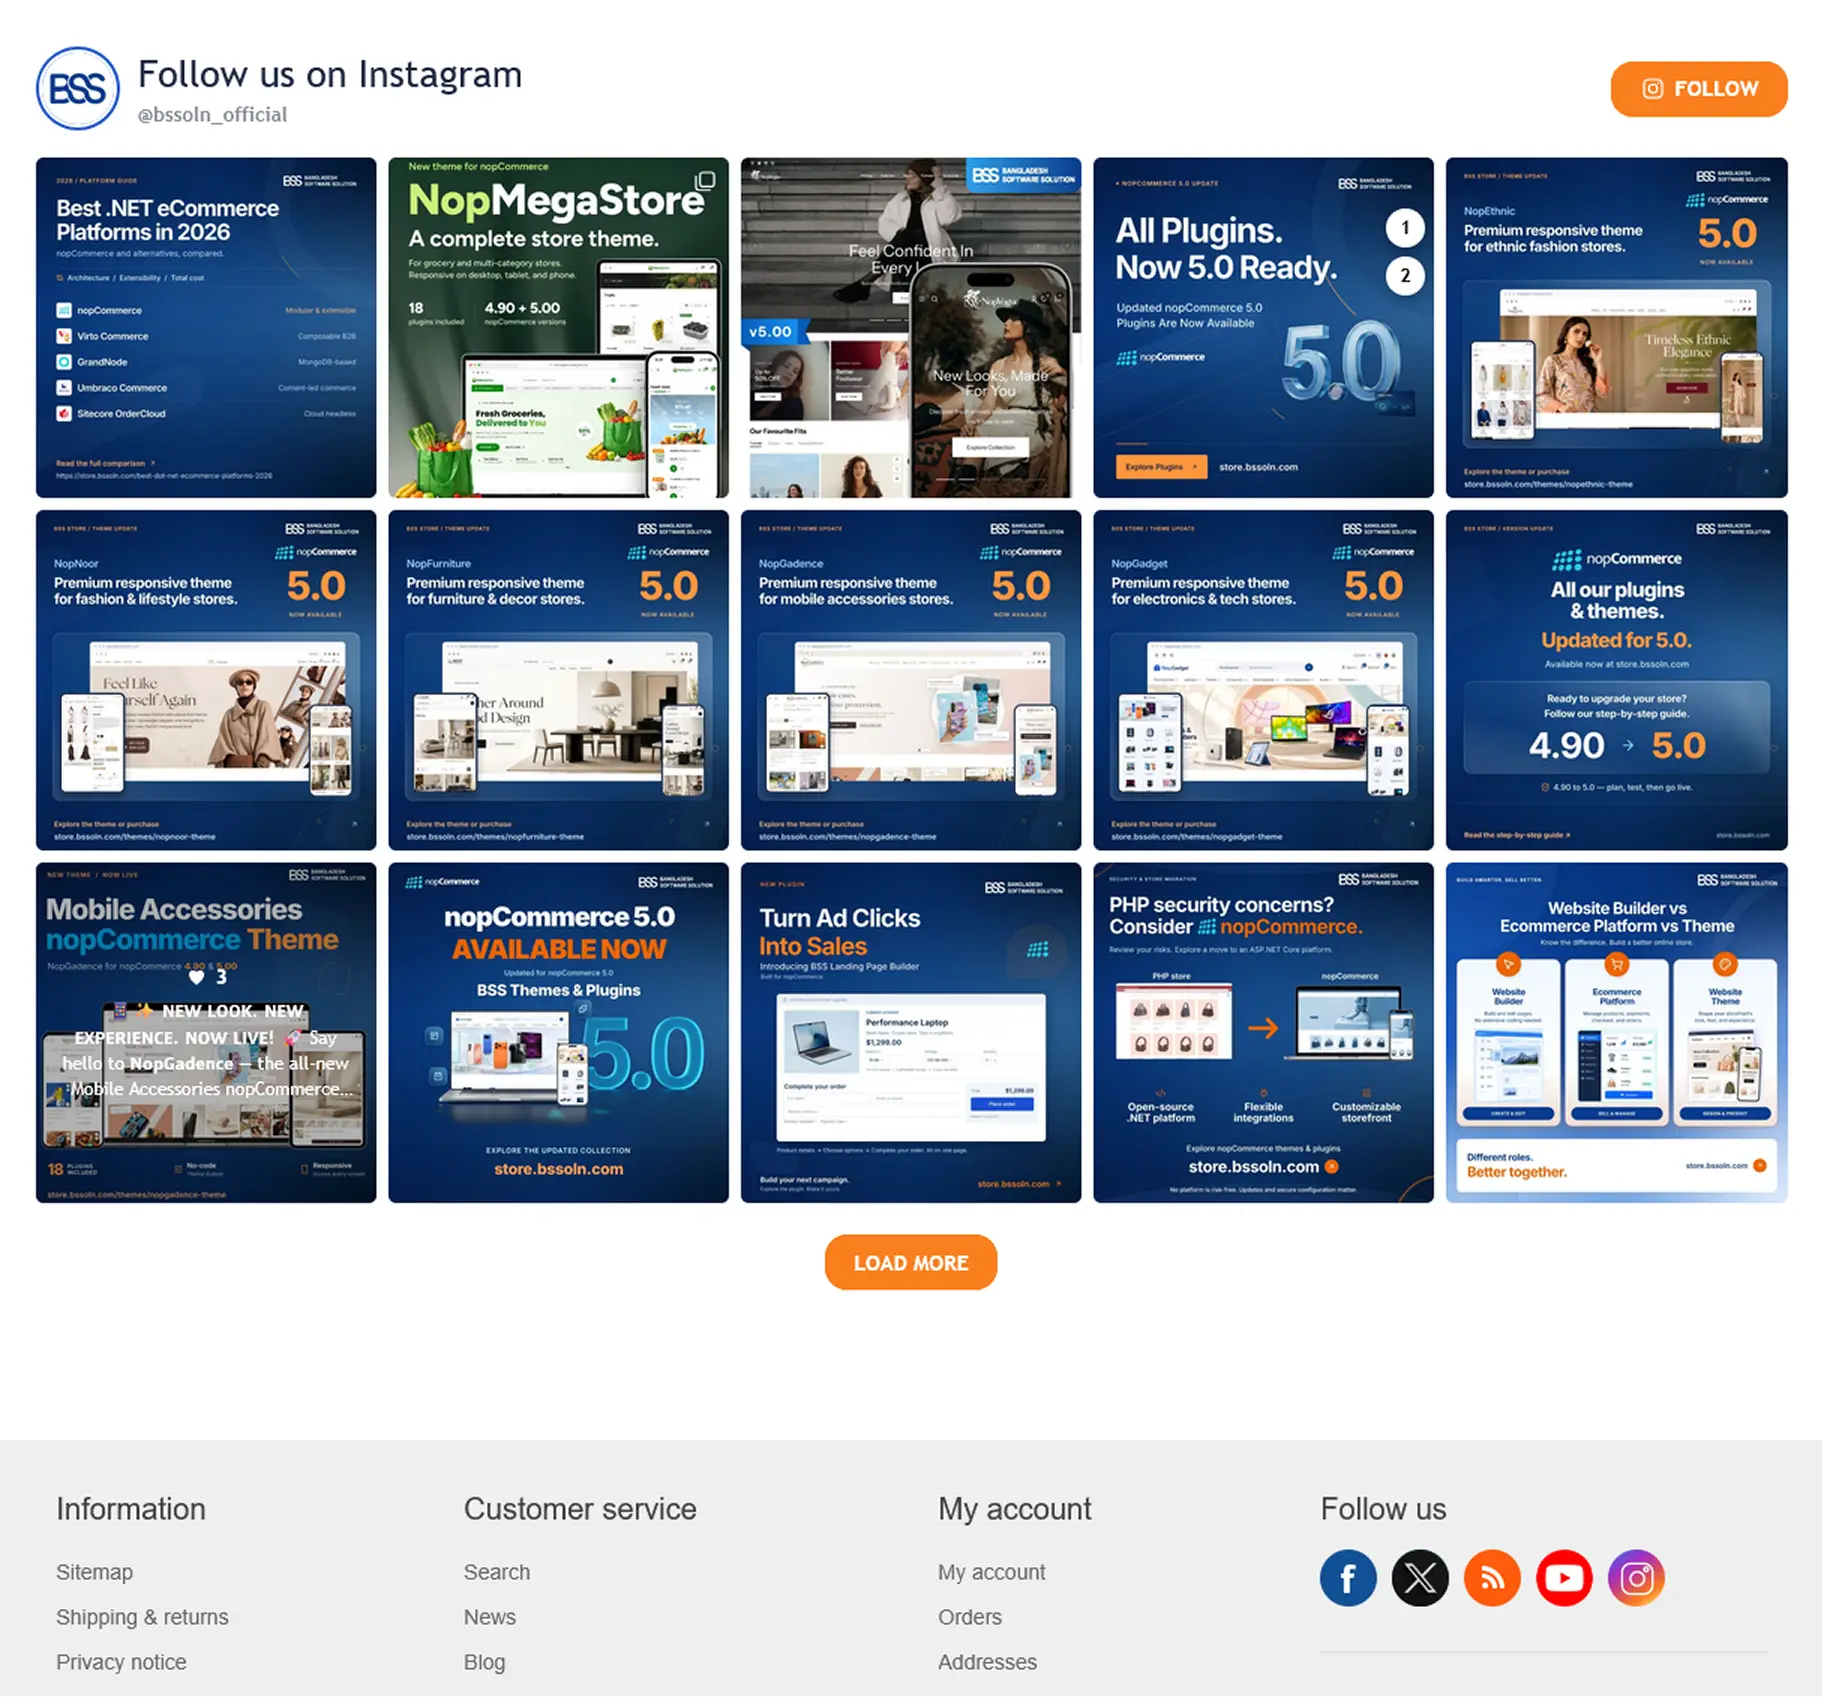
Grid layout: Displays Instagram posts in a grid with a Load More button to view additional posts.
-
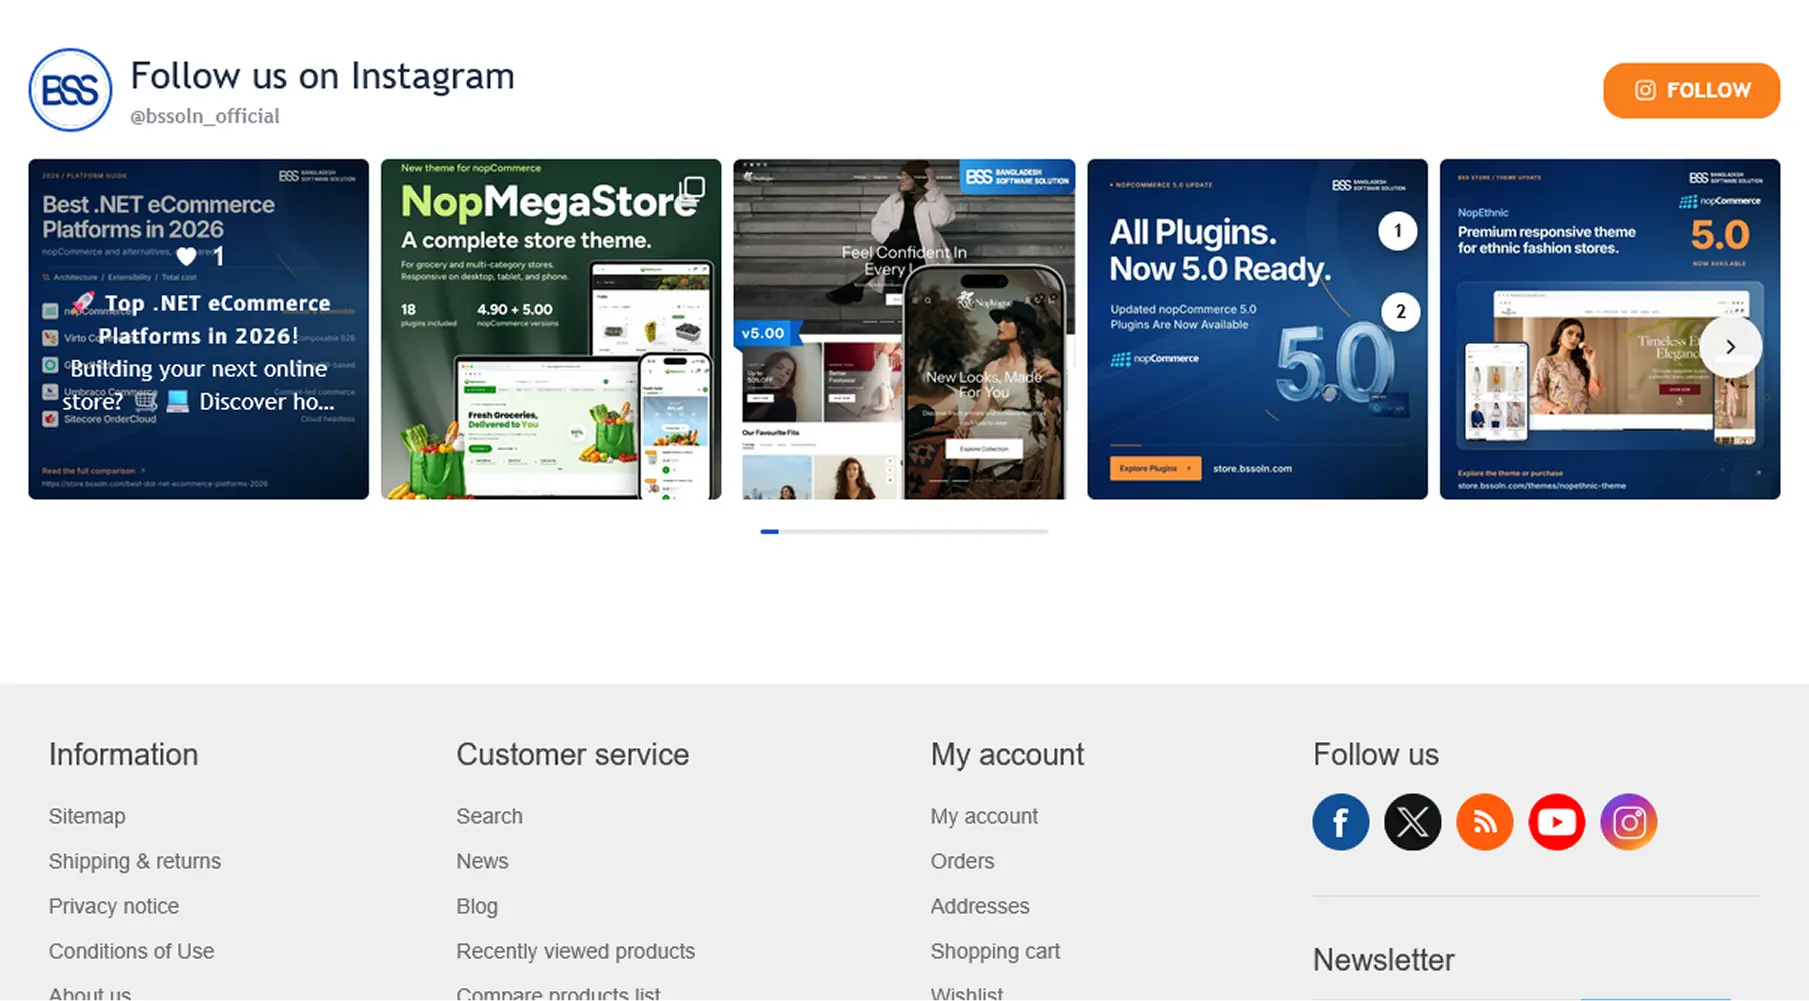
Slider layout: Displays Instagram posts in a horizontal slider with navigation arrows and pagination indicators.
-
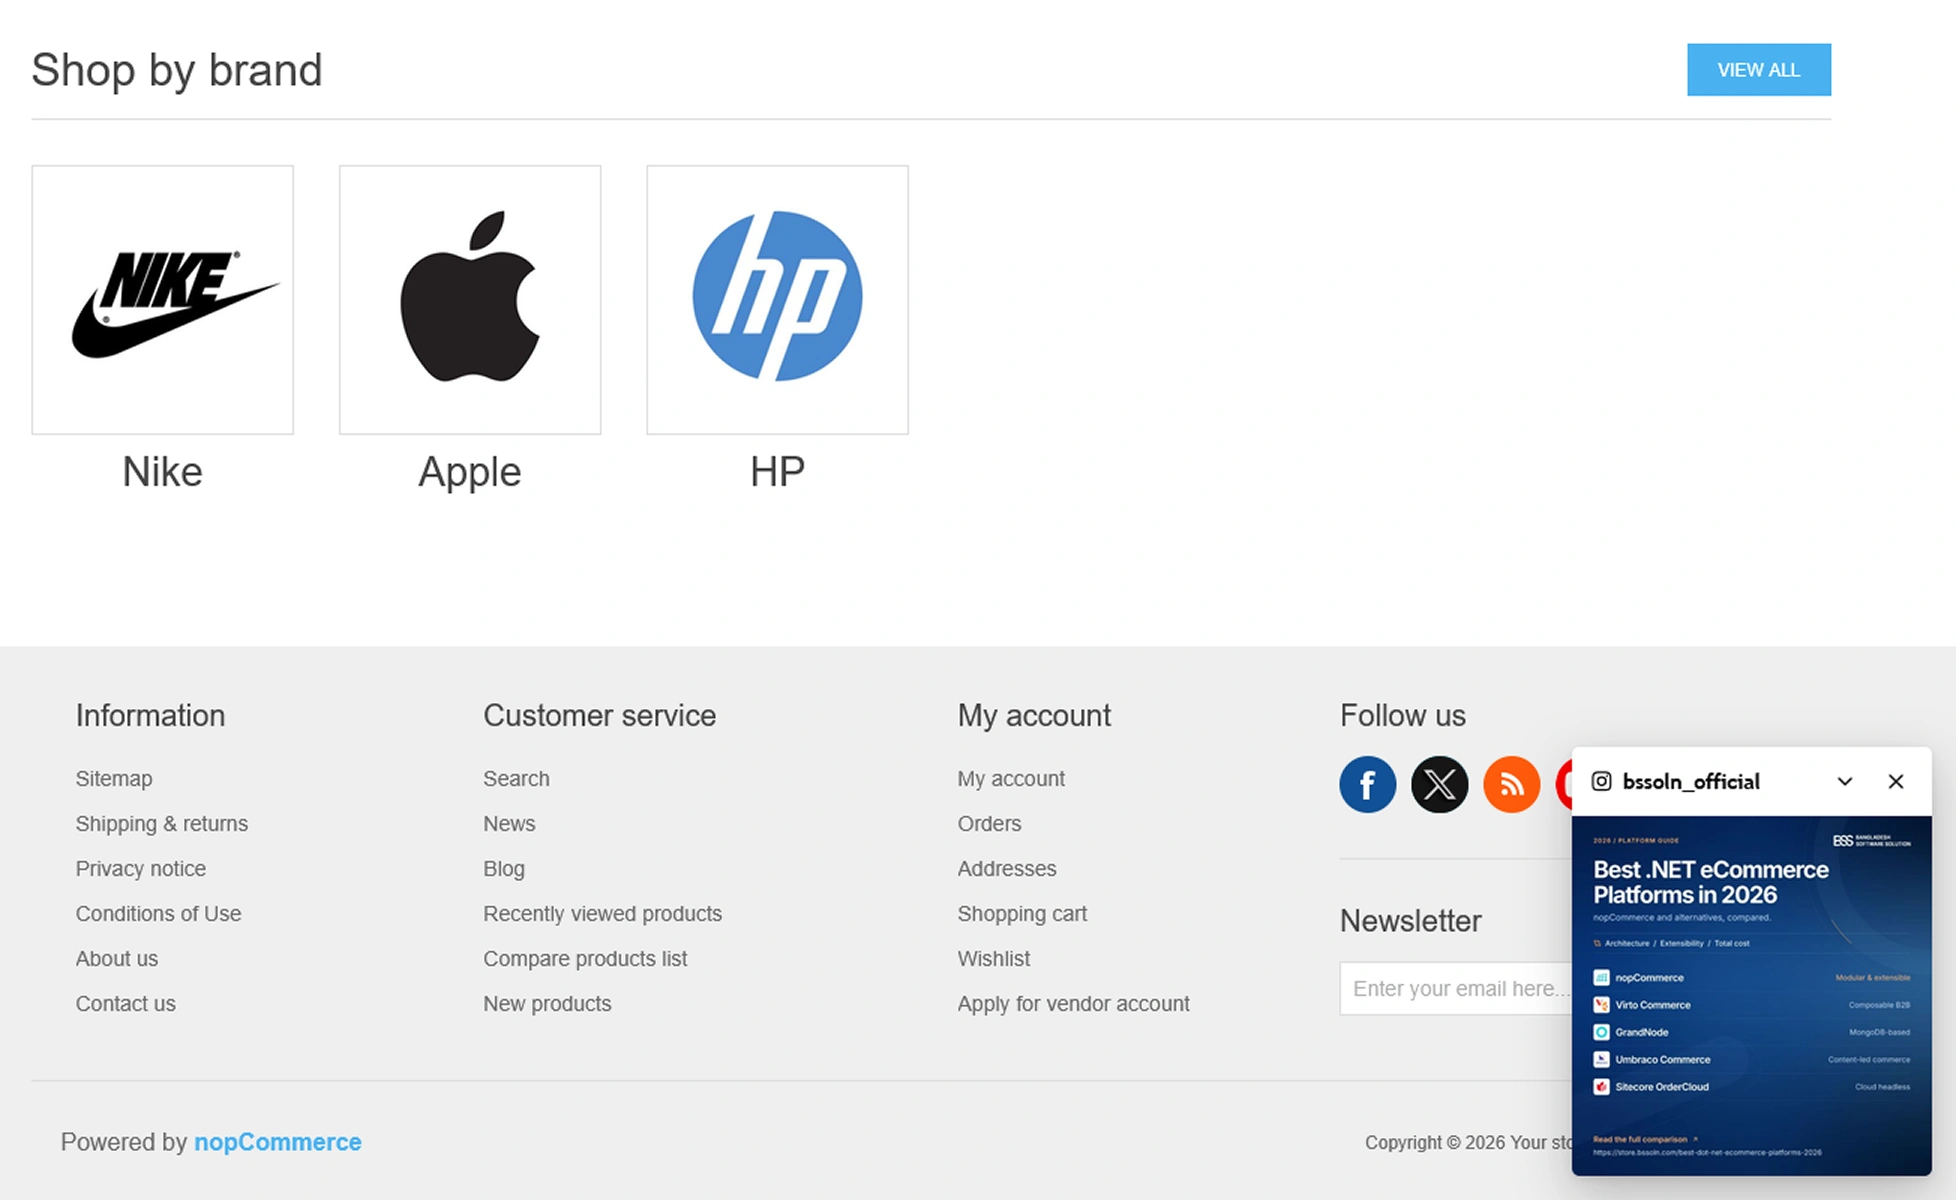
Floating post layout: Displays an Instagram post in a floating panel at the bottom-right corner of the storefront.
-
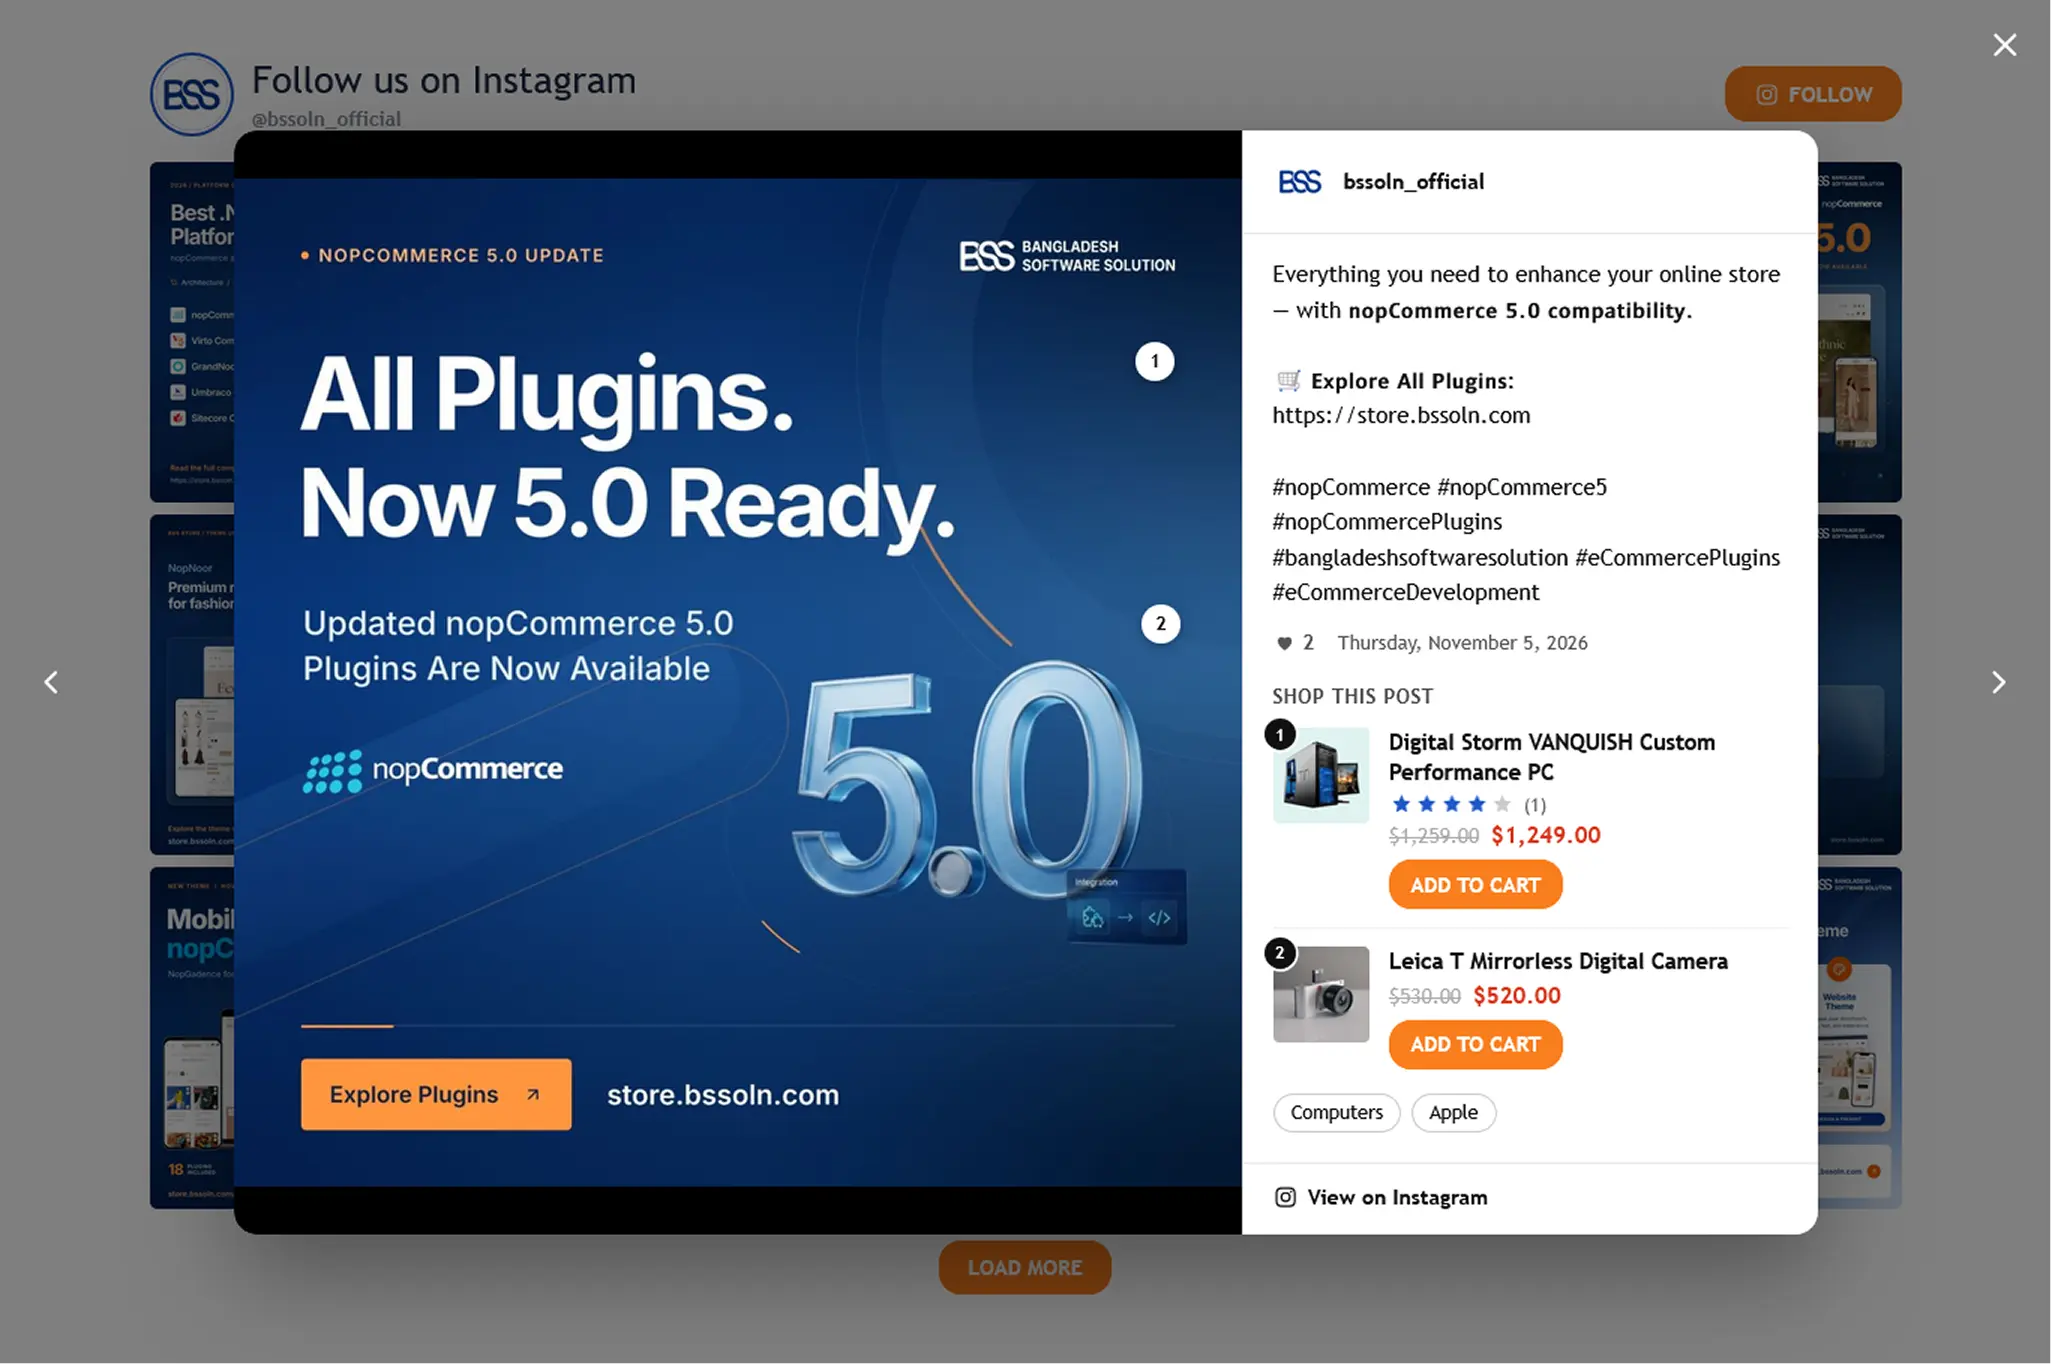
View post details: Click on a post to open a detailed view showing the image, caption, and tagged products. Customers can explore the products and add them to their cart directly from the post.
FEATURES
-
Instagram Feed for Your Online Store: Show your Instagram posts, reels and videos on your nopCommerce store to turn store visitors into Instagram followers and your posts into sales.
-
Shoppable Instagram Gallery: Tag products on your posts with numbered markers. A click opens a popup where customers see the price and reviews, add items to the cart and visit the original post on Instagram.
-
Instagram Grid, Slider & Floating Post Layouts: Choose a responsive grid with a Load more button, a slider with arrows and dots, or a single floating post in the corner of every page.
-
Multiple Feeds for Any Page: Place as many feeds as you need on the home page, product pages, category pages, the footer or every page. On product and category pages, show only the posts tagged with that product or category.
-
Manage, Pin & Hide Posts: Hide or show posts one by one or in bulk, and pin your best posts to the top by drag and drop or by position number.
-
Hashtag, Post Type & UGC Filters: Show only posts with chosen hashtags, only photos or videos, with or without reels. Include user-generated content from accounts that tagged yours, and keep it hidden until you approve it.
-
Upload Your Own Photos & Videos: Add your own media to any feed next to your Instagram posts.
-
Feed Header & Follow Button: Add a title, your profile photo and follower count, and a Follow button that opens your Instagram profile. Translate the title and button text into every language of your store.
-
Custom Design & Live Preview: Pick the image shape, spacing and rounded corners, show likes and captions on hover, and set video autoplay while you watch the live preview on desktop and mobile. The feed follows your theme's font, colours and buttons, and you can add custom CSS.
-
Instagram Analytics & Sales Tracking: See feed views, post clicks, click rate, product clicks, add to carts, influenced orders and revenue in one dashboard. Compare any period with the previous one, filter by feed, and find your top posts and top products. No personal data is stored.
-
Automatic Hourly Sync & Email Alerts: New posts appear in your store automatically, and you get an email if the connection needs attention.
-
Easy Meta Connection: Connect with Instagram login or Unified login, with step-by-step setup guides and an access token option if the normal connection fails.